ANTMAN'S Thread

Thanks for the reply and welcome.

So as far as the lights, I am curious about getting the wire through the cab to the switches. Did you have to remove any panels or just fish it through.

Also, is your roof rack custom and is the ladder hinged?

Thanks again!

My rack isn't custom- it's a Gobi Stealth- part of the group buy:

http://www.toyota-4runner.org/5th-g...rooftop-rack-free-ladder-sun-roof-insert.html

It is custom designed for the 5th Gen 4Runner though! The ladder attaches to the hatch and opens with it.

As far as the wiring-
If you pull the weatherstripping from around the hatch area (it has a greasy sealer on it so be careful!)you can feed the wiring down into the access panel for your drivers side taillight. Then feed into the jack area. Open the drivers side rear door and pull the sill plate off, then the weatherstripping from around the rear door opening. You can see into the jack area to fish the wire through. That's the hardest part. From there it's just along the sillplates, to the kickpanel to the dash.

Very easy to run the wiring!
 
Awesome,

I wish I had know about the Gobi before I bought my Yakima. I will see if I can get just the ladder.

Thanks again!
 
Oh yea,

One last thing. Where did you get the power for the light switches? I think I want them hot any time the key is Acc or On

Thanks Again!
 
Oh yea,

One last thing. Where did you get the power for the light switches? I think I want them hot any time the key is Acc or On

Thanks Again!

The light switches get power from the fusebox- the same circuit as the 12v outlets (ignition on), you can use a fuse-tap if you dont want to splice into any wires. The switches turn on a relay that controls the lights. That way the lights are powered directly from the battery, but can only be turned on when the ignition is on. Hope that makes sense!

...damn- I really need to take the time to do a writeup for this I guess.
 
That's all I needed to know but you can write it up if you want!

Thanks again, I'll get some pictures up of rack with lights when I'm done and hopefully remember to take some while I'm doing it.

Next time you're in Colorado, I'll buy you a beer!
 
ANTMAN MOD# 7

Tailgater Cupholders

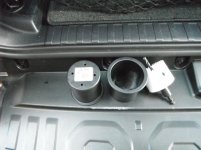
This Mod gives you a nice place to keep your beer, or soda (yeah right!) when you have the hatch open. Inspired by our meeting at Sandy Point...

Day off today, and I had to get some boat supplies at West Marine. I was browsing around the aisles and I saw these cupholders. They come in a variety of sizes and colors- I chose the smallest ones in black. I think they cost about $7 each. When was the last time I drilled into expensive Toyota plastic? What an opportunity!!

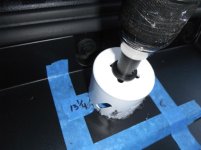
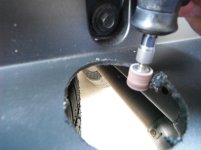
OK- this may take some guts, but it's super easy to drill the bumper for this mod. I used a 2&1/2" hole saw, which is too small. I could have purchased the correct size 2&3/4", but I already had the smaller size, and I wanted to make sure the fit was super tight. I Dremelled the hole to the final size.

Here's the writeup:


Here are the parts/tools you need. 2 cupholders, and a 2&1/2" holesaw

132.jpg


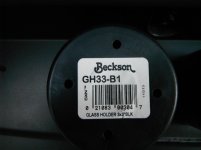
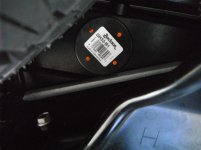
Closeup of the back of the cupholder

133.jpg


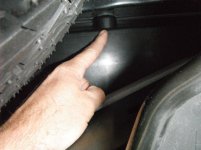
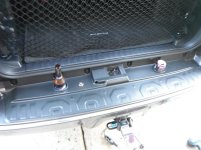
This is the space you have underneath the bumper- even more room on the passenger side! I'm pointing to the bolt hole you can see in the other shots.

134.jpg


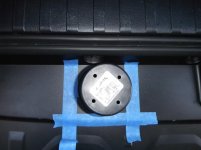
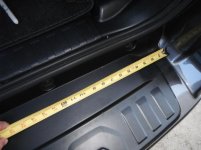
The measurements for the center of the holes are, 1&3/4" from the front edge (where the screws are holding the bumper on), and 13&1/4" from the edge of the door opening. (Not sure if the measurements will be the same on a TE) More pics of the measurements on the pass side...

136.jpg


Time to drill. YAY!

137.jpg


Dremel the hole to the correct size. Grind a little and check. Be patient. When it's a little too small, push the cupholder in forcefully until it's fully seated. Be sure you trim the edges where you ground the hole so the cupholder sits nice and flush. Hey, check out my CRAPPY TIRES!

145.jpg


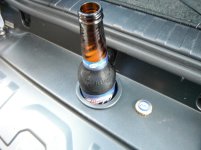
Enjoy your beer while you do the other side :beer:

144.jpg


Continued...
 

Attachments

  • 132.jpg
    132.jpg
    88.5 KB · Views: 21,515
  • 133.jpg
    133.jpg
    44.5 KB · Views: 21,279
  • 134.jpg
    134.jpg
    78.3 KB · Views: 21,259
  • 136.jpg
    136.jpg
    73.8 KB · Views: 21,255
  • 137.jpg
    137.jpg
    67.2 KB · Views: 21,188
  • 145.jpg
    145.jpg
    52.4 KB · Views: 21,204
  • 144.jpg
    144.jpg
    74.4 KB · Views: 21,321
Last edited:
This is the edge you measure from for the hole (same on both sides)

141.jpg


Look how much room there is! And you thought you were going to drill into the spare tire didn't ya? Admit it...

147.jpg


All done!

No, they don't contact the hatch (even with my ladder)

No, you can't see the cupholders with the hatch closed

No, water can't get into your truck

YES- If you try to close the hatch with a beer bottle in there, you will make a terrible mess. Better not drive home if that's the case... :)
 

Attachments

  • 141.jpg
    141.jpg
    75.6 KB · Views: 21,302
  • 147.jpg
    147.jpg
    68 KB · Views: 21,391
  • 146.jpg
    146.jpg
    84.3 KB · Views: 21,295
Last edited:
Dammit. I'm going to west marine. Then the hardware store.

And yes- it's bull**** on your truck until it's lit up with an led...

Also, now that we know it's clear underneath, that's all just empty space on top that can be used for a sunken tray for snacks, ice, etc. Maybe even one with a lid! Get crackin' and take pics. I want appetizers with my beer.
 
Last edited:
Looks like a snug fit, how are you going to fit your beverage in there whilst in a coozie? Someone please solve this logistical nightmare.:redbrick:
 
Looks like a snug fit, how are you going to fit your beverage in there whilst in a coozie? Someone please solve this logistical nightmare.:redbrick:

Funny you should ask, my friend. 2 Options.

1- They sell a bigger version that should fit.

2- They have an insulated "cupholder extender" that fits into the cupholder.

Both @ West Marine:thumb3:
 
Funny you should ask, my friend. 2 Options.

1- They sell a bigger version that should fit.

2- They have an insulated "cupholder extender" that fits into the cupholder.

Both @ West Marine:thumb3:

Just pulling your chain buddy! The install looks super clean (per usual). I might have to follow your footsteps on this one.
 
I just finished installing one of these on my driver's side. I can't get it to stay flush, it always pops up a little, like less than a quarter inch. I may widen the hole a little and run a small bead of Lexel to secure it in there. I'll do the passenger side another time. My wife can hold her drink...

Otherwise this is a great easy mod! I checked out the larger size cup holder (the guy let me bring them out to the parking lot before I bought them) and it seems a tiny bit too big. If you want to trim the lip a little it should fit without sticking out from under the gate.
 
I just finished installing one of these on my driver's side. I can't get it to stay flush, it always pops up a little, like less than a quarter inch.


You may have the hole a little too small, but first try this:

Hold the cupholder firmly in place with one hand. Reach up under the bumper with a big flathead screwdriver and push the bumper plastic up tight against the lip of the cupholder. Do this all the way around the hole. You may be flexing the bumper to the point that it's causing it to not stay flat.........hence why ...I...said it was flexing. errrrrr Whatever. You get the point!

Get crackin' Kraeken...
 
Last edited:
I tried the screwdriver thing right away, didn't work. I'll widen the hole a tiny bit tomorrow. Thanks again!
 

Members online

Forum statistics

Threads
278,306
Messages
3,554,045
Members
248,016
Latest member
Advally Service

Trending content

Back
Top