Anyone added the TRD Start button to their 4Runner?

Register to hide this ad
Disclaimer: I know its 'ricey' and expensive.. but seeing the Meso one, Id rather the authentic TRD one. This would be for the vehicles with keyless start, not adding keless start to a vehicle without.

Looks like the Hilux model fits plug and play:
Part # MS422-00003

5th Gen Toyota 4Runner (2014-21) Push Engine Start/Stop Red TRD Button – KTJO 4x4

Anyone tried it?

Different from what you're wanting to do, but I did add one to my 2017 4Runner non-smart key just as a push to crank button. Had the button from my other truck, so figured why not

https://www.toyota-4runner.org/2824361-post17.html
 
Disclaimer: I know its 'ricey' and expensive.. but seeing the Meso one, Id rather the authentic TRD one. This would be for the vehicles with keyless start, not adding keless start to a vehicle without.

Looks like the Hilux model fits plug and play:
Part # MS422-00003

5th Gen Toyota 4Runner (2014-21) Push Engine Start/Stop Red TRD Button – KTJO 4x4

Anyone tried it?

Not sure if you're commited to the TRD logo but AJT has one. It says for the Tacoma but I think it fits the 4Runner as well. I don't have it yet but I've been eyeing it. Have their Key Fob and I like it.

Products | ajt-design
 
I have the red Meso one in mine. It’s not the TRD one, just red with the normal start button verbiage. It’s much cheaper than buying the whole assembly. I fits just fine and looks good to me.
 
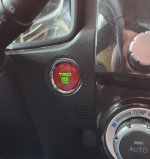
Well I ended up ordering the TRD button and installed it tonight, looks good and took about 5-10mins to install.
 

Attachments

  • 20211111_185431.jpg
    20211111_185431.jpg
    96.3 KB · Views: 3,615
Wanted to see how you actually removed the old start button? Which panels did you have to remove to do this?

getting to that panel is not difficult just a lot of steps

- driver's side door sill needs to be removed (held in place using plastic clips)
- trim piece near parking brake needs to be removed (one plastic screw near the dead pedal and then pull out)
- kick panel under steering wheel can be partially removed. there are two bolts (m6 thread) that need to be removed and then you can GENTLY pull and unclip the kick panel
- left AC knob trim near radio needs to be removed
- you MAY need to remove the steering wheel plastic trim. I'm not 100% sure. car in ON position, turn wheel to left, unscrew the screw right in front of you. do the same for the right side. unclip the plastic it comes out in two pieces
- now you can pull out the push to start button trim and get to work

now you can probably do this without partially removing the steering wheel trim / steering wheel kick panel but doing so will give you more room. reassemble in reverse order

this video is for a trailer brake install but it shows you how to remove the various components. if you're new to panel popping get some extra plastic clips and a good panel tool

HOW TO | TOYOTA 4RUNNER BRAKE CONTROLLER INSTALL - YouTube
 
Last edited:
I like it

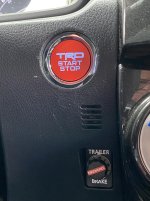
I got the MESO red TRD Stop/Start through bustabeatgeorge. To install, the steps are roughly:

1) use a plastic panel-popper to gently lever the bottom of the dash-portion with the existing Stop/Start button. I levered the bottom out, then arc'd it upward and pulled outward until the top two friction-holder pins popped free.

2) unplug things. In my case it was both the Stop/Start button and my Redarc brake controller. Easy. Just two plugs.

3) from the backside of this small panel, squeeze the side-ears of the Stop/Start button, and push it out of the panel toward the front.

4) gently dig under the chrome trim-ring with your fingernail, and work your fingernails around. I secured my progress with toothpicks, trying to ensure a level, gradual removal so that the little plastic tabs on the back won't break. You'll need to re-install this original trim ring, so be careful. Rather than fingernail, you could use guitar picks, old credit- or library-card, spudgers, etc.

5) once the chrome trim ring pops off, use the included little hook-tool to reach down the sides of the existing switch-cap, and start pulling it off. Start at the left, where you may be lucky and grab/release the main clip. Otherwise, pull fairly hard and work your way around.

6) push the new red MESO Stop/Start button onto the original switch. "Up" is when the printing on the switch-body reads correctly

7) study the snaps and guides fot the chrome trim-ring gently start it while examining for correct orientation. Snap fully to complete

8) Snap switch back into panel. From the front-side, backing in.

9) Reconnect wire-connectors.

10) re-install small dash panel. Start by aligning and pressing the upper two friction pins, pivot the panel down and complete by similarly snapping the two lower friction pins into place.

11) Test. Enjoy!

 

Attachments

  • IMG_2010.jpg
    IMG_2010.jpg
    136.9 KB · Views: 1,223

Members online

No members online now.

Forum statistics

Threads
278,312
Messages
3,554,083
Members
248,016
Latest member
Advally Service

Trending content

Back
Top