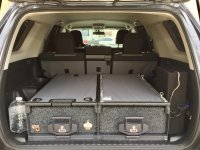
ARB drawer install overview

Didn't find detailed write-ups when I was looking into it (beyond "it just bolts on!" - it doesn't)...


Also - did you ever find the "vehicle specific instructions" the directions constantly reference?


Sent from my iPhone using Tapatalk
 
I'm about to do this install and I have some stupid questions.


For the drawers themselves - how did you bolt the frame to the panel/piece of wood? Did you just screw the bolt into the wood? Or is there a nut on the other side?


I ask because, if there is a nut on the other side, how did you access it to hold onto it when tightening? Or did you attach the frame to the board first, then mount the board in the back of the truck?


Thanks!!


Ahhhh. T-Bolts. Got it. Told you it was a dumb question.


Sent from my iPhone using Tapatalk
 
Sorry to be blowing this thread up today.

But I figured out where he drivers side hole was. Haha. Might have damaged the thread a little. :(

de6b4dfbddddd203480c48b257ffef75.jpg


8509e3b2077801592a32890c89bf092f.jpg


4787205a807b8ae9ff56f4b926425c9a.jpg


f7e291d271f6a72b0abb5fe419240688.jpg


AND - figured out how to FIGURE out where the other one was as well.

On the underside. Just look for these things.

d5b20f4edd116f04d0e3949def92fa48.jpg


Close up

67da8fba60a574071dc37f78cd86cb32.jpg


So proud of myself. Look at me... being all handy.


Sent from my iPhone using Tapatalk
 
I'm about to do this install and I have some stupid questions.

For the drawers themselves - how did you bolt the frame to the panel/piece of wood? Did you just screw the bolt into the wood? Or is there a nut on the other side?

I ask because, if there is a nut on the other side, how did you access it to hold onto it when tightening? Or did you attach the frame to the board first, then mount the board in the back of the truck?


Thanks!!

I used (4) M8 t-nuts for each drawer pressed into the underside of the wood board. Then bought (8) 25mm M8 hex bolts to bolt the drawer to the wood plate.

I would install your board in the cargo area first, set the drawer frames on the plate and line them up where you want, mark the holes where you want to set the t-nuts, remove the drawer frames and wood plate, drill your holes in the wood plate, press the t-nuts on the underside of the board, re-install the wood plate in the cargo area, set the drawer frames on the wood plate (make sure your holes line up), bolt the drawer frame(s) together using ARBs hardware, then bolt the drawers to the wood plate using M8x25mm bolts & washers (not included). Then reinstall the drawers into the cabinets (dont forget to install the drawer stops), bolt the tops back on and your all done! Hope this helps :thumb:
 
Sorry to be blowing this thread up today.

But I figured out where he drivers side hole was. Haha. Might have damaged the thread a little. :(

de6b4dfbddddd203480c48b257ffef75.jpg


8509e3b2077801592a32890c89bf092f.jpg


4787205a807b8ae9ff56f4b926425c9a.jpg


Sent from my iPhone using Tapatalk

Thanks! This will definitely be useful for others. I could have used this when I was drilling my cargo floor pan but instead I installed Riv-nuts for the rear bolts since I wasn't sure how to locate these existing threads.
 
I used (4) M8 t-nuts for each drawer pressed into the underside of the wood board. Then bought (8) 25mm M8 hex bolts to bolt the drawer to the wood plate.


I would install your board in the cargo area first, set the drawer frames on the plate and line them up where you want, mark the holes where you want to set the t-nuts, remove the drawer frames and wood plate, drill your holes in the wood plate, press the t-nuts on the underside of the board, re-install the wood plate in the cargo area, set the drawer frames on the wood plate (make sure your holes line up), bolt the drawer frame(s) together using ARBs hardware, then bolt the drawers to the wood plate using M8x25mm bolts & washers (not included). Then reinstall the drawers into the cabinets (dont forget to install the drawer stops), bolt the tops back on and your all done! Hope this helps :thumb:



Fantastic.

I had no idea t-nuts were a thing. Love learning new stuff! I'm definitely not handy!


Sent from my iPhone using Tapatalk
 
Teaser....:tea:

16581004103_43b692f850_c.jpg

I had to copy you with the Canvasback liners! :thanks:
Canvasback did not have the template from before, so I drew up a new one and sent it to them. If anyone is interested in a set, feel free to PM me for the template. Canvasback was really easy to work with and sent these to me very quick!

Photo Apr 24, 9 01 59 AM.jpg

Photo Apr 24, 9 05 16 AM.jpg
 

Attachments

  • Photo Apr 24, 9 01 59 AM.jpg
    Photo Apr 24, 9 01 59 AM.jpg
    134.7 KB · Views: 5,172
  • Photo Apr 24, 9 05 16 AM.jpg
    Photo Apr 24, 9 05 16 AM.jpg
    136.8 KB · Views: 2,621
Installed these with no drilling

I tapped a couple 5/16 x 18TPI holes, screwed in a couple eye bolts, and secured to factory mounting points using turnbuckles.

Solid as a rock. 2016 TRD.

LMK if this is interesting to you and I'll post some pics and a few details.
 
Last edited:
I used (4) M8 t-nuts for each drawer pressed into the underside of the wood board. Then bought (8) 25mm M8 hex bolts to bolt the drawer to the wood plate.

I would install your board in the cargo area first, set the drawer frames on the plate and line them up where you want, mark the holes where you want to set the t-nuts, remove the drawer frames and wood plate, drill your holes in the wood plate, press the t-nuts on the underside of the board, re-install the wood plate in the cargo area, set the drawer frames on the wood plate (make sure your holes line up), bolt the drawer frame(s) together using ARBs hardware, then bolt the drawers to the wood plate using M8x25mm bolts & washers (not included). Then reinstall the drawers into the cabinets (dont forget to install the drawer stops), bolt the tops back on and your all done! Hope this helps :thumb:

I just got my drawers today! I think I am going to do the plywood trick with carpet. Is there anyway I can get one of you guys out to Denver to help me with the install?
I also ordered the Universal Side Floor Kit from ARB, part number 945FK, since ARB doesn't yet make a side floor kit for the 5th Gen. It is intentionally wide, so that you can cut to contour to the 5th Gen.
I think I would need to install the Universal Side Floor kit prior to making all my marks and bolting everything down.
 
Hey thanks [MENTION=138641]ArrArr[/MENTION] and [MENTION=137794]JasonKoko[/MENTION] for the ideas on installing the drawers!

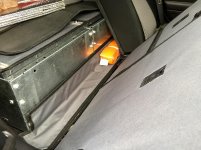
And in case anyone was interested if seeing a side floor kit works, it does! You'll need a plunge router, dremmel metal and wood cutting wheels though. It's a universal side floor kit. So measure twice, cut once.


Hey thanks [MENTION=138641]ArrArr[/MENTION] and [MENTION=137794]JasonKoko[/MENTION] for the ideas on installing the drawers!

And in case anyone was interested if seeing a side floor kit works, it does! You'll need a plunge router, dremmel metal and wood cutting wheels though. It's a universal side floor kit. So measure twice, cut once.


Nice work!!! Did you end up drilling into the frame to mount the drawers?
 
Nice work!!! Did you end up drilling into the frame to mount the drawers?

Thanks. I followed the guidance from JasonKoko above for where the bolt holes were covered up and ArrArr's guidance on using a 3/4" plywood sheet to bolt the drawers to. So, plywood bolted to car and drawers bolted to plywood.
 
Hey thanks [MENTION=138641]ArrArr[/MENTION] and [MENTION=137794]JasonKoko[/MENTION] for the ideas on installing the drawers!

And in case anyone was interested if seeing a side floor kit works, it does! You'll need a plunge router, dremmel metal and wood cutting wheels though. It's a universal side floor kit. So measure twice, cut once.


Are you able to open your fridge completely?
 

Members online

Forum statistics

Threads
278,309
Messages
3,554,074
Members
248,016
Latest member
Advally Service

Trending content

Back
Top