Bad rear brake light

Hi aceee,

If you look at the bezel (Lamp assm.) there are five wires; Red, Yel, Blu, Grn, and White w/Blk marker. The BLUE wire feeds the stop light, and the White w/Blk stripe is the ground. Get hold of a test light (Auto-Zone $4.99) or multi-meter. You need to prove the HOT and the GND to find the culprit. Remove the Double filament bulb from the socket and see the copper contacts inside of the lamp socket. Try to determine which one is the HOT and which is the GND; the colored wires will usually be adjacent to their prospective copper contact. For these tests, wrap the test light's metal probe with vinyl electrical tape to prevent popping a fuse by accidentally short circuiting the probe while working inside of the socket!

Using a KNOWN power source (like the rear 12V receptacle with vehicle IGN ON) connect the 'alligator clip' end, to the copper contact (GND) directly adjacent to the White/black wire inside of the stop-lamp socket, and touch the probe's pointed end with the center copper contact inside of the 12V socket. If the test light, lights up then the ground isn't the problem. Now to test the power supply of the stop-light. With the alligator clip connected to a KNOWN working GND (perhaps a bolt or screwhead at the tailgate latch assembly), touch the pointed end to the copper contact directly adjacent to the BLUE wire inside of the stoplight socket. If this doesn't work, try piercing through the blue insulation directly on that feed wire.

If this time the 'test light' lights up, then the problem is your Blue wire power supply to the stop-light socket. So at very least now you know which part of the electrical circuit is the problem! Just as [MENTION=65614]Antman[/MENTION] alluded to in his earlier post, it may be time to 'dig in' and start taking the electrical socket apart to get at the true problem e.g., broken wire, bent copper HOT contact, dirty ground contact...etc! I know you've checked the fuse and proved the bulb earlier, so your problem is somewhere in that socket assembly, you may even end up replacing it; autozone has them on their turn-style socket display, not expensive at all! please be sure to let us know what you find; someone else here will certainly struggle with this same trouble, 'Best'

rig!


Thanks so much for the info. I will give that a shot this weekend and post back with results.
 
So I solved my issue. I thought i had a loose connection in the tail light's harness but turns out there actually was power running through the harness (blue wire and ground were fine). I then thought the wiring on the tail light itself was messed up or had a bad connection so i had someone use a multi meter and everything looked fine as well. We kept testing the power throughout every connection on the back of the tail light and with the light bulb sockets and turns out one of the prongs on the turn signal socket (the one that the cars harness plugs into) was not making a solid connection with the connections on the tail light itself. All i did was pull/bend out that prong/tab and viola! Driver side brake light is working again. All that frustration over such a simple fix :frusty:
 
brake light not working

I read the prior posts but they appear to have failed to mention what i found my brake problem to be. 2010 4Runner. Same issue - drivers side brake light not working, changed bulb, swapped bulb sockets side to side and the drivers side still wouldn't work. The posts below mentioned cleaning the brake light bulb contacts - which I did and it still didn't work. Took the whole brake light lens assembly out only to realize the the brake light wires pass through the lower bulb socket. I took out the lower (headlight) bulb socket (which is wired) , lightly sanded those contacts, hit them with electrical contact cleaner, applied some dielectric grease - and bingo all came back to life. I could have done this (cleaned lower bulb) without taking out the whole assembly but I didn't know how it was wired until I took the assembly out.
 
Bulb Socket Removal

Lots of good info on here, thanks for all the information! I wish I had taken some photos to be more clear in my description but alas everything is back together now.

Tools needed:10 millimeter deep socket, 2" extension(optional), 400 grit sand paper(really any sandpaper will do), flat head screwdriver, beer

Estimated time: 20 mins

Start by popping off the back light access panel, there is a small indention on the bottom left(if on passengers side) or bottom right(drivers side) that you put your flat head screwdriver into to pop off the panel, this should come off quite easily.

Next you should see two threaded bolts sticking out about 2" towards the front of the car, one above the other. There is a 10 millimeter nut at the end of these bolts that you will remove with you 10 mm deep socket.

The light housing is now free to be popped off, there will be some resistance as there are plastic tabs that hold it in place with pressure(rods with fat heads that slip into rubber inserts). After taking the light housing off you can now easily twist off the bulb socket(mine was beige) in a CCW manner to remove it.

There are three gold tabs on the light fixture and three silver tabs on the bulb socket. Remove all residue from these contacts(tabs) using your sandpaper and maybe some isopropyl alcohol and a paper towel. You can also bend the silver tabs out a little extra to ensure they are making contact once the socket is put back into place, but be careful not to bend them too much and break them!

Verify this fixed the issue, if it did not, replace the bulb as this was my issue, even though I checked that the filament was not broken the bulb was still bad.

Put the housing back on and tighten the nuts back down, replace the panel and you should be good!

Hope this helps.
 
Left Side Stop Lamp Solution:
_______________________________________________________________________

Fixed my 5thGen left side stop light. They use a 'staple' method on the wire whereby a staple-like connector is simply pushed down onto the wire, puncturing the vinyl wire cover and makes contact with the wire. Cleaning the assembly with contact cleaner, and using electrical bulb grease and a new bulb didn't solve the problem.

I removed the left tail lamp assembly, and sat down with it at the table where I proceeded to remove the staple connectors one at a time. And, cut the end of the wires, and stripped them - then replaced the staple connector.

Do this for each wire on the stop lamp. Follow the wires that lead from the stop lamp, and make sure not to get them mixed up. They lead to the turn signal socket, which is apparently some kind of master link.

For each wire running from the stop lamp to the turn signal socket; remove the staple connector, re-position the wire & simply re-install the staple connector.

NO PROBLEMS SINCE.
 
Last edited:
Left Side Stop Lamp Solution:
_______________________________________________________________________

Fixed my 5thGen left side stop light. They use a 'staple' method on the wire whereby a staple-like connector is simply pushed down onto the wire, puncturing the vinyl wire cover and makes contact with the wire. Cleaning the assembly with contact cleaner, and using electrical bulb grease and a new bulb didn't solve the problem.

I removed the left tail lamp assembly, and sat down with it at the table where I proceeded to remove the staple connectors one at a time. And, cut the end of the wires, and stripped them - then replaced the staple connector.

Do this for each wire on the stop lamp. Follow the wires that lead from the stop lamp, and make sure not to get them mixed up. They lead to the turn signal socket, which is apparently some kind of master link.

For each wire running from the stop lamp to the turn signal socket; remove the staple connector, re-position the wire & simply re-install the staple connector.

NO PROBLEMS SINCE.

I was about to take my 4Runner in to have the brake light looked at, but I rediscovered this thread and your post saved my bacon, thank you sir! I had already tried cleaning the contacts but stripping the wire where the staple-like connector attaches to the wire did the trick.

I did end up accidentally clipping off ~10mm of wire (using wire cutters as a wire stripper) but there is enough wiring in the housing that it was not an issue.
 
This thread is pretty disappointing. Here we have vehicles that cost approx 40K with issues like this due to poor design and cheap parts. I've got bulbs in my 95 Nissan and 2000 Tundra I've never changed. Guess we'll be finding out what average LED life is soon too!
 
fixed it

Had the same thing happen. it was a faulty connector. just had them clean it out and replace the bulb.

I switched the driver brake socket and it worked on the passenger side, so now I know it is in the wiring. I took out the main socket, middle one with the wires, sprayed it with electrical cleaner and wahla, all fixed. never took out the lamp assembly just the socket in the brake housing. hope this helps.
 
turns out one of the prongs on the turn signal socket (the one that the cars harness plugs into) was not making a solid connection with the connections on the tail light itself. All i did was pull/bend out that prong/tab and viola! Driver side brake light is working again. All that frustration over such a simple fix :frusty:


Went through the process of elimination today and this was the answer. Brake light on drivers side would not light up. After testing many things, then unplugged the wiring harness, pulled out the turn signal bulb / connecter, lightly scrubbed the tabs and cleaned them with electrical cleaner and now the brake light works again.
 
Last edited:
I'm having a similar issue with my 2013 4Runner where my center (3rd) brake light isn't working but before I go down the road of replacing I want to check/swap the fuse.

Can someone tell me where the fuse is for the center (3rd) rear brake light? I can't seem to find an answer anywhere. Thanks in advance!
 
Thought I would the quick and easy fix for my 2011. Had the same issue, running light worked but not the brake light. I found that my problem was on the connections for the turn signal socket. When I removed it I noticed not all the tabs were bent to the same angle. There is about 5 of them on this socket. Upon evening them all out everything was working properly. Happy camper!
 
Stripped brake light wire for fix

Left tail lamp wiring.jpg

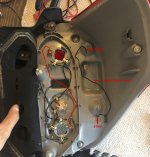
I had to take out my left brake tail lamp. I found out that the brake light is powered by the wire I outlined in the pic. I stripped the ends with a wire stripper and re-clamped them down.

Just sanding and cleaning the connections didn't work for me.
 

Attachments

  • Left tail lamp wiring.jpg
    Left tail lamp wiring.jpg
    120.4 KB · Views: 453
I had an issue with my drivers side brake light working intermittently. I tried cleaning all the contacts, bending up all the tabs, stripping the wires and replacing the staples. Nothing worked.

Turns out the blue wire connection in the plug that plugs into the bottom bulb was loose. For now I've been able to jiggle the blue wire so that the connection is good enough for the brake light to work, but I'm worried that it will get vibrated loose again.

Does anyone know how I can improve the connection of the blue wire in the plug or otherwise fix this problem?
 
View attachment 319381

I had to take out my left brake tail lamp. I found out that the brake light is powered by the wire I outlined in the pic. I stripped the ends with a wire stripper and re-clamped them down.

Just sanding and cleaning the connections didn't work for me.

This one worked for me as well after trying everything else in this thread. You guys are the best!
 

Members online

No members online now.

Forum statistics

Threads
278,312
Messages
3,554,083
Members
248,016
Latest member
Advally Service

Trending content

Back
Top