
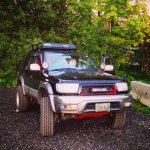
Blcktpgsr's '97 transformation

I dont know if its me or the forums, but I cant send you a Private message or reply to your thread without quoting you.

But anyways, here is the PM i was gonna send you ( also, if anyone else knows answers to the questions feel free to answer them too.) thankyou :


Hey, I've been on the forums for a while now, and I've seen some amazing quality in your 4Runner!

Although I wouldn't put everything you have on your runner, there's a few things I would and I have questions about.

Please answer these ASAP:

How did you get perfectly matching paint to paint the flares above your tires and the rear bumper? Or did you have a professional paint them?

What was the first roof rack you had on? Can you link me to it? It's the coolest one I've ever seen.

And the most important question: what the thing above your rear window? Yours is the only 4 runner I've seen it on. Can you link me to it? P.s. I want the original 4Runner rear door, but add the fin on the top.


And one more question:

I have a friend who crashed his 98 runner. What parts would be smart to scrap from his vehicle for a future 4Runner build?


Please respond! I would deeply appreciate it!
 
I dont know if its me or the forums, but I cant send you a Private message or reply to your thread without quoting you.

But anyways, here is the PM i was gonna send you ( also, if anyone else knows answers to the questions feel free to answer them too.) thankyou :


Hey, I've been on the forums for a while now, and I've seen some amazing quality in your 4Runner!

Although I wouldn't put everything you have on your runner, there's a few things I would and I have questions about.

Please answer these ASAP:

How did you get perfectly matching paint to paint the flares above your tires and the rear bumper? Or did you have a professional paint them?

What was the first roof rack you had on? Can you link me to it? It's the coolest one I've ever seen.

And the most important question: what the thing above your rear window? Yours is the only 4 runner I've seen it on. Can you link me to it? P.s. I want the original 4Runner rear door, but add the fin on the top.


And one more question:

I have a friend who crashed his 98 runner. What parts would be smart to scrap from his vehicle for a future 4Runner build?


Please respond! I would deeply appreciate it!
PM replied.
 
Wow

I recently saw pictures of you at the BC Toyota 4WD Toy Run up Hale (unfortunately couldn't go) and decided to look up this thread and have been reading through it the past few days.... wow.....made some serious notes, thats all I can say. I am from the North Shore and would like to wheel anytime if you need someone to tag along, im pretty familiar with everything int he sea to sky region. I have a black 99 Hilux Surf, still pretty stock, especially by your standards:


Let me know!
 

Attachments

  • 10628295_4690207511290_3505454756738072730_n.jpg
    10628295_4690207511290_3505454756738072730_n.jpg
    141.2 KB · Views: 1,367
I recently saw pictures of you at the BC Toyota 4WD Toy Run up Hale (unfortunately couldn't go) and decided to look up this thread and have been reading through it the past few days.... wow.....made some serious notes, thats all I can say. I am from the North Shore and would like to wheel anytime if you need someone to tag along, im pretty familiar with everything int he sea to sky region. I have a black 99 Hilux Surf, still pretty stock, especially by your standards:


Let me know!

Nice^^
Hey Chris,The Toy Run had a good turnout, less 4Runner than I thought there would've been but pretty cool nonetheless to meet new faces and see the many Toyota owners we have in the mainland.

There's plenty of places in the Squamish area that I haven't explored yet and a tour guide would be super. I've seen a couple photos of your trip you posted on Facebook and the sceneries were incredible. I will inform you of the next trip for sure, or keep an eye on any of the runs & events on the Facebook page.
 
Nice^^
Hey Chris,The Toy Run had a good turnout, less 4Runner than I thought there would've been but pretty cool nonetheless to meet new faces and see the many Toyota owners we have in the mainland.

There's plenty of places in the Squamish area that I haven't explored yet and a tour guide would be super. I've seen a couple photos of your trip you posted on Facebook and the sceneries were incredible. I will inform you of the next trip for sure, or keep an eye on any of the runs & events on the Facebook page.

Awesome! Will do! Thanks for the reply.
 
.....and lastly, to those who still have their trailer hitch but dreads the gapped look created by the Bodylift well, too bad! jk! jk!:biggrin2:

Here's what I did to put the hitch back up to stock form..
6-3.jpg~original


7-4.jpg~original


http://i763.photobucket.com/albums/xx277/erionracer/9-1.jpg[/QUOTE]

So if I understand correctly you just measured the gap.... Cut out the side and re-welded it adjusted down 1.5" or did you cut metal out...

A little additional info would be awesome.. I see the pictures but if you moved the side down wouldn't they be pushed out to the sides prevented the mounting points from aligning?... Or did you open the mounting holes a little more to allow for adjustment side 2 side?....

Thanks!
 
So if I understand correctly you just measured the gap.... Cut out the side and re-welded it adjusted down 1.5" or did you cut metal out...

A little additional info would be awesome.. I see the pictures but if you moved the side down wouldn't they be pushed out to the sides prevented the mounting points from aligning?... Or did you open the mounting holes a little more to allow for adjustment side 2 side?....

Thanks!

Basically, i removed the whole section from the lip/flanged part(part that physically attached to the frame) to where you see the white outline...
Cut it up again across where it bends then re-use the lip section and lower it down 1.5". Weld and gusseted after.

Hope this explains it better..Cheers!

 
[MENTION=46329]blcktpgsr[/MENTION]

Ahhhhh!!!! Those 2 extra pictures helped out a lot!

I understand now completely! Although I don't plan to ever tow anything.. The gussets are a super good idea. For strength especially now that there is little to no support when re-welding that back on.
What did you you cut it with? A grind wheel? It's thick metal!!
Btw. What type of welder do you have? Your weld beads look superb.
 
[MENTION=46329]blcktpgsr[/MENTION]

Ahhhhh!!!! Those 2 extra pictures helped out a lot!

I understand now completely! Although I don't plan to ever tow anything.. The gussets are a super good idea. For strength especially now that there is little to no support when re-welding that back on.
What did you you cut it with? A grind wheel? It's thick metal!!
Btw. What type of welder do you have? Your weld beads look superb.

I did another one for a 1"BL application but in a completely different approach..much more superior than the previous one.

Analyze this photo and see how I did it

completely cut them in half, raise the hitch bar to suit your BL height, then slap a piece of 3/16" plate to join the two together.

Red area represents the 3/16" plate to be welded re-joining the cut pieces together....Blue dots could either be plug welds or maybe even bolt that goes thru both plates. Black vertical line is where the complete cut is. Weld around the perimeter of that 3/16" plate and you're golden.
This way, you retain the structural integrity of the bend.

Then put gussets as seen in this photo..


At the time, I didn't have plasma to use, just plain ol' cutting discs so it made cutting a little annoying. That welder is my trustee Hobart Handler 140.

Thanks
 
Last edited:
[MENTION=46329]blcktpgsr[/MENTION]

Brilliant!

My concern with doing it this was was that because a 1.5" BL is a significant drop I guess you made for that with some extra metal and gussets...

But I see how this is less cutting and less room for error because it's just a straight cut down both sides!
 
[MENTION=46329]blcktpgsr[/MENTION]

Brilliant!

My concern with doing it this was was that because a 1.5" BL is a significant drop I guess you made for that with some extra metal and gussets...

But I see how this is less cutting and less room for error because it's just a straight cut down both sides!

Exactamente. I would say 1.5" BL is borderline the most this method works best on. Atleast you'd still have a big chunk of extra plate to hold the two halves together.
 
Just looked through this build thread. I have to say seeing where you started and then the many tweaks along the way, I am truly impressed. One of the nicest transformations I've seen. Definitely giving me ideas for mine, as I go along with my build.
 
While this thread has again been re-visited, why not update it with some small mods I've done while being away.

This started out simply by drilling holes on the filler plate to accept 7 LED DRL's.


Everything was fine until I had them installed back on the truck. I went in front to have a look at how bright they were but surprised to see only half the brightness looking head on, reason being, they were facing at an angle because the filler plate they're mounted on naturally sits at an angle. You'd have to go out to the sides to appreciate they're full brightness.


I wasn't gonna go and settle with that disappointment. I simply calculated the angle I needed and that was 8-9 degree from zero and I'd have the LED's facing forward.

This is how much of an angle the filler plate sits at in relation to the bumper, looking at birds eye view.


Then these..


Tack the angled tubings in place..


All primed, painted ready to go..


Just how bright are they? They're 1 watt each in comparison with a 20ma amp draw of the Maxxima LED's. They're really noticeably bright even during a nice sunny day.


Here's the link to the LED's
http://www.google.ca/url?sa=t&rct=j...iIKwBA&usg=AFQjCNFTZRt0CQrz0GLZq4K9VQJTvJezkA

Here's a 5LED version using Maxxima LED's

 
Last edited:
In preparation for our last winter wheeling trip, I needed to have my essentials up and ready(literally, lol!)

I'd made better use of the GOBI rack by making an axe/shovel mounts attached to it. Also, I relocated my hi-lift from inside the cargo area to the roof rack, too.

Majority of the steel used was 1" by 3/16" plate. I made the hi-lift mount stouter of course due to it's shear weight.

Here's the lot of it..


had these pieces powder coated..


Looks like some Chinese character:juggle:


Axe/shovel mounts..


Hi-lift mount..


I'll put up some better pics of the mounts at some point in time..

I think the accessories will stay up on the roof all year round, it adds on to the character of the 4Runner.


Some wheeling pics in between....


Build still looking strong!

I can't thank you enough my friend...Stay safe!

Just looked through this build thread. I have to say seeing where you started and then the many tweaks along the way, I am truly impressed. One of the nicest transformations I've seen. Definitely giving me ideas for mine, as I go along with my build.

Yeah it's not always easy to be unique and original....but one's just got to try.
Thanks for taking the time.

^^^^^^


This is such a good idea!!! Geeeeezus. Dat ingenuity doe....

You my friend are blowing my mind....

Admittedly, this has been done by quite a few, just another twist to the same tune..

Lol...its alright!
 
Love the LED's in the in-fill panel - I'm stealing that idea ;)

But why did you ditch the projectors and go back to standard headlights?
 
Love the LED's in the in-fill panel - I'm stealing that idea ;)

But why did you ditch the projectors and go back to standard headlights?

Steal away:guitar2: I must forwarn you tho, the filler panel filled with LEDs across is possible but not without some modification to the front fender where this filler plate attaches to. See the photos below.

I hit a minor snag here as the last LED to the right would hit the bolt head not allowing the plate to sit flush. Driver side fender shown.


Solution was easy enough..just a little re-configuration of the fender attachment..Passenger fender shown.


Ahh, the projectors, my brother wanted them badly that I was forced to just let go of 'em. One of these days, I may do another set.
 
Last edited:

Members online

Forum statistics

Threads
278,312
Messages
3,554,085
Members
248,016
Latest member
Advally Service

Trending content

Back
Top