BOFFROAD Build Thread

Update

Let's get an update on the gunmetal build!!!

Bought an android touchscreen Headunit and the JBL AMP adapter kit. It sucked. Sound quality was horrible. Don't know if it was the head unit or the AMP kit, but I didn't have much time to work on it so I reinstalled factory headunit and returned the Android.
 
Last edited:
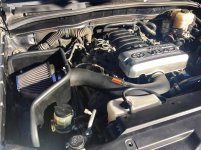
Installed a K&N Cold Air Intake. Installation was easy and I love it. It's quiet during regular driving, but roars like the presidential "BEAST" at full open throttle on the run from a threat. It's insane! :usa2:
 

Attachments

  • FullSizeRender 3.jpg
    FullSizeRender 3.jpg
    137.3 KB · Views: 502
Bought an android Joying touchscreen Headunit and the JBL AMP adapter kit. It sucked. Sound quality was horrible. Reinstalled factory headunit and returned the Joying through Amazon.

Haha...hate to hear that man. I still love mine. It's actually the only reason why I haven't finished my door speaker install. With the android processing program I downloaded, my factory setups sounds way better. Keep in mind, I'm coming from a Non-JBL setup so not sure if your output became convoluted with the android or even bypassed the AMP altogether.

Out of curiosity, which one did you end up getting?
 
Haha...hate to hear that man. I still love mine. It's actually the only reason why I haven't finished my door speaker install. With the android processing program I downloaded, my factory setups sounds way better. Keep in mind, I'm coming from a Non-JBL setup so not sure if your output became convoluted with the android or even bypassed the AMP altogether.

Out of curiosity, which one did you end up getting?

That's good to hear. I have heard many other good things about them from other people, I just never was able to find anyone who replaced the JBL system with one. I used the android for a few days and the thing was awesome other than it being low volume and making the speakers sound crackly. I don't know if it was the head unit or the AMP adapter computer thingy. I had contacted Joying about it and they were very helpful in giving me things to try, however I only had a few days to get it figured out before I go back to school. So I decided to return it while I can. If I had more time I would have tried a different AMP kit. These are what I used:

https://www.amazon.com/gp/product/B01MDQ4SQI/ref=oh_aui_detailpage_o01_s00?ie=UTF8&psc=1

https://www.amazon.com/gp/product/B00133RCCC/ref=oh_aui_detailpage_o01_s00?ie=UTF8&psc=1

Thank you though for you help!
 
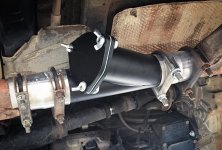
It's time for an update on this thread so I'll get right into it. About 2 months ago I installed a Jeg's Exhaust Cutout. Eventually I will get a cheap electric valve that I can control from inside the cockpit of the vehicle, but as of now if I want a nice rumble when offroad I just remove 3 wing nuts and its good to go.
 

Attachments

  • FullSizeRender 4.jpg
    FullSizeRender 4.jpg
    121.9 KB · Views: 401
Here is my first fabrication project that I have been working on for several weeks now. I designed it based off of photos of some of the Whitson Metalworks roof racks but added my on changes as I went along. I bent, cut, and notched everything myself and did some of the welding. Once I had everything how I wanted I had a friend do most of the welding for me. I just dropped it off for powder coating yesterday and will get it back today.


<a data-flickr-embed="true" href="https://www.flickr.com/photos/129908027@N03/37638292116/in/dateposted-public/" title="Roof Rack"><img src="https://farm5.staticflickr.com/4454/37638292116_fb9cacf317_c.jpg" width="800" height="532" alt="Roof Rack"></a><script async src="//embedr.flickr.com/assets/client-code.js" charset="utf-8"></script>

<a data-flickr-embed="true" href="https://www.flickr.com/photos/129908027@N03/37016256473/in/dateposted-public/" title="Roof Rack"><img src="https://farm5.staticflickr.com/4456/37016256473_f7b5d0356b_c.jpg" width="726" height="800" alt="Roof Rack"></a><script async src="//embedr.flickr.com/assets/client-code.js" charset="utf-8"></script>

<a data-flickr-embed="true" href="https://www.flickr.com/photos/129908027@N03/37638273056/in/dateposted-public/" title="Roof Rack"><img src="https://farm5.staticflickr.com/4475/37638273056_dbcf24aa1a_c.jpg" width="800" height="629" alt="Roof Rack"></a><script async src="//embedr.flickr.com/assets/client-code.js" charset="utf-8"></script>

<a data-flickr-embed="true" href="https://www.flickr.com/photos/129908027@N03/37016256763/in/dateposted-public/" title="Roof Rack"><img src="https://farm5.staticflickr.com/4467/37016256763_7aecf5c420_c.jpg" width="800" height="583" alt="Roof Rack"></a><script async src="//embedr.flickr.com/assets/client-code.js" charset="utf-8"></script>
 
Last edited:
Roof Rack Update

Time for an update. I completed the roof rack about 2 months and am loving it. It sure was a lot of work because, well it is a roof rack that was made from scratch, but also because I used round tubing which required precise tube bending and notching. I also designed it to nicely fit a 42" light bar I picked up off Amazon. I decided to position the light bar back slightly to reduce glare on the windshield. The faring is made from Lexan and does exactly what I wanted it to do, reduce wind noise, and it does just that. There is almost no wind noise at all on the highway. The rack consumed a good amount of my summer but it was well worth it and I learned a lot about fabricating. I plan to eventually have a shovel, jack, and some traction tracks mounted up there.


<a data-flickr-embed="true" href="https://www.flickr.com/photos/129908027@N03/37638076126/in/album-72157687304940480/" title="Terranea"><img src="https://farm5.staticflickr.com/4463/37638076126_4b18d6772d_c.jpg" width="800" height="600" alt="Terranea"></a><script async src="//embedr.flickr.com/assets/client-code.js" charset="utf-8"></script>

<a data-flickr-embed="true" href="https://www.flickr.com/photos/129908027@N03/37016027503/in/dateposted-public/" title="Roof Rack"><img src="https://farm5.staticflickr.com/4473/37016027503_3d6844cb19_c.jpg" width="800" height="800" alt="Roof Rack"></a><script async src="//embedr.flickr.com/assets/client-code.js" charset="utf-8"></script>

<a data-flickr-embed="true" href="https://www.flickr.com/photos/129908027@N03/37429036480/in/dateposted-public/" title="Roof Rack"><img src="https://farm5.staticflickr.com/4495/37429036480_b7b6ab3500_c.jpg" width="800" height="572" alt="Roof Rack"></a><script async src="//embedr.flickr.com/assets/client-code.js" charset="utf-8"></script>

<a data-flickr-embed="true" href="https://www.flickr.com/photos/129908027@N03/37638076376/in/dateposted-public/" title="Roof Rack"><img src="https://farm5.staticflickr.com/4487/37638076376_9a8b24332c_c.jpg" width="800" height="572" alt="Roof Rack"></a><script async src="//embedr.flickr.com/assets/client-code.js" charset="utf-8"></script>

<a data-flickr-embed="true" href="https://www.flickr.com/photos/129908027@N03/37429036620/in/dateposted-public/" title="Roof Rack"><img src="https://farm5.staticflickr.com/4484/37429036620_a0eb4b8772_c.jpg" width="800" height="600" alt="Roof Rack"></a><script async src="//embedr.flickr.com/assets/client-code.js" charset="utf-8"></script>

<a data-flickr-embed="true" href="https://www.flickr.com/photos/129908027@N03/37638076586/in/dateposted-public/" title="Roof Rack"><img src="https://farm5.staticflickr.com/4455/37638076586_93536a3c42_c.jpg" width="800" height="572" alt="Roof Rack"></a><script async src="//embedr.flickr.com/assets/client-code.js" charset="utf-8"></script>
 
Last edited:
That is probably the nicest diy roof rack ever made

Thank You! I am kind of a perfectionist when it comes to creating things. If something gets screwed up I don't just roll with it because I know I will regret it later. Imperfections kill me which is one reason why I try to always to my own work. "If you want it done right do it yourself."
 
Also upgraded my headlights to the 2006-2009 projector style. These are aftermarket Black headlights that I got off amazon. They work well with a good set of bulbs. I first cheaped out on the bulbs on Amazon and they weren't very good. After reading that a lot of people with new 4Runners and Tacomas upgrade their OEM bulbs with Hikari LED bulbs I decided to try them and they were way better. They throw a nice beam and are a nice bright white light.

DSC02356 by Brad Archambault, on Flickr
IMG_4139 2 by Brad Archambault, on FlickrIMG_4135 by Brad Archambault, on FlickrIMG_4249 by Brad Archambault, on Flickr
 
Last edited:
Fast forward to present time. Yesterday I ordered a CBI front bumper.

<a data-flickr-embed="true" href="https://www.flickr.com/photos/129908027@N03/44092543544/in/dateposted-public/" title="TOYOTA-4TH-GEN-4RUNNER-FRONT-BUMPER"><img src="https://farm2.staticflickr.com/1891/44092543544_9340728ace_z.jpg" width="640" height="640" alt="TOYOTA-4TH-GEN-4RUNNER-FRONT-BUMPER"></a><script async src="//embedr.flickr.com/assets/client-code.js" charset="utf-8"></script>
 
Last edited:
Loving the new CBI bumper.

<a data-flickr-embed="true" href="https://www.flickr.com/photos/129908027@N03/44318602215/in/dateposted-public/" title="DSC02920"><img src="https://farm2.staticflickr.com/1954/44318602215_a719fd3e94_c.jpg" width="800" height="534" alt="DSC02920"></a><script async src="//embedr.flickr.com/assets/client-code.js" charset="utf-8"></script>
 

Members online

No members online now.

Forum statistics

Threads
278,307
Messages
3,554,050
Members
248,016
Latest member
Advally Service

Trending content

Back
Top