BrianSD_42 Photo Journal Build Maintenance Thread

19.
JfM3dQb.jpg


20.
l9Yiyxh.jpg


21.
3LrBpsy.jpg


22.
QED0OX8.jpg


23.
tI3jwOI.jpg


24.
PQHU6gs.jpg


/*** end part 1 ***/
 
Jan. Death Valley Trip Report Part 2A, Panamint Dunes and Mine

Very light 4WD. Drove to Panamint Dunes, my friends went for a hike to the dunes and I drove up to the mine instead. I didn't make it to the mine but I got pretty far up in the canyons. It is VERY easy to get lost off a few hundrew feet off the hard to see trail even in broad daylight. I ended up having to backtrack and do a small climb up some rocks to get out of the wash. Got a few poser shots in.


Jan. Death Valley Trip Report Part 2B, Ballarat to Clair Camp via Pleasant Canyon trail

High Resolution Map of trail
https://www.deathvalley.com/images/exploring/maps/pleasant.pdf

Another map
Pleasant Canyon - Las Vegas Jeep Trails

We originally drove up this way looking for shelter because our original destination was blocked due to a gate closure, likely from the recent flooding. Eventually after about an hour of slow driving we came to this cabin. It was already occupied so we just stayed in the spot below which was fine. Wow though what a windy night, easily the absolute windiest night I have ever spent in my tent. Overall a pretty cool trail, will definitely go back. This was the first Death Valley trip where nothing expensive broke on my truck.


Pics - Part 2A, Panamint Dunes and Mine


1.
tIJXS7M.jpg


2.
7Ta6IL3.jpg


3.
a6Z3oVR.jpg


4.
7Mwxafx.jpg


5.
6x9g3rp.jpg


6.
COFbXcu.jpg


7.
TOc3tS8.jpg


8.
KMYcXCG.jpg


9.
pTiNW6M.jpg


10.
4n23Gzq.jpg


11.
oc5iWiI.jpg


12.
ZLPuy7E.jpg


13.
AlL26n0.jpg


14. Driving back down finally
rCQBdr1.jpg


/*** End pics Part 2A ***/
 
Last edited:

Pics - Part 2B, Ballarat to Clair Camp via Pleasant Canyon


1.
2b6ACYt.jpg


2.
pedOsrj.jpg


3.
YjlivWV.jpg


4.
8olFg6A.jpg


5.
jIs5Tvm.jpg


6.
uKTSghg.jpg


7.
PClb8C5.jpg


8.
xCuVGA2.jpg


9.
NA6EIXE.jpg


10.
sQRuEiP.jpg


11.
BxvxLwv.jpg


12.
NbZ4SRC.jpg


13.
MtKrahF.jpg


14.
krWGRF7.jpg


15.
Eua8Adz.jpg


16.
L4IAuMq.jpg


17.
wBej0EW.jpg


18.
FHZjBtY.jpg


/*** End ***/
 
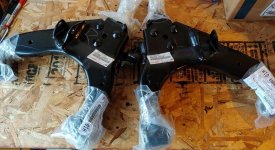
Got my new lower control arms (with bushings installed) in the mail last week. Should be getting them installed in early March. APhelps has been kind enough to provide some guidance on this job, will be a major wallet saver compared to the mechanic costs.

:surfer:
 

Attachments

  • 0220191726_2 - Smaller2.jpg
    0220191726_2 - Smaller2.jpg
    120.1 KB · Views: 347
Now THOSE are some sunset photos! I so need to get a real camera. Really cool trail pics too. That black 4runner of yours always seems to look sharp man. That trip looked fun and is great inspiration to get back out there. I need to up my tent game though. My tent is no snow camper. Ask me how I know. It feels like I am sleeping under the stars with a screen door laying on top of me. Come ooooooon Spring!
 
Thanks. All of the pictures were taken with my new Pixel 3, hand-held including the sunset and sunrise while driving (19) down a dirt road at 30+ MPH. It is only 12MP but the tech makes up for only modest resolution compared to an SLR. Every picture is 8 separate fast F1.8 pics stack merged into a single pic using both SW and a dedicated HW chip for the photo magic.

This picture (repost) is a good example of what I'm talking about. You simply could not or would have an incredibly hard time taking this picture with even the best Digital SRL. Yes it is not a perfect picture but compared to a DSLR which doesn't can't do real time 8x image stacking with noise and jitter corrections (or an iPhone) this pic is pretty good actually.

Why would it be so hard?
* The car is MOVING, a lot actually ~ 47 MPH
* Hand held pic in the dark
* It's pitch black in the vehicle and dark outside as the sun is still pre-dawn and hasn't even begun rising
* The picture captures the mountains edge in focus, Miles away
* The picture also captures the speedometer very well, just Inches away, again pretty much in focus.
* Only the center image road and stop sign has noticable blur.

How does Google do it?

---> Google AI Blog: Experimental Nighttime Photography with Nexus and Pixel

---> HDR+ HDR+ Pipeline Implementation

In broad daylight a DSLR with higher MP (like 24+) combined with bracketing and or Lightroom will definitely be the better setup .... if you are shooting in those conditions.


20.
l9Yiyxh.jpg

.
 
Last edited:
Got my new lower control arms (with bushings installed) in the mail last week. Should be getting them installed in early March. APhelps has been kind enough to provide some guidance on this job, will be a major wallet saver compared to the mechanic costs.

:surfer:

My LCA bushing are shot also, just getting OEM arms with bushings pressed in was on my mind as an option as well. I am in SD also and called Truck Shop for a quote. James told my about 900 bucks to do the work. so paying 400 ~ for the entire arms and not having to deal with pressing BS is a good options I think.
My other option is getting a used pair for 40 bucks and "pre" pressing in some Whiteline's Poly

Let me know if you need a hand it would be good to see the install happen so to educate myself a little more.
 
Thanks for the comment. Just sent you a PM.

Yes I did weigh replacing the bushings with OEM and originally I had thought it would be $55/pair plus cost of pressing them in. I have no access to bench press and no way of doing the pressing. In actuality Camelback charges $110/pair so $220 for just raw bushings. Then I would have to pay someone to remove and press in the new ones, another $50 I presume. That is now up to $270. I ended up just buying the two new arms because at $430 for a separate pair with OEM and already factory pressed it seemed like the right choice for me. The other benefit is having the arms all done and ready to go when you start the replacement job will make things much much easier.
.
 
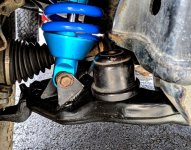
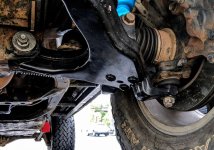
New OEM LCAs installed!!!!!!

I owe a huge shout-out to another member that helped me out but I won't name drop because then people would start hitting him up to do free work on their trucks. Nevertheless this job was a solid 5+ hours of work from start to finish.

Installed: brand new Toyota LCAs at a cost of ~ $450 shipped from Camelback.

I also replaced my aging and not that high quality diff drop spacers from Sonoran Steel with brand new machined spacers from Toytech.

Looking forward to getting this rig on a few trails in the near future.
.
 

Attachments

  • IMG_20190312_091008~2-01.jpg
    IMG_20190312_091008~2-01.jpg
    140.6 KB · Views: 571
  • IMG_20190312_091028~3-01.jpg
    IMG_20190312_091028~3-01.jpg
    138.9 KB · Views: 548
  • IMG_20190312_091016~3-01.jpg
    IMG_20190312_091016~3-01.jpg
    135.2 KB · Views: 532
You don't have a diff drop spacer? I thought everyone did.

It is pretty standard for any lift with at least 2" gained.
.
 
So I'm getting ready to go camping soon and I have a few things left on my prep list.

I tried to install 26mm Poly sway bar bushings for the front sway bar and for the life of me I cannot get them to go into the OEM sway bar brackets. The front sway bar is always a PIA to install but the poly are so stiff I couldn't make work and gave up after an hour. I am going to try again on Thursday but I may just go back to OEM bushings if I pick some up in San Diego.

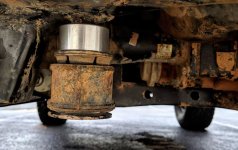
A few weeks ago I ordered the front diff replacement bushings from plastics guy and am looking forward to installing those. One side is already disintegrating from old age so this should be a good preventative maintenance item.

I considered buying a hard shell Roof Top Tent since there is an epic 4 day sale right now at Costco.com for one that is normally $2,400 for only $1,699. I decided against it but maybe some of you would be interested. Looks like a great tent.

SilverWing 90 Hardshell $1,699 until 03/29
---> https://www.costco.com/Silverwing-C...Rooftop-2-person-Tent-.product.100468990.html

I won't be buying that but I am considering getting a portable Solo campfire pit since I've got a 20% off coupon for REI and about $175 in gift certificates. The idea is it burns hotter and there is waaaay less smoke in your eyes.
---> https://www.solostove.com/solo-stove-bonfire/
 
Looks good Brian. So now each LCA is $225? Crap. I remember having them in my cart at $160 a pop some years ago.

Yes it must have gone up. I was looking at $55 x 4 bushings just for the OEM and then paying to have them pressed on since I don't have a press or access to a press. After all of that I would have been at around $300 spent so I decided to just get new with the bushings already installed.

:surfer:
 
/*** May 2019 - Julian CA to Anza-Borrego State Park ***/

Trip report: met up in Julian CA with [MENTION=146513]APhelps[/MENTION] and my neighbor nick. We started at Banner Rd. and drove up into the mountains. It was raining but overall that just made the scenary a bit more interesting. We took Banner to Chariott Pass and then down to the S2 in Anza-Borrego. From there we did Diablo Dropoff and Fish Creek. Lastly we drove out along the railroad tracks back down south towards the 8 highway.

This was my first trip with the Sony A7iii & F4 kit lens.


1.
CRMDF7H.jpg


2.
aRuSXec.jpg


3.
MC5bI8w.jpg


4.
f62B8hQ.jpg


5.
eP4ncKL.jpg


6.
XAxgd2l.jpg


7.
CTWgTmI.jpg


8.
C3cn79w.jpg


9.
ybeHlyd.jpg


10.
ttyX0uL.jpg


11.
8RyHw51.jpg


12.
G9vfulT.jpg


13.
ZYDuGZJ.jpg


14.
oluqanM.jpg


15.
FPeI1T9.jpg


16.
kz1rpZE.jpg


17.
nhKYk50.jpg


18.
rCQknF8.jpg


19.
ysSS7L2.jpg


20.
2h0V9tD.jpg
 

Members online

Forum statistics

Threads
278,316
Messages
3,554,120
Members
248,016
Latest member
Advally Service

Trending content

Back
Top