Brillos Builds

brillo_76

Elite Member
I currently own 7 3rd gens with 2 of which are parts. Along with an 02 Camry, 07, Sienna Van, 2010 sienna Van, 09 Tocuma and 2 classic cars. Been working on Toyota's since the early 90's used to have a fleet of 80's pickups for parts and 3 road rides. So more of a hobby mechanic then anything. Graduated college as an Electrical Engineer and work with computers these days.

I use my rigs (2 only at a time on the road) as DD and work rides. I mostly keep mine mostly stock and focus on frame repairs and body repairs and maintenance more then anything else. [I do enjoy seeing other folks rigs and the mods they have done ;-) ]

Living in the rust belt, I been experimenting and improving on my repairs on frames and chassis. One of the reasons I choose the 4 runners was to learn how to weld a lot better. Along with them being Toyota Trucks that are SUVs and the 3rd Gens are my favorite.

So by contributing on this forum and sharing what I have learned over the years, along with others sharing what they have as well with me. We can all benefit from this community of owners.

So my Builds photos will mostly be frame and chassis repairs and those sorts of things. I will help others and will be active in this forum.

So do anyone out there want to see my frame repairs?? :D

P.S. As I have a fleet of 3rd Gens. I am always looking for parts. I would rather buy the parts from other 3rd Gen owners then southern Junkyards..


So PM me if your parting one out especially the parts that rot out in the rust belt. You never know what I am after at any given time :D As I work 1 or 2
at time restoring them to DD status.
 
Last edited:
Register to hide this ad
So my Builds photos will mostly be frame and chassis repairs and those sorts of things. I will help others and will be active in this forum.

So do anyone out there want to see my frame repairs?? :D

From one northeasterner to another.......Bring it on!!
 
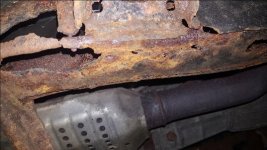
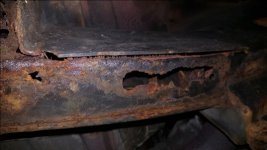
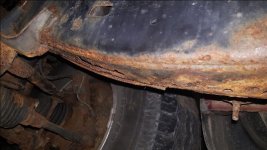
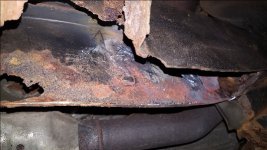
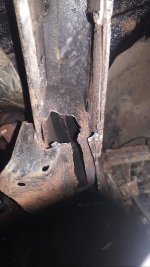
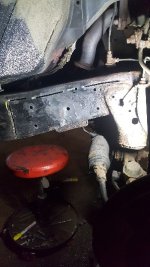
97_5_Speed_PS_Front_Arch

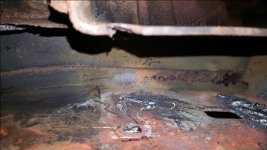
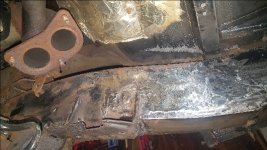
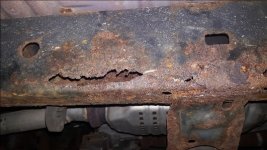
This was what my passenger side front arch looked like when I started the repair. :[
 

Attachments

  • 1997_5_Speed_PS_Frame01_Reduced.jpg
    1997_5_Speed_PS_Frame01_Reduced.jpg
    65.9 KB · Views: 7,090
  • 1997_5_Speed_PS_Frame_02_Reduced.jpg
    1997_5_Speed_PS_Frame_02_Reduced.jpg
    61.5 KB · Views: 7,045
  • 1997_5_Speed_Frame_03_Reduced.jpg
    1997_5_Speed_Frame_03_Reduced.jpg
    43.5 KB · Views: 7,051
  • 1997_5_Speed_PS_Frame_04_Reduced.jpg
    1997_5_Speed_PS_Frame_04_Reduced.jpg
    53 KB · Views: 6,944
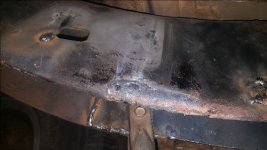
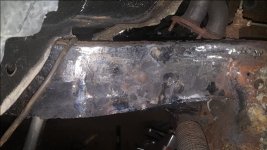
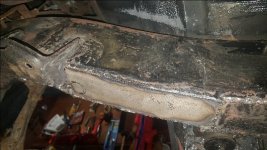
Stage 1: So Like a stated before, I cut the bottoms out of the frame and place my patching on the inside of the frames, The super bad areas get cut out. The plates and frame itself get painted as well during the process..
 

Attachments

  • 1997_5_Speed_PS_Frame_Cutout1_Reduced.jpg
    1997_5_Speed_PS_Frame_Cutout1_Reduced.jpg
    61.7 KB · Views: 6,949
  • 1997_5_Speed_PS_Frame_Cutout2_Reduced.jpg
    1997_5_Speed_PS_Frame_Cutout2_Reduced.jpg
    54.9 KB · Views: 6,980
  • 1997_5_Speed_PS_Frame_Cutout3_Reduced.jpg
    1997_5_Speed_PS_Frame_Cutout3_Reduced.jpg
    48 KB · Views: 6,865
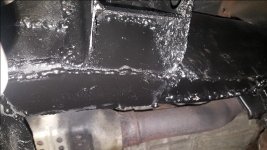
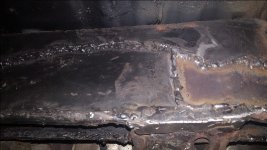
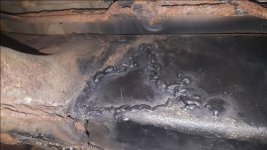
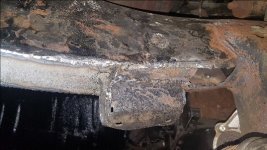
Phase 2 is always getting the plates back in to give the frame back strength. I paint them then weld them in and paint over again. I will drill holes through the frame and bolt the plates into place before welding then after all welded in, I weld the holes shut. I also cut windows into the frame to weld the plates on the top and on areas where plates meet. This way, everything is one piece and strong. On this particular area. I sealed the frame up because I drove the vehicle for 8 months before doing phase 3.
 

Attachments

  • 1997_5_Speed_PS_Phase2_Arch_Reduced.jpg
    1997_5_Speed_PS_Phase2_Arch_Reduced.jpg
    58.4 KB · Views: 6,799
  • 1997_5_Speed_PS_Phase_2_Inside_Arch_Reduced.jpg
    1997_5_Speed_PS_Phase_2_Inside_Arch_Reduced.jpg
    52.8 KB · Views: 6,793
  • 1997_5_Speed_PS_Frame_Repair_Reduced.jpg
    1997_5_Speed_PS_Frame_Repair_Reduced.jpg
    55.8 KB · Views: 6,765
  • 1997_5_Speed_PS_Frame_Inside_Reduced.jpg
    1997_5_Speed_PS_Frame_Inside_Reduced.jpg
    56.3 KB · Views: 6,727
  • 1997_5_Speed_Frame_Body Mount resized.jpg
    1997_5_Speed_Frame_Body Mount resized.jpg
    62.6 KB · Views: 6,771
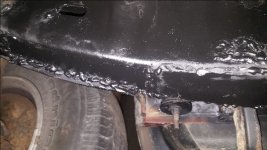
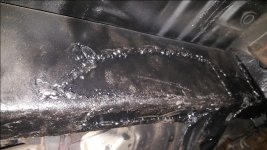
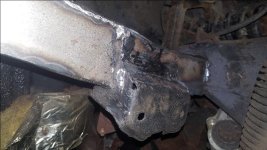
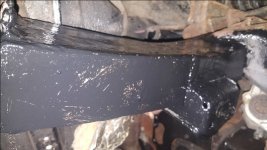
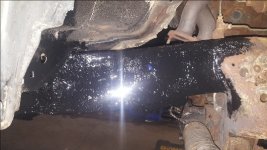
Phase 3: Grind smooth Paint over and always when all Done an area, Fluid Film inside and out
 

Attachments

  • 1997_5_Speed_PS_Arch_01_Phase_03_Reduced.jpg
    1997_5_Speed_PS_Arch_01_Phase_03_Reduced.jpg
    53.8 KB · Views: 6,754
  • 1997_5_Speed_PS_Arch02_Phase_03_Reduced.jpg
    1997_5_Speed_PS_Arch02_Phase_03_Reduced.jpg
    56.3 KB · Views: 6,711
  • 1997_5_Speed_PS_Arch03_Phase_03_Reduced.jpg
    1997_5_Speed_PS_Arch03_Phase_03_Reduced.jpg
    59.1 KB · Views: 6,687
  • 1997_5_Speed_PS_Arch04_Phase_03_Reduced.jpg
    1997_5_Speed_PS_Arch04_Phase_03_Reduced.jpg
    68.4 KB · Views: 6,771
  • 1997_5_Speed_PS_Arch05_Phase_03_Reduced.jpg
    1997_5_Speed_PS_Arch05_Phase_03_Reduced.jpg
    56.5 KB · Views: 6,694
  • 1997_5_Speed_PS_Arch06_Phase_03_Reduced.jpg
    1997_5_Speed_PS_Arch06_Phase_03_Reduced.jpg
    71.6 KB · Views: 6,666
Phase 3 conintued
 

Attachments

  • 1997_5_Speed_PS_Inner_Arch_Phase_03_Reduced.jpg
    1997_5_Speed_PS_Inner_Arch_Phase_03_Reduced.jpg
    64.8 KB · Views: 6,634
  • 1997_5_Speed_PS_Arch_Painted_02_Phase_03.jpg
    1997_5_Speed_PS_Arch_Painted_02_Phase_03.jpg
    50.3 KB · Views: 6,584
  • 1997_5_Speed_PS_Arch_Painted_Phase_03_Reduced.jpg
    1997_5_Speed_PS_Arch_Painted_Phase_03_Reduced.jpg
    59.7 KB · Views: 6,586
Brillo,


Well done and gives hope to those who have such issues, me included!


LMS
I actually do the entire frames from bumper to bumper. Sometimes, it's in steps. On the 5 speed. However, it will have at least 90% of the frame rails done just like that arch. The entire underbody is all cleaned and painted as well. The trick is to remove all the frame holes and paint as well as fluid film all steel. That way, its sealed and use the paint as an indicator. If something up the paint will let you know. :]

Sent from my SM-J337V using Tapatalk
 
Looking good!
Wondering what your painting/coating with after your final finish prior to the Fluid Film.
Anything special like POR-15, Rust Bullet, etc or just regular rattle can semi gloss black?
Will use my Runner as year round daily. Presently no rust through holes, just surface and some scaling.
Planning to wire wheel some of the accessible rusty areas, apply POR-15 to the exterior and Eastwood’s internal Frame coating to the inside.
Doing my best to preserve the integrity of the frame as I know the salty winter roads will not be kind.
 
Looking good!
Wondering what your painting/coating with after your final finish prior to the Fluid Film.
Anything special like POR-15, Rust Bullet, etc or just regular rattle can semi gloss black?
Will use my Runner as year round daily. Presently no rust through holes, just surface and some scaling.
Planning to wire wheel some of the accessible rusty areas, apply POR-15 to the exterior and Eastwood’s internal Frame coating to the inside.
Doing my best to preserve the integrity of the frame as I know the salty winter roads will not be kind.

I tried many over the years. I have one 4 runner with POR-15. Eastwoods internal Frame coating was a major disappointment. I coated that arch with that and went back in a year later and it was rusting. POR-15 and KB-Seal seem to seal off the steel. Just make sure you don't get any on your skin and where a respirator because those fumes are nasty. I just mostly use Gloss Black rust-oleum as my paint. Really wash out that inside frame and get all the dirt and debris you can out. Then just Fluid Film it the inside of the frame really heavily. When the outside is clean, you can either Paint with POR-15, KB Seal, Rust-Oleum the outside then coat it with Fluid Film. If you can even silicon the frames holes shut after its all cleaned up it will help keep the salt, dirt and water out. Making your Frame last a lot longer without repair..

I choose to plate the inside so that I can always change a Body Mount Etc if i need to and will have steel to weld to instead of plating the outside like a lot of people do. All your work is inside and you can sand it down smooth on the exterior which as you can see looks more OEM then just plating the exterior frame holes. You be surprised how thin some of the areas in the frame really are when you get some holes starting. That's why I switched do insides plates and replacing the bottom method.
 
I’ve been hearing a lot of good things about the Eastwood internal coating. What would you recommend instead?


Sent from my iPhone using Tapatalk
 
I’ve been hearing a lot of good things about the Eastwood internal coating. What would you recommend instead?


Sent from my iPhone using Tapatalk
Yes I was quite surprised myself when I opened that arch back up a year later and saw rust. I would use fluid film inside the frame as it is non toxic creeps everywhere. Other folks have used mineral oil or other oils. The main ingredient in fluid film is lanolin the same substance that sheeps wool repel water. It never fully dries though. So you probably have to coat your wheel well areas yearly as these areas get power washed and sand blasted just driving in the rain. After I done fixing the rig or areas I paint and coat everything with fluid film. :]

Sent from my SM-J337V using Tapatalk
 
I actually do the entire frames from bumper to bumper. Sometimes, it's in steps. On the 5 speed. However, it will have at least 90% of the frame rails done just like that arch. The entire underbody is all cleaned and painted as well. The trick is to remove all the frame holes and paint as well as fluid film all steel. That way, its sealed and use the paint as an indicator. If something up the paint will let you know. :]

Sent from my SM-J337V using Tapatalk

Brillo,

So, if I understand you correctly, you Fluid film the old frame, then weld in the repairs and paint the new repairs then Fluid them after?

Mine was repaired from the dealer so only a couple of spots, but I did Fluid film the inside of the frame as well as outside those areas needing it. Do you use cans or have the professional setup with the long wand and compressed air?

LMS
 
Brillo,


So, if I understand you correctly, you Fluid film the old frame, then weld in the repairs and paint the new repairs then Fluid them after?


Mine was repaired from the dealer so only a couple of spots, but I did Fluid film the inside of the frame as well as outside those areas needing it. Do you use cans or have the professional setup with the long wand and compressed air?


LMS
No. Fix the frame first. With painted plates. Then paint over the welds. As I am placing the bottom frame welded back on I spray fluid film in the sealed frame as I doing sections. Then paint the outside frame and fluid film it. The paint is an indicator on how things are going. If you see it coming off you need to investigate. The metal has to be clean for the paint to stick. I use acetone to clean the surfaces before painting. Mostly everything gets too coats. :)

Sent from my SM-J337V using Tapatalk
 
I use both cans and I buy the fluid film by the 5 gallon bucket and spray it with my air compressor and gun kit I bought from Amazon. Once everything's coated really well. I head for the dirt dusty roads the dust will actually seal the steel off so oxygen cant get to it.

LMS... how bad was your frame? What areas were patched?

Sent from my SM-J337V using Tapatalk
 
I use both cans and I buy the fluid film by the 5 gallon bucket and spray it with my air compressor and gun kit I bought from Amazon.

Planning on applying Fluid Film after I remove some heavy surface rust from various areas of the frame and undercarriage.
Can you provide a link to the spray gun kit you purchased from Amazon.
Would like to go that route since I have access to air compressor as well.
 
Planning on applying Fluid Film after I remove some heavy surface rust from various areas of the frame and undercarriage.
Can you provide a link to the spray gun kit you purchased from Amazon.
Would like to go that route since I have access to air compressor as well.

This is a close as they have now to my gun kit... https://www.amazon.com/woolwax-Lano...599&s=gateway&sprefix=wool+wax,aps,157&sr=8-7

Mine has a metal attachment as well and only 3 bottles instead of 4.
 

Members online

No members online now.

Forum statistics

Threads
278,306
Messages
3,554,045
Members
248,016
Latest member
Advally Service

Trending content

Back
Top