Brillos Builds

Planning on applying Fluid Film after I remove some heavy surface rust from various areas of the frame and undercarriage.
Can you provide a link to the spray gun kit you purchased from Amazon.
Would like to go that route since I have access to air compressor as well.

You better check if you have heavy surface rust on a frame. There is a good chance you have holes in the frame. As from what I have observed over the years of toyota frames, they rust from the inside out. :{
 
Hopefully this thread gets big to show people examples of how a frame can be fixed and a 3rd gen saved from falling apart! I bought my 3rd gen with a hole as bad (or worse) than the pictures above, and I fixed it. Patch, reinforce, paint, and protect! Thanks for showcasing your awesome work :rockon:
 
I use both cans and I buy the fluid film by the 5 gallon bucket and spray it with my air compressor and gun kit I bought from Amazon. Once everything's coated really well. I head for the dirt dusty roads the dust will actually seal the steel off so oxygen cant get to it.

LMS... how bad was your frame? What areas were patched?

Sent from my SM-J337V using Tapatalk

Brillo,

The frame wasn't bad as it looked like they caught it early at the dealership.
Looks like a couple of 2-3" patched on the vertical sides close to Cat / Exhaust area. Same problem with passenger side, side panel of bumper. The heat in winter as you know causes havoc with metal and the salt we use in these parts. Appears they undercoated the whole vehicle so that is why the body is in such good shape. I did notice a flaw in Toyota's design behind the front tires there is an opening at the rocker panel point :( And we wonder why rust happens there, lol The running boards is the saving grace on these units I think.

I just tried to loosen the emergency brakes and opened the boots and you should have seen the salt granules coming out of those boots. Needless to say those need to be replaced. Had the mechanic remove and replace new 99 tall springs and as Tim showed in his video it lifted the rear end by 1-1/2" so she is rolling down the road without the rear sag!
 
I use both cans and I buy the fluid film by the 5 gallon bucket and spray it with my air compressor and gun kit I bought from Amazon. Once everything's coated really well. I head for the dirt dusty roads the dust will actually seal the steel off so oxygen cant get to it.

LMS... how bad was your frame? What areas were patched?

Sent from my SM-J337V using Tapatalk

Brillo,

Do you have a lift to use that spray system?
I looked at the one attachment spray wand that is about 24" plus in length
and that looked like it would be easy peasey doing inside of frame.
Fluid Film / Woolwax Undercoating Pro Gun 360* Flexible Spray Wand. 32" | eBay

PS: Thanks for the dusty road tip, man that is interesting and would have never thought of that!!!!!!!!:yo:

I used this device and it worked the nuts, but man do those cans disapear fast using that sucker!
Fluid Film 360deg Extension Wand for spray cans | eBay
 
Did you spray the Woolmax product or Fluid Film with this gun.....or both.
I use fluid film and wool wax is extremely similar. Those aerosol can extenders are very good for getting into tight places. The dust just helps make it not sticky and drier and fluid film never gets hard. It's one of the reasons you have to redo your wheel wells every year. As they are constantly getting sandblasted and power washed every time it rains.

Sent from my SM-J337V using Tapatalk
 
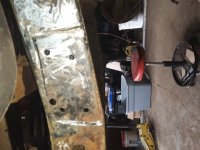
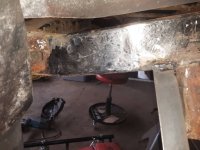
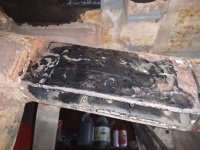
97 5 speed got another foot of frame repair. Passenger side rear arch. I got it close to where I want it. Will look at it again before giving it a heavy coat of paint. Another 16 inches or so and my passenger side rail will be completed. :] 20190915_143831.jpg20190915_145845.jpg20190915_173032.jpg20190915_173051.jpg

Sent from my SM-J337V using Tapatalk
 

Attachments

  • 20190915_143831.jpg
    20190915_143831.jpg
    47.6 KB · Views: 1,915
  • 20190915_145845.jpg
    20190915_145845.jpg
    59.7 KB · Views: 1,982
  • 20190915_173032.jpg
    20190915_173032.jpg
    62.5 KB · Views: 2,012
  • 20190915_173051.jpg
    20190915_173051.jpg
    69.7 KB · Views: 1,898
Looking good Brillo.
I’ve never welded before, can you share specifics and a picture of the setup you’re using as I would love to give it a shot at some point.
 
Hopefully this thread gets big to show people examples of how a frame can be fixed and a 3rd gen saved from falling apart! I bought my 3rd gen with a hole as bad (or worse) than the pictures above, and I fixed it. Patch, reinforce, paint, and protect! Thanks for showcasing your awesome work :rockon:


Thank you... I have fixed some majorly bad frames over the years. I have one driver side arch that the driver side sway arm bracket pulled off the frame. As I have only the top frame and maybe 1/4 of steel holding it at the time. I parked it until I fix its frame [Tetanus 2]..

I am trying to complete my 97 5 speed frame. When they get totally rotted out. Its best to plate inside and the outside and smooth it up. Not only to you get all your strength back. You get the plywood effect with the plates. Makes it extremely strong. I have sections of this frame are over 1/4 inch think now. When the areas completly rotted out.

When you drill the plates and bolt, you get to really vise the plates against the surface. Then you basically use the drill and fill method on areas you cant weld normally. This has been the best way I have found to repair bad and weak areas in Frames. I am hoping it inspires others to repair their frames and seal them up. That way their 3rd Gens can run a lot longer in the rust belt areas. ;-)
 
Brillo,

Great Pic's and info on frame repair!
I noticed you had a section of repair that had a arch pattern
in that area of the frame, how did you cut that pattern and are
you using all 1/4" plate for these repairs?

I took your advice and purchased a Fluid Film spray gun with a
long extension ( 32" ) for inside the frame coating. Time to save a
few pennies and stop buying those spray cans. I also ordered a can
of the FF with the brush for touch up spots such as my back bumper.
I am very pleased with the rust on the frame results after applying this
stuff!

Keep up the great work showing us your methods as I will try to do the same on my
end for whatever I do as well where it can help the community here on T4R......

LMS
 
Last edited:
Brillo,

Great Pic's and info on frame repair!
I noticed you had a section of repair that had a arch pattern
in that area of the frame, how did you cut that pattern and are
you using all 1/4" plate for these repairs?

I took your advice and purchased a Fluid Film spray gun with a
long extension ( 32" ) for inside the frame coating. Time to save a
few pennies and stop buying those spray cans. I also ordered a can
of the FF with the brush for touch up spots such as my back bumper.
I am very pleased with the rust on the frame results after applying this
stuff!

Keep up the great work showing us your methods as I will try to do the same on my
end for whatever I do as well where it can help the community here on T4R......

LMS


I use 1/8 plate. As 1/4 plate is entirely too think and hard to work with. My patterns are made with just card board. Then I trace it out the the steel and cut it out.. I mostly leave a 1/4 to 1/8 gap in the bottom so i weld the plate to the frame and keep it all in the lip.

I use I will verify but from memory 5.5 inch 1/8 bar stock, 3.5 inch 1/8 bar stock and 2.5 bar stock steel. the 2.5 is my bottom of the frame and the other two sizes are my sides.. Middle section is 5 inch.

when an area is completely rotted. I cut it out and plate the inside first. Once that is completed. I will put a plate on the outside was well and weld it all together. This is very common in the Arch areas as they mostly rot out first. By sealing this all up. Not only we get a super strong frame. We get rid of all the holes in the frame. So the paint and fluid film cant go anywhere and just protect the steel. Should make the frames last almost forever. Regardless of the areas they are in. :-]
 
Looking good Brillo.
I’ve never welded before, can you share specifics and a picture of the setup you’re using as I would love to give it a shot at some point.

Sorry Sarki, somehow I missed this. First Welding you have to be really careful. I mostly pull my Gas Tanks out. You Can't have any gas smell or gas fumes at all If you do, you can seriously blow yourself up. I believe we have a few threads on this forum explaining how safety always has to come first on welding.

My Welding setup sucks to be honest. I have totally outgrown it. My welder is only 110 volt craftsmen that is on its last leg. One of these days the smoke is going to roll out of her..lol I would be good for body panels and lighter steel but its duty cycle is way too low.

I weld using gas and .035 mig wire. As you can see on one of my photos. I actually weld my grounding bar right to the area I am working. I use a piece of steel attached to the grounding clamp. When done in that area break the weld strap off and grind smooth.

I wear full leather gloves and full leather welding jacket. So I don't get burnt. I also use a Lincoln Viking 3350 welding helmet.


My replacement welder will be a Lincoln MP210. Being its both a 110 /220 welder. That can mig, tig and even stick weld it will be able to do everything I want it to do.

For Example: For me to weld 1/8 plate, I have to really slow my wire speed down. To get enough heat to have a decent weld. Mostly you want your welding area to be glowing red hot while welding so the metal bonds and melts together.

Welding takes practice to good at. When I first starting welding, I was extremely bad. I think Mig is easier then Stick myself. The only way to get good at welding is like anything else. You do it and practice makes perfect.


Another welding tip that I have is the area has to be clean and shiny. You get a better weld if the area is clean and non rusty. Welding on rusted steel is not easy at all. Its difficult and the splatter popping at the weld surface is a lot higher due to the rust oxide. It can be done but the cleaner you get your welding area the better.. :-)

I hope this helps. :-)
 
Welding takes practice to good at. When I first starting welding, I was extremely bad. I think Mig is easier then Stick myself. The only way to get good at welding is like anything else. You do it and practice makes perfect.
I hope this helps. :-)
Thanks for taking time out to respond with detail.
I most definitely want to learn how to weld as been thinking about it for a long time.
Best bet will be to find a class close by that offers a day of basic instruction for beginners. They usually include use of all safety equipment and I imagine they have up to date welding equipment as well.
Spend a couple hundred and learn the basics.
What do you think is more useful when it comes to welding regarding automotive application, TIG or MIG? Or are both equally useful?
 
Thanks for taking time out to respond with detail.
I most definitely want to learn how to weld as been thinking about it for a long time.
Best bet will be to find a class close by that offers a day of basic instruction for beginners. They usually include use of all safety equipment and I imagine they have up to date welding equipment as well.
Spend a couple hundred and learn the basics.
What do you think is more useful when it comes to welding regarding automotive application, TIG or MIG? Or are both equally useful?

Excellent idea on the Class. Mig is for steel. Tig is the aluminum.. Being the automotive steel is fairly thin. You almost entirely be doing Mig welding.. :-)
 
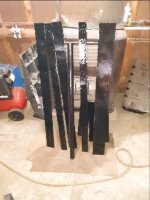
All I got done this weekend was painting some new bar stock. The wife had me replace a dishwasher ...oh and I changed the oil and rotated tires on the 09 Tocuma..
 

Attachments

  • Painted_Plates_For_Frame_Repair_Resized.jpg
    Painted_Plates_For_Frame_Repair_Resized.jpg
    28.4 KB · Views: 1,337
2 more plates, some grinding and paint my passenger frame rail will be completed

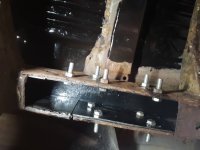
I am putting a hitch on this rig and of course the frame dosent have the 2 rear nuts. So I made a plate to weld the nuts to. Used 2 small bolts and nuts to hold that plate in place until I could get the nuts welded in there proper places. Then welded that plate in place.

I always found it best to weld the nuts to a plate. Then bolt that plate into place before welding it in.

Being I didn't want to drop the hitch an 1/8 down. I left the bottom of this section of the frame in. Plus I wanted to have the exact location for those hitch holes.

What made it more interesting is I wanted to plate both insides of the frame rail too.

So I got all 3 plates ready and in location before welding this together. Then I welded a plate on the end of my frame to seal it. Drilled a 3/4 hole in it for my fluid film hose to fit in. Will put a rubber grommet in the 3/4 hole to seal it.

As the bottom and sides were intact. I had no way to paint it. So I cleaned everything out. Blew it out with an air compressor. Then fluid film the entire section. Once it was coated. I then put the plates in and started welding once all my bolts were tight. Here are the photos of today's project.

It seems I didn't take a photo of my nut plate. Oh well. Maybe I will when I do the drivers side. :]
a488d1e2ff7d061c0cb7e643fff750dd.jpg
5341e27f8c844ddf000aa312bd3a8240.jpg
2c72507f585747442ecb83c0cf934031.jpg


Sent from my SM-J337V using Tapatalk
 
Working on Tetanus 1 now. I cut all the bad rocker steel out of the passenger side and fitted a 2 ×2 16 gauge square tube in. I need to verify my outer rocker will fit over this square tub. It's going to be close. If it dosent I will drop to a 2 x 1 or worst case 1 x1. Need that tube so I have a decent bottom pinch weld line. Plus I need to rebuild my rear fender well and needed to rebuild my front. So I can bolt the bottom of my fender back on. This is what I have so far I have a replacement dog leg half welded on already
c7389fd6f222d637729300dd79828df7.jpg
b429e1ca29534cb219c6450989d0d2b4.jpg
bc15e4ad0d9f61005240805fd68cd227.jpg
882d3a49056f9b2c164ed8e19b45308f.jpg
55744a31b03e28396cbbbdeba3842111.jpg


Sent from my SM-J337V using Tapatalk
3146a5e1c9c3ac7c924835a9c9f62686.jpg
 
Last edited:
Nice work and great progress.
Your determination to restore the integrity of your fleet of Runners is very inspiring......thanks!!
 
Well. I need to drop to a 2 x1 inch flat bar. When I cut my rocker panel to size it up. I was a 1/2 inch lower on the pinch weld. So this is what the I got done today. Just seeing how things would fit. My daughters cat Rosie even was helping some. :] I am getting closer to getting this passenger side buttoned back up.

I verify the 2 x 1 will work good. Then start rebuilding the inner rocker. Weld the tube in. Then weld the outer rocker in. Finish by building the front and rear back in again.
819b0384b88f4909b5afa6d7965b9796.jpg
5b577967aab8068e1780d4d25cd58e46.jpg
48af7159654b8a67e7dd0e398f3fbfc9.jpg
00133961e55cb748455e2dca783bbcc4.jpg
cc07c026e755b95678a2262cfc2bfddc.jpg


Sent from my SM-J337V using Tapatalk
 
Nice work and great progress.
Your determination to restore the integrity of your fleet of Runners is very inspiring......thanks!!
Why Thank you Sarki. I am just showing people how these 3rd gens can be saved and rebuilt from Rust Belt damage. When this is completely done the running boards will even be back on it. I am glad a few folks out there appreciate my build thread. :D

Sent from my SM-J337V using Tapatalk
 

Members online

No members online now.

Forum statistics

Threads
278,309
Messages
3,554,071
Members
248,016
Latest member
Advally Service

Trending content

Back
Top