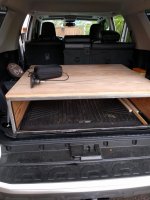
Building my own drawer for cargo area

kags1969

New member
So realized the need for good storage after my first trip with tons of crap just piled everywhere. I decided to build one instead of buying, simply because I thought I could build a decent drawer for much less than I could buy one. If I had a bunch of extra money, I would probably buy one but I don't so here we go.

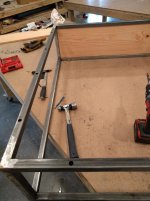
I took both a woodworking and a welding class at the local art school. I built a nice little table over 12 weeks and took a six week metalworking/welding class and built a frame for the drawer out of 1" steel tube (14 gauge).

I wanted both metal and wood, so I went to the local fine lumber place and looked around. I found some nice douglas Fir (softwood) that I liked and bought it as finished lumber 1"x12" (about 26 linear feet). It was pricier then I was expecting $157. I think this was because it was wide and finished 4s4.
 

Attachments

  • IMG_20161223_132743 (1).jpg
    IMG_20161223_132743 (1).jpg
    131.7 KB · Views: 475
  • IMG_20161223_143422.jpg
    IMG_20161223_143422.jpg
    130.6 KB · Views: 532
Register to hide this ad
When I built he frame, I wasn't completely sure what I wanted. I knew I wanted a drawer or two to store stuff 10-12" tall. I built the frame for the back with dimensions of 36" deep - 43" wide and 12" tall. This fits snugly into the back, but no room on the sides for 1" wood sides unless I went interior to the frame.

I started thinking about how I was going to put it together. For the top I wanted the wood to rest on the frame so that I could put heavy stuff on top of it. (Fridge) and later screw into if I needed to.

For the side I could have gone with metal but decided on wood and think that I will end up screwing the slide onto these. (I thought briefly about adding another 1" tube for the side rails to screw into, but decided to try wood and see how it fairs.

I attached the side by drilling a small pilot hole threw both sides of the square tube, then followed up by adding a larger hold on top to allow for the screw to be screwed in. I did this to keep the screw heads from jacking with the top resting on top.

Every 10" or so I did the dual holes then attached the sides by screwing 1" 1/4 wood screws threw the tube into the sides.

I did all of the measuring by putting wood up to the frame and tracing onto the wood. Kinda backwoods, but it works for me.

I faced glued the top together and drilled pilot holes into the frame for the screws to have someplace to bite. 14 gauge is pretty thick.

Had I known when I started I might have made the frame 2" narrower to allow for surface mounting the wood.

I haven't decided how I am going to finish it. I should probably paint the frame so I don't get rust, but I thought of just clear coat on the bare metal. I don't want it to look too homebrew. I have time to decide and can always change it if I don't like it. As far as the finish of the wood, I need to research what fir likes. Maybe a surface finish that will add some toughtness.

I started thinking about wood burning a compass rose into the top surface .
 
Last edited:
Looks great! I've been wanting to take a welding class locally but can't commit to being in town long enough for a real course (work has me away from home a lot).

Anyways, why not just cut 2" out of the center crossing tubes and then weld it back together? I think it will still be plenty strong. You could narrow it that way and build the sides the way you want.
 
Good work!

I just built a set a few months back, but I knew they'd be somewhat temporary due to future plans of a fridge and the like, so I went with cheap sand ply.

I love the idea of the compass rose in the top, very XO-ey.
 

Members online

Forum statistics

Threads
278,316
Messages
3,554,111
Members
248,016
Latest member
Advally Service

Trending content

Back
Top