California DMV Brake & Light Certificate

JamieG

New member
My 2WD 4Runner needs a California DMV Brake & Light Certificate.
All the lights need to be working and aligned.

I just tested all the lights and the two side white-and-yellow lamps in the front fender (one on each side of the car) don't light up ever. Aren't they supposed to be "driving lamps" and "turn signal" lamps too?

(The turn signals facing directly front and back work.)

It's really hard to get my hands on the bulbs of those two front side lights. One side has the battery in the way, the other the air intake to the engine.

Is there a special trick to get those lights out so I can check the bulbs?
(Where do I find out what bulbs they use?)

The only other lights not working are the license plate lights.
Where do I find what bulb they take and how to remove them?

TIA
 
Register to hide this ad
I've never heard of a California DMV brake and light certificate. Did you change it from the stock setup and want to get official approval or something?

If you have the stock setup it was DOT approved by the government when Toyota got it cleared to sell it here. You shouldn't need anything else if you have everything stock.

The turn signals in the front are in the valence below the metal bumper and are extremely easy to access with 2 screws that hold in the orange cover. The bulb should be a standard incandescent bulb sold in any autoparts store.

Only Canadian 4runners had day time running lights, the US 4runners have parking lights.

The side marker lights in the corners are easy too, you open the hood and the side marker light housing is held in with a screw, the housing also has a prong that press fits into a ring in the body work, just pull out and it will pop loose. That is also a standard bulb sold at any autoparts store. I believe its a T3.25 bulb.

Just search around the forum for bulb sizes, any auto part store should be able to look up the correct replacement bulbs. Only get incandescent bulb type, no LED if your getting approval.
 
My 2WD 4Runner needs a California DMV Brake & Light Certificate.
All the lights need to be working and aligned.

I just tested all the lights and the two side white-and-yellow lamps in the front fender (one on each side of the car) don't light up ever. Aren't they supposed to be "driving lamps" and "turn signal" lamps too?

(The turn signals facing directly front and back work.)

It's really hard to get my hands on the bulbs of those two front side lights. One side has the battery in the way, the other the air intake to the engine.

Is there a special trick to get those lights out so I can check the bulbs?
(Where do I find out what bulbs they use?)

The only other lights not working are the license plate lights.
Where do I find what bulb they take and how to remove them?

TIA
Just to check, when you say the marker lights never turn on, have you checked when you lock and unlock with the fob? I don't know of another way to make them turn on.
 
Apparently, a Brake and Lamp Certificate is needed when re-establishing cirrent registration for a previously salvaged title in CA.
It might help if you identified the year and submodel(trim) of your vehicle. My '97 has the side markers as what we used to call "parking lights" on the first detent of the headlight switch. The headlights come on at the second detent. So, yeah, they are supposed to be on if the headlights are on.
 
Thanks everyone for the help as it's a salvage vehicle (which simply means it was in an accident and the insurance company already paid the retail value of the vehicle instead of actually fixing it).

The accident was minor and had nothing to do with the lights but when a California vehicle goes into salvage, the title always has to be changed, the license plates always must be replaced, and it has to have a $60 STAR smog certificate and a $150 California DMV Brake & Light Certificate. Only after that can you pay your registration which has to be done in person because they have to check the VIN and they check that the replacement parts aren't stolen (nothing was replaced as the accident just destroyed the rear bumper).

In the California DMV Brake & Light Certification inspection, they check that all the lights work (including when you press on the brakes and when the high beam goes on the dashboard blue light has to also go on) so I wanted to test the lights first before spending the money for the check.

When I tested the lights, the two white license plate lights didn't go on with the headlights, and those two side white/yellow corner lamp lights didn't go on ever either. (There is no "key fob". There's just a key.)

I'm glad the YouTube video shows that the headlight doesn't have to come out first as I couldn't figure out how that corner light comes off. I'll try it tomorrow in the daylight and let you all know how it goes. The YouTube video says the front corner lights take a Toyota 194 bulb. Apparently it needs just a single Phillips head screw for each light.

I'm glad I watched that video because I may have to sand the headlights if they're fogged as that would make them fail the inspection also. Interestingly it seems the corner light has to come out before the headlight can come out.

I may also need to adjust the headlights as they did in this YouTube video (but I don't know the dimensions for setting the high beam - do you?)
 
Thanks everyone for the help as it's a salvage vehicle (which simply means it was in an accident and the insurance company already paid the retail value of the vehicle instead of actually fixing it).

The accident was minor and had nothing to do with the lights but when a California vehicle goes into salvage, the title always has to be changed, the license plates always must be replaced, and it has to have a $60 STAR smog certificate and a $150 California DMV Brake & Light Certificate. Only after that can you pay your registration which has to be done in person because they have to check the VIN and they check that the replacement parts aren't stolen (nothing was replaced as the accident just destroyed the rear bumper).

In the California DMV Brake & Light Certification inspection, they check that all the lights work (including when you press on the brakes and when the high beam goes on the dashboard blue light has to also go on) so I wanted to test the lights first before spending the money for the check.

When I tested the lights, the two white license plate lights didn't go on with the headlights, and those two side white/yellow corner lamp lights didn't go on ever either. (There is no "key fob". There's just a key.)

I'm glad the YouTube video shows that the headlight doesn't have to come out first as I couldn't figure out how that corner light comes off. I'll try it tomorrow in the daylight and let you all know how it goes. The YouTube video says the front corner lights take a Toyota 194 bulb. Apparently it needs just a single Phillips head screw for each light.

I'm glad I watched that video because I may have to sand the headlights if they're fogged as that would make them fail the inspection also. Interestingly it seems the corner light has to come out before the headlight can come out.

I may also need to adjust the headlights as they did in this YouTube video (but I don't know the dimensions for setting the high beam - do you?)

Someone else should weigh in on the marker lights, but I know mine blink with the taillights when I lock the car with the keyfob. Outside of that, I've never been able to figure out another way to turn them on. When I originally bought my car, I thought they didn't work because of that until I noticed that they do flash when you lock the car with the keyfob.

The marker lights don't need to be pulled to remove the headlights, but you do need to remove the grill to access some of the screws.

If you have OEM headlights, they should be glass, so you don't need to worry about sanding them, frosting only happens to plastic lenses over time due to UV exposure.

To me it sounds like you are way overthinking this. Replace the license plate lights and double check that everything works and get it inspected.
 
194 bulbs for the corner lights (the assemblies next to the headlights) and license plate. The corner lights are parking lights only, they do not blink with the signals.
 
I want to add that if you look under the Do it Yourself section in the owners manual, not only does Toyota give you every bulb type used in the vehicle, but it also shows illustrations on how to change the bulbs (even the difficult side marker lights have an illustration)
 
194 bulbs for the corner lights (the assemblies next to the headlights) and license plate. The corner lights are parking lights only, they do not blink with the signals.

Thanks. I bought four Sylvania 194 bulbs today for $3 each at O'Reilly, and the good news is the front side markers started working again.
The bad news is the rear license plate lights STILL don't work.

Worse was that I didn't take the inspection seriously until I found out they rip the whole thing apart almost.
I ended up failing my Brake & Light inspection which was $200 wasted since I didn't think the license plate light mattered.
But it does.

They also checked that the rotors and drums, pads and shoes were over the minimum, which I didn't expect, where they also failed me on the four piston front brake calipers having torn rubber boots.

I may need to start a separate thread on what goes wrong with the license plate lights since all the other exterior lights are working and that means it has to be from the rear taillamp connection to the license plate bulbs to ground somewhere.

All fuses tested good (both in the engine and under the dash but I knew that anyway because the tail lamps and the license plate lamps must be on the same fuse.
 
Last edited:
Have you looked for frayed/cracked/broken wires under the rubber boot that protects them where they jump from the body to the top of the hatch?
 
Have you looked for frayed/cracked/broken wires under the rubber boot that protects them where they jump from the body to the top of the hatch?

Good catch. Thanks.
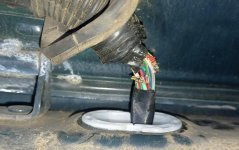
Almost half of the (20 gauge?) wires were broken!

Is it worth it to just buy the rear hatch harness loom or would you splice half the wires?
 

Attachments

  • loom.jpg
    loom.jpg
    107.7 KB · Views: 2,229
I was just parroting advice I've picked up reading other threads here. I'm afraid to look at my own wire bundle.....

It was damn good advice you gave me.

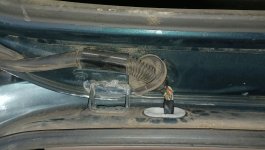
With just your hands, and without taking anything apart you can pry up the bottom black rubber boot off the white plastic escutcheon to look for yourself at your own harness.

Here is a zoomed out picture of that first step which should only take a minute and which doesn't require any tools.

Given that all the wires are thin (most are about 20 gauge maybe?) and given they've been flexing at the same spot for 27 years, I'd rather replace the entire harness if it's not too hard (or too expensive).

In the short term though, to pass the inspection, I'll certainly splice them (I need to figure out what kinds of really thin splicing connectors to buy as there isn't much room in that rubber boot).
 

Attachments

  • looms.jpg
    looms.jpg
    92.5 KB · Views: 186

Forum statistics

Threads
278,314
Messages
3,554,097
Members
248,016
Latest member
Advally Service

Trending content

Back
Top