

Crocket
Member
Hi guys,
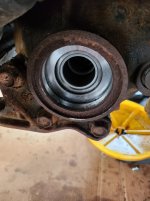
so I purchased the Yukon variant of the ECGS bushing for the front diff needle bearing replacement in my 2017 4Runner. Ran into a bunch of issues along the way as most do (free tip, don't make your own bearing extraction tool......lol), but got by. I have the new Yukon bushing installed now, and dammit I must of zoned out a bit while hammering it in as it's not flush with the carrier but recessed a bit (I was using a generic Amazon driver bearing driver....of course).
So, what to do? I was able to verify with a video inspection probe (bore scope) that the back of the bushing isn't contacting anything (although it's close, maybe 2mm (.08") gap from the spider gear). I can rotate the front prop shaft by hand and don't hear anything scary happening inside. So I'm thinking maybe I'm ok? I checked to see if I could pull it out a bit using the proper ECGS/Yukon extraction tool (yes I got one after the failed DIY attempt), and unfortunately the backing nut doesn't fit behind the bushing anymore. I could try grinding down the nut a bit so it's thinner.....but obviously this option is fraught with potential issues. I'm tempted to just put it back together as is and see what's what, but thought I'd chime in here first looking for some expert opinions.
Thanks guys.
S
P.S. Bonus question: After trying unsuccessfully for an hour or so, I ended up destroying the axle oil seal trying to drive it back in to the diff housing. It was waaaaaay too tight. I've ordered two replacement seals and am wondering the best way to approach this now? I noticed quite a bit of corrosion on the inside mating face, so I lightly wet sanded it smooth. I am also debating on using a seal that has been chilled in the freezer for a few hours hoping it might make it shrink enough where I can pop it in. Any advice on re-installing stubborn axle seals would be appreciated too. Thanks again.
so I purchased the Yukon variant of the ECGS bushing for the front diff needle bearing replacement in my 2017 4Runner. Ran into a bunch of issues along the way as most do (free tip, don't make your own bearing extraction tool......lol), but got by. I have the new Yukon bushing installed now, and dammit I must of zoned out a bit while hammering it in as it's not flush with the carrier but recessed a bit (I was using a generic Amazon driver bearing driver....of course).
So, what to do? I was able to verify with a video inspection probe (bore scope) that the back of the bushing isn't contacting anything (although it's close, maybe 2mm (.08") gap from the spider gear). I can rotate the front prop shaft by hand and don't hear anything scary happening inside. So I'm thinking maybe I'm ok? I checked to see if I could pull it out a bit using the proper ECGS/Yukon extraction tool (yes I got one after the failed DIY attempt), and unfortunately the backing nut doesn't fit behind the bushing anymore. I could try grinding down the nut a bit so it's thinner.....but obviously this option is fraught with potential issues. I'm tempted to just put it back together as is and see what's what, but thought I'd chime in here first looking for some expert opinions.
Thanks guys.
S
P.S. Bonus question: After trying unsuccessfully for an hour or so, I ended up destroying the axle oil seal trying to drive it back in to the diff housing. It was waaaaaay too tight. I've ordered two replacement seals and am wondering the best way to approach this now? I noticed quite a bit of corrosion on the inside mating face, so I lightly wet sanded it smooth. I am also debating on using a seal that has been chilled in the freezer for a few hours hoping it might make it shrink enough where I can pop it in. Any advice on re-installing stubborn axle seals would be appreciated too. Thanks again.
Attachments
Last edited:

 .
. . This time around I lightly wet sanded (with WD40) the bore that the seal press fits into (first with 150 then 400 grit sandpaper) as it was badly corroded. Next I put the seal in the freezer to hopefully make it shrink a bit and make it harder (ie. less grippy). And lastly I lubed up the interface with bearing grease. These three things, and making sure I tapped lightly and evenly, had the seal go in quite easy this time around. I was quite surprised (and relieved) to be honest.


