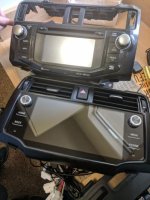
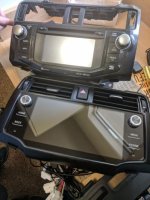
Wanted to let folks know about some installation notes before I forget. I just finished most of my installation, although I'll go back later to install the new camera that came with the kit. A few things to share while they're still fresh in my mind:
1. The best place I've found to start your install is
Android Head Unit Upgrade on 5th Gen 4Runner, Complete Dash Upgrade
The author is on the forum, I don't remember his handle (it's just some numbers I think). It's a great place to start, although I wouldn't call it comprehensive, and some of the things I encountered were different. For reference, I have a 2016 Trail with NAV but not JBL.
2. I had to remove a bracket from the side of my existing head unit to remove the wiring for the hazard light button. No big deal, just not mentioned in the other instructions. May not have been applicable for his year/model.
3. My OEM assembly had a plastic trim piece that basically creates the shelf that exists under the clock. I needed a #0 phillips screwdriver to remove this piece and transfer it to the new unit.
4. My hazard light button did not have a screw that needed to be removed prior to relocation.
5. I found it helpful to connect the wiring harness to the back of the new unit before installing the vents.
6. Next to each vent on the front side, there is a small vertically oriented trim piece with icons that show air flow/no air flow along the adjustment wheel. Mine were separate pieces that also required a #0 phillips to remove and reinstall. This would've been a lot easier if I figured it out while the vents were still loose. Removing the vents was kind of a pain, but eventually they popped loose without too much force. Most things worked themselves free without too much maneuvering. Happily, the new unit had holes in place to install these trim pieces.
7. The GPS tile has adhesive on the back. There is a good spot underneath the dash to adhere it behind the clock. The space isn't huge, but it's there.
8. There are 2 USB cables wired directly out the back of the new unit. I think this is a recent addition. I disassembled my USB jack next to the cig lighter and tried to get it to neatly mount there, but the cable is just a bit too large. It works well, but I am going to have to clean up the mounting method.
Quick first impressions are:
1. Holy cow this screen is nice and bright and big. In the attached picture you can see it
seems like it's double OEM size.
2. I've booted it up twice so far and it was way faster than I thought it would be. I have had old Android units before, and this doesn't feel like one. My guess is that if you don't put too many apps on it, performance will probably hold up pretty well for a while (obviously it won't last forever).
3. The black color is not bad at all. I was worried it would have that super cheap faded ABS look, but it doesn't.
4. Sound quality from one minute of play is also better than I expected.
5. I am the Forrest Gump of my household and I was able to do this install without breaking any tabs or even scratching a knuckle in less than 90 minutes.
6. The OEM backup camera picture is not as crisp as before. I have not tried their camera yet.
7. I am putting a Verizon Jetpack in my glove box with the hope that it will automatically connect every time I start the car without having to worry about the phone. Fingers crossed.
As you can probably tell, I had pretty low expectations. $429 is not a lot of money for something like this. So far, I'm extremely happy. I'm about to make a 9 hour drive, so we'll see if it melts. I'll follow up again after I go through more of the functions.