JMS87
New member
DIY custom iPhone, iPad, phone, or tablet dash mount. Its designed to be easy to slide your phone in and out, in the ideal location for using a navigation app, and to be barley noticeable when not in use.
Purpose was to build a discrete mount for my phone so I could use google maps for navigation, rather than the built in nav.
What about built in nav, is it any good? As any 4runner w/ navi owner will tell you, its absolute rubbish. Using it is awkward, slow, and frustrating, and lets be honest, nothing will ever beat out google maps except for a newer version of google maps.
But James, if you want a mount for iPhone why not just buy one of the hundreds of options available on Amazon for super cheap, like one of those suction cup style ones?
Because I've used a lot of them over the years and never liked any of them. My most recent one was a low profile suction cup mount that could stick on the windshield or on any flat area of the dashboard. It worked great but left much to be desired. As with any mounting device you have to stick it on, or install it or whatever when you want to use it. Then you have the choice of leaving it in place for the next time you need it, or removing it to clean up the look of your car. Personally I hate leaving the suction cup thing on my windshield or dash because it looks cheap, and it makes you look like your someone who gets lost a lot and needs navigation. But its too much of a hassle to take it down every time your done using it, just to put it back the next day.
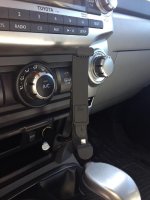
So I wanted a permanent low profile dash mount in an ideal location for viewing directions while driving. Because this one sits higher than the built in nav you can actually see it easier while driving, you barely have to take your eyes off the road to see it.
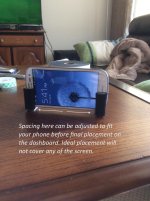
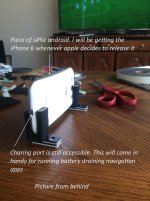
Here is a picture of the final product:

Now for the write up.
Its always nice having a dremmel but you don't need it for this project.
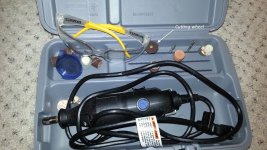
Here are some supplies you need
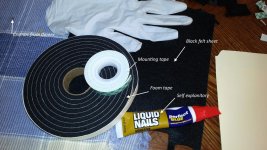
Start with 4 metal L brackets, cut 2 of them to size, and paint them black.
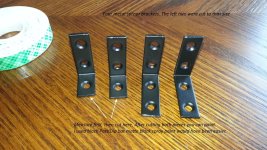
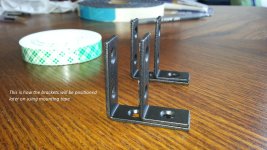
This shows how they will be positioned. Width will depend on your phone.
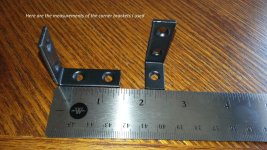
Here is another picture of the bracket measurements. These things are available at home depot and lowes.
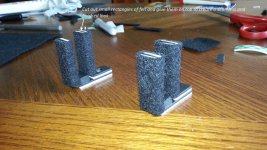
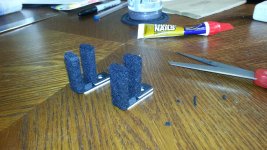
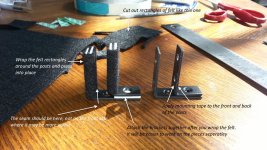
This shows how you put it all together using mounting tape and black felt. Cutting the felt to fit was the hardest part. It takes a few tries to get it right. Just keep cutting and trimming and have some patients.
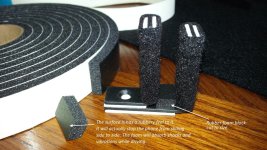
Now cut the rubber foam tape. Just a little block that will fit in between the brackets. This piece is essential because its what provides the shock absorbency while driving. It also provides grip to keep your phone from sliding left to right inside the holder.
Continued.....
Purpose was to build a discrete mount for my phone so I could use google maps for navigation, rather than the built in nav.
What about built in nav, is it any good? As any 4runner w/ navi owner will tell you, its absolute rubbish. Using it is awkward, slow, and frustrating, and lets be honest, nothing will ever beat out google maps except for a newer version of google maps.
But James, if you want a mount for iPhone why not just buy one of the hundreds of options available on Amazon for super cheap, like one of those suction cup style ones?
Because I've used a lot of them over the years and never liked any of them. My most recent one was a low profile suction cup mount that could stick on the windshield or on any flat area of the dashboard. It worked great but left much to be desired. As with any mounting device you have to stick it on, or install it or whatever when you want to use it. Then you have the choice of leaving it in place for the next time you need it, or removing it to clean up the look of your car. Personally I hate leaving the suction cup thing on my windshield or dash because it looks cheap, and it makes you look like your someone who gets lost a lot and needs navigation. But its too much of a hassle to take it down every time your done using it, just to put it back the next day.
So I wanted a permanent low profile dash mount in an ideal location for viewing directions while driving. Because this one sits higher than the built in nav you can actually see it easier while driving, you barely have to take your eyes off the road to see it.
Here is a picture of the final product:
Now for the write up.
Its always nice having a dremmel but you don't need it for this project.
Here are some supplies you need
Start with 4 metal L brackets, cut 2 of them to size, and paint them black.
This shows how they will be positioned. Width will depend on your phone.
Here is another picture of the bracket measurements. These things are available at home depot and lowes.
This shows how you put it all together using mounting tape and black felt. Cutting the felt to fit was the hardest part. It takes a few tries to get it right. Just keep cutting and trimming and have some patients.
Now cut the rubber foam tape. Just a little block that will fit in between the brackets. This piece is essential because its what provides the shock absorbency while driving. It also provides grip to keep your phone from sliding left to right inside the holder.
Continued.....
Attachments








Last edited: