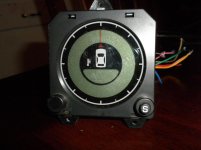
Custom dash mount gauge cluster.

djskorch

New member
So I was tired of my boost gauge just sitting in the corner of my windshield on my dash and decided that I didnt want to use a pillar mount where I would have to remove my grab handle (Im only 5'7 so getting in without it can be a little tough when I'm wheeling)

I was at a local junk yard browsing when I came across a 98 mitsubishi montero sport. On the center of the dash above the radio/ac heater controls was a 3 pod gauge cluster. This was a factory installed cluster that had a compass, outside temp, Volt and oil pressure gauges.

Upon further inspection, I decided that I would be able to modify it to fit the 4runner so I grabbed it for a whopping $10.

The following pictures show my boost and egt gauges installed in place of the volt and oil pressure, along with it mounted in the dash. It was a little nerve wracking as I had to cut a hole in the dash above the heater vents however I think it turned out pretty good. I also was able to wire up the compass and temp sensor to work. The only thing left to do is pull the cluster back out (2 screws) and replace the TINY bulbs in the compass/ temp sensor gauge as they are burnt out.

Let me know what you think.

a>

a>

a>

a>

a>

a>

a>
 
Last edited:
Register to hide this ad
Great find and score; looks good. How close was the color match? For some reason, I miss seeing my Voltage reader that I had on my Cherokee.
 
Man.... people need to stop doing cool things! my summer list of stuff to do is getting longer and longer....
 
Great find and score; looks good. How close was the color match? For some reason, I miss seeing my Voltage reader that I had on my Cherokee.

The color match is almost identical. If you click the pictures, you can see them larger and see for yourself.
 
Do you have a pic of the holes you had to make to secure it on the dash? I believe I will start trying to find the parts to make it happen.
 
Do you have a pic of the holes you had to make to secure it on the dash? I believe I will start trying to find the parts to make it happen.

I dont have any right now. I will try to get some in the next couple days when I pull it out to replace the bulbs in the compass.

There was some slight cutting involved in the back of the cluster to allow the gauges to fit however I did this in about 20 minutes with a razor blade. You will also have to remove the trim ring around each of your gauges which is simply a process of slowly going around the back edge with a small flathead as they are just a press on type.

Other than that and cutting a hole in the dash, it is pretty straight forward.

Basic steps.

1. Disassemble the gauge cluster. There are 3-4 screws that hold the faceplate on and I think 5 that hold the cluster together.

2. Cut out back of both left and right slots with a razor blade or other tool of your choice. Be careful doing this as the plastic is very soft. I broke a part of mine and had to use some bondo to fix it.

3. Remove trim rings from aftermarket gauges and slip them into the front plate (you will see what I mean when it is disassembled).

4. Put cluster back together and figure out your wiring. (If you are going to retain the compass/temp sensor, I can send you the wiring information.) There is a plug on the back that is wired into everything. I simply cut off about 12 inches of wiring along with the plug and used the factory wiring. This makes it so when I remove the cluster for any reason, I simply unplug it and pull it out. No cutting of wires etc.

5. Measure and cut hole in the dash. There is plenty of room below the dash before it would interfere with the vents so no worrys there. The only issue I ran into was that towards the front edge of the dash where cutting is required, there are some metal bands running between the plastic and dash cover. A dremel or air grinder with a cut off wheel will make quick work of these.

6. Wire everything up and screw it down. There is a small gap around the backside of the top cover that I will take a picture of for reference. If you are good with fiberglass, you could simply modify the top cover to fit flush. I have a dash mat that covers everything so I was not to worried about it.

I will try to post some pictures of everything when I can.

I didnt expect many other people to be interested in repeating so I didnt take any yet. haha :sorry:
 
How did you get the compass to work? I tried and it shows bunch of "s" running around. Got the temp to work though.
Thanks
 
How did you get the compass to work? I tried and it shows bunch of "s" running around. Got the temp to work though.
Thanks

If its the same one as mine, you should have an S on the top, bottom, left and right constantly moving I think.

Press the small S button down for a couple seconds until it is flashing (or something, I cant remember exactly). If you get to where it is showing a W or E on top with numbers in the temp sensor area, you held it to long.

After you have it flashing etc, drive around in 2 big circles. There will be a single S that will float around in both directions getting faster and faster. Drive until it stops and all N, S, E, W are showing and it is telling you that you are going in the right direction.

Sorry its kinda vague, I cant remember exactly what is shown on each step.

It if is an older one, you need to make sure that you have the separate gps box that was on the dash (small black box with an arrow on it. This one has the gps sensor built in)
 
I got the same meter

OK. thanks for the info. I tried to a point that I felt so tired. I'll try the way you said. I am trying to get this into an inclinometer/altimeter setup.
Pic is what I have.
 

Attachments

  • DSCN3629.jpg
    DSCN3629.jpg
    80.5 KB · Views: 4,086
OK. thanks for the info. I tried to a point that I felt so tired. I'll try the way you said. I am trying to get this into an inclinometer/altimeter setup.
Pic is what I have.

Yep, thats the same as mine.

You should only have to hold the button down for 2-5 seconds to see the "change" that im talking about. Then its just a matter of driving in 2 big circles while it calibrates.
 
Saw your link from the other thread, wow that turned out really well!

I am also not a fan of removing the handle since my wife can't get in without it (she's 5'1). By looking at the pics, did you shave off one side more than the other so it sits level, since the dash isn't? or did it just naturally sit that way?

I will have a boost gauge and an A/F gauge hopefully soon, so thinking of where I can put it. It's either a setup like yours or going under the CD player.
 
So I was tired of my boost gauge just sitting in the corner of my windshield on my dash and decided that I didnt want to use a pillar mount where I would have to remove my grab handle (Im only 5'7 so getting in without it can be a little tough when I'm wheeling)

I was at a local junk yard browsing when I came across a 98 mitsubishi montero sport. On the center of the dash above the radio/ac heater controls was a 3 pod gauge cluster. This was a factory installed cluster that had a compass, outside temp, Volt and oil pressure gauges.

Upon further inspection, I decided that I would be able to modify it to fit the 4runner so I grabbed it for a whopping $10.

The following pictures show my boost and egt gauges installed in place of the volt and oil pressure, along with it mounted in the dash. It was a little nerve wracking as I had to cut a hole in the dash above the heater vents however I think it turned out pretty good. I also was able to wire up the compass and temp sensor to work. The only thing left to do is pull the cluster back out (2 screws) and replace the TINY bulbs in the compass/ temp sensor gauge as they are burnt out.

Let me know what you think.

a>

a>

a>

a>

a>

a>

a>


So...I know this is super old. Any chance these photos are still around? They dont load anymore! I am trying to do a gauge pod setup and I would love to see what this setup looks like
 
So...I know this is super old. Any chance these photos are still around? They dont load anymore! I am trying to do a gauge pod setup and I would love to see what this setup looks like

I am sorry, I dont have those pics anymore and sadly, I dont have the rig anymore to take new pics. I sold it about a year ago. :( I never was able to get the compass to work right and never installed the temperature sensor so the center gauge on the cluster was pretty much useless. The EGT gauge and boost gauge were great though. Never had any issues with the cluster once I mounted it.

Good luck.
 

Members online

No members online now.

Forum statistics

Threads
278,306
Messages
3,554,045
Members
248,016
Latest member
Advally Service

Trending content

Back
Top