
Custom garage door opener button

LakeRunr

Member
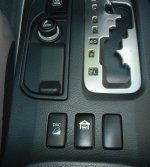
I don't have the homelink buttons in my overhead panel, so I recently installed a custom garage door opener button in my center console.

I started by purchasing a second OEM "VSC OFF" button (the one with the car glyph, with skid marks, and the word "OFF"), wiring socket, and "repair" wires (wires that already have the metal connectors on the end, which slip into the "socket"). The "VSC OFF" button is a momentary switch.

Then I masked off the car glyph (and the body of the button), and sprayed flat black model paint over the button (a few coats), to get rid of the skid marks and "OFF" letters.

Next, I removed the masking tape from the car glyph, and rubbed on some dry-transfer decals to make the garage outline glyph. I wish these had been a little narrower, and I still may redo it if I find the right decals.

Finally, I sprayed a few coats of semi-gloss ModelMasters lacquer over the whole button surface to make a good match for the OEM buttons and to lock in the dry-transfer decals.

Installation consisted of connecting two wires to tap into the ashtray illumination wires (could have also used the DAC switch's illumination wires), one wire to constant 12v power (my power socket is constant, having done the constant 12V power outlets mod), and the last wire I ran up thru the dash, up the A pillar, under the headliner, to the cavity behind the overhead (maplight) panel.

That's where I hid my garage door opener. It's a 12 volt LiftMaster unit. I soldered the internal switch contacts, and ran the last wire to the + terminal where the battery usually sits. The - terminal has a wire soldered that taps into the ground wire in the overhead (maplight) panel. I used a Deutsch DTM 2-way connector for modularity.

I used "Posi-Taps" for the tapped-in wires. They are much better and easier to use than "vampire" taps.

At night, with the parking lights on, the little car glyph is illuminated!
 

Attachments
  • DSC00557.jpg
    DSC00557.jpg
    132.2 KB · Views: 6,772
Last edited:
Register to hide this ad
Part #s:

  • 84988-35070 "switch, traction" [the "VSC OFF" button]
  • 90980-10933 "housing, connector" [the socket that plugs into the back of the "VSC OFF" button]
  • 82998-12340 "terminal, repair" [wires with female metal connectors that fit into the socket]
 
That's a great idea. One question. With the + wire, did you use a fuse holder? If so, what Amp fuse did you use for a 12v hardwire like this? Or did you run it straight to the batt?

Every time I think I'm starting to learn a little more about wiring someone comes along with something like this. Good stuff.
 
With the + wire, did you use a fuse holder? If so, what Amp fuse did you use for a 12v hardwire like this? Or did you run it straight to the batt?

I'm not exactly sure which wire you're asking about, so let me try to explain the entire path of power to the garage door opener:

Posi-tap to the hot wire for the 12v power outlet. This is the outlet right next to the gear shifter, under the center console. I ran a wire from this Posi-tap to one of the center pins of the new button. (Since the power outlet is already fused, I didn't install any other fuses.)

Then I ran another wire from the other center pin of the new button, down along the wiring harness that's already in the center console, behind the dash, then left over to the A pillar, up the A pillar, under the headliner, to one pin of a 2-contact Deutsch DTM connector which lives in the cavity right above the overhead (maplight) panel. (The other pin of the DTM connector runs to a wire that taps into the ground wire for the maplight assembly.)

A matching, opposite gender Deutsch DTM connector is connected to the two wires going to the garage door opener (which are soldered into the opener's circuit board).

I know, I should've taken some pictures. If this explanation doesn't make sense, let me know and I'll open it back up again and snap a few pictures.
 
I'm not exactly sure which wire you're asking about, so let me try to explain the entire path of power to the garage door opener:

Posi-tap to the hot wire for the 12v power outlet. This is the outlet right next to the gear shifter, under the center console. I ran a wire from this Posi-tap to one of the center pins of the new button. (Since the power outlet is already fused, I didn't install any other fuses.)

Then I ran another wire from the other center pin of the new button, down along the wiring harness that's already in the center console, behind the dash, then left over to the A pillar, up the A pillar, under the headliner, to one pin of a 2-contact Deutsch DTM connector which lives in the cavity right above the overhead (maplight) panel. (The other pin of the DTM connector runs to a wire that taps into the ground wire for the maplight assembly.)

A matching, opposite gender Deutsch DTM connector is connected to the two wires going to the garage door opener (which are soldered into the opener's circuit board).

I know, I should've taken some pictures. If this explanation doesn't make sense, let me know and I'll open it back up again and snap a few pictures.


No, that's exactly what I wanted to know. My phrasing was off and I should have just asked if you needed to add any additional fuses. Good stuff. Thanks LakeRunr.
 
I am trying to tap power from the center console without having to remove the whole thing. It appears the power port/storage area to the left of the shifter, like pictured (I have a 2004-no lighter) pops out.

Anyone have an idea how to pop this out? I have already done the mod to make the power port live all the time but I want to avoid having to remove the console just to tap a wire for a flashlight charger.
 
I am trying to tap power from the center console without having to remove the whole thing. It appears the power port/storage area to the left of the shifter, like pictured (I have a 2004-no lighter) pops out.

Anyone have an idea how to pop this out?

I think the "the power port/storage area" is screwed into the bottom of the center console trim. When you say "without having to remove the whole thing", are you talking about the trim piece that fits around the shifter and contains the DAC button (and its blank neighbors)? If so, that's what I'm calling the center console trim...it pops straight up with 3 pressure clips. Then the wires are right there.
 
Great mod. I did something similar to my S2000 where I wired in the garage opener to my headlights. Everytime I flashed my high beams it would open the garage. Not sure which way I'm going to go on the 4Runner.
 
This is really cool! I'm pretty anal retentive and would be looking for thinner decals too, but overall this is an awesome mod!!

J
 
i know this is an old thread, but any chance of pictures of the switch soldered and how you ran the wires? thanks.

Sorry, I didn't take any pictures of the soldering of the garage door opener switch contacts. When you open up the Liftmaster unit (I'm sure they're all like this), you can see that the buttons just push down on these little board-mount buttons. Those board-mount buttons always just connect two of their four mounting pins when pushed, so you just get an ohm meter to see which two pins to use. In this case, I soldered those two pins together (one the back side of the circuit board), as if the button was always pushed.

I soldered in the wire that comes from the new center-console button to where the positive terminal of the Liftmaster battery touches, and soldered another wire from ground to where the negative terminal of the Liftmaster battery goes.
 
^^ Sorry, I don't recall. I think I remember there being 4 pins: illumination, ground, and two contact pins. Since it's the same as the VSC button, the pinouts are the same, if you can find a spec for that button in the wiring diagrams. Or you could use an ohm meter to find the pins.
 

Members online

Forum statistics

Threads
278,310
Messages
3,554,079
Members
248,016
Latest member
Advally Service

Trending content

Back
Top