CV Replacement Tutorial with New Seals (120+ Pictures)

Best write up I've seen on here! Thank you for taking the extra time for photos and small details, it helps a lot. Gonna be doing this soon.

Thanks! I hope its helpful to you, feel free to reach out with any questions and I'd be happy to help

Big thanks for the write up. If this had been here when I did mine, it would have gone a lot smoother.

For those coming in later, you absolutely will need some kind of tool to get the old one out. You've got to have a way to get hammer blows in the right direction. I've done it with a screw driver, and I've done it with a cold chisel myself. A friend of mine suggested doing a free rental of pickle forks from autozone or similar. You can put the U behind the outer bell housing on the CV and hammer away. No idea how well it works, but seems like a sound idea for those on a budget.

I did ultimate bravery mode on the new diff seal install, and used the CV itself to press in the new seal. Do not do that. It worked, but it was a crapshoot. Get the 4" bit of pipe or whatever and do it right. As a bonus, it will also work for doing the crankshaft seal when you do the timing belt.

As always, these tutorials are amazing. I wish I could remember to take this many pictures when I do it lol.

Glad you liked the writeup :thumb:

Getting it out seems to be the hardest part. I've seen multiple people here and on FB have a dog of a time getting them out. Mine came out fairly easy, which surprised me. I guess its just luck of the draw

Diff seal was definitely tricky, as I'm sure you saw it took me a few tries lol. I have seen people use the axle to seat the diff seal with success. The knuckle one went in smoothly, funny that the dust cap has so many uses lol

Thanks haha, I have to try to remember to get pics of everything too. I have fun making these and am glad they are helpful to others out there in the 4runner community!
 
Genius use of the drain cover as a drift to set the seal. There was an Ace hardware down the street from the dealer and I'm all dialed in.

Thanks!
 
Great write up and awesome pictures. I just finished doing both CVs and replacing all the seals. I got everything put back together and now I have what I could call a "wobble" when I am driving at 50MPH or faster. I would describe the wobble as feeling similar to a wheel not being bolted up correctly or something. I've retorqued both my wheels and still feeling the wobble.

The CV axles were rebuilds from McGeorge Toyota. Here are my thoughts as to what it could be...
- It's possible that one of the "rebuilt" CVs is bad.
- Perhaps putting new CVs in and not replacing bearings has exposed the fact that I have a bad bearing...
-Maybe I did a shabby ass job of torqing the CVs to the wheel hub.

I will probably break loose and retorque the axles again. Other than that, I am at a loss.

Any thoughts?? Thanks in advance.
 
[MENTION=429038]y=mx+b[/MENTION], great write-up as usual. I’ve done the left cv boots and outer knuckle seal within the last few years. Cv boot is split yet again. I’m getting ready to do the 5th gen boots, inner and outer seals on both sides. The seals aren’t leaking but after dealing with the dry rotted outer last time I might as well. I should probably do new axles but that’s not gonna happen right now as my Scion needed a clutch and I’m remodeling the kitchen for my wife. I am however debating doing the ECGS bushing because it seems like I have some excessive deflection of the inner shaft in the clamshell. Any thoughts on that? Any idea through your research on how much play is acceptable?
 
[MENTION=429038]y=mx+b[/MENTION], great write-up as usual. I’ve done the left cv boots and outer knuckle seal within the last few years. Cv boot is split yet again. I’m getting ready to do the 5th gen boots, inner and outer seals on both sides. The seals aren’t leaking but after dealing with the dry rotted outer last time I might as well. I should probably do new axles but that’s not gonna happen right now as my Scion needed a clutch and I’m remodeling the kitchen for my wife. I am however debating doing the ECGS bushing because it seems like I have some excessive deflection of the inner shaft in the clamshell. Any thoughts on that? Any idea through your research on how much play is acceptable?

Thanks! As long as the axles aren't making clicking noises from all the play, they're probably fine. I had one that I let go with a torn inner for a while before swapping to new axle, and it had obviuos large metal shavings in the grease of the inner cup. As long as you're not there, the axles themselves are probably a-okay

I haven't looked much into the ECGS bushing for myself, since mine doesn't seem to have much play. I do have friends with tacomas, and the late 2nd and 3rd gen tacos seem to have this issue more frequently. From what I hear, its pretty simple to do once you know what you're doing. There is a thread on TacomaWorld called "Whoring out ECGS Bushing Tool" where guys are sharing the tool so you don't have to buy one. The replacement of those is also well documented over there IIRC, should be the same process as any 2nd or 3rd gen tacoma
 
I’m baaaack! Lol.

Soooo….I commented on this post three years ago and now I’m back with a boot blown on both the driver and passenger sides on a stock, no lift 2005 Sport.

I installed two Rock Auto CARDONE axles with the “upgraded” heavy duty thermoplastic boots. Just wanted to let everyone know that they lasted about two and half years as it’s three years now and they have been blown at least 6 months. I will say that at the time of installation I did note that the boots appeared to be impinging on themselves and they probably could have benefited from the “Boot Stretch Mod”.

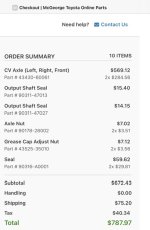
Don’t know if it would have helped and will never know because I just whistled up two brand new OEMs with OEM seals all around. I prolly would have went with OEM Reman’s but they were on national backorder. No matter, these should last the life of the truck so I’m thinking money well spent not to have to fool with them again. Here’s a pic of the damage$$ with part numbers.
 

Attachments

  • IMG_6071.jpeg
    IMG_6071.jpeg
    48.8 KB · Views: 1,173
Question - CV Dust Shield Gap

Hey [MENTION=429038]y=mx+b[/MENTION]. Excellent writeup!!

I followed this over the weekend to replace my driver side CV. I have a question though.

I completed the job amazingly without issue and after driving around a little bit I went under to verify nothing was leaking (so far no leaks).

When verifying no leaks, I noticed that the CV dust shield appears to be about 1/16" pulled out of the diff (see pic).

Initially when I installed it, after using the telescoping joint as a slide hammer as recommended, the dust seal appeared to be flush with the diff as I believe it should be. However I am wondering if maybe it wasn't and I didn't do a good job verifying. I thought when I checked that it looked even a hair past flush and that was the confirmation I needed to move on to the next step.

If it is not leaking, is this something I should be concerned with and look to remedy? Wondering it I can just use my long pry bar and hammer it back into being flush without having to disassemble everything. I replaced the OEM axle with a GSP axle from Rock Auto. Plan on rebuilding the OEM to have as a spare.

11/5 Update: I finally was able to get back under the car today, and the yoke barrel itself seems to be able to slide back and forth approximately 1/8" and I moved it back so the dust shield is now flush into the differential housing. I compared against the other side which was an OEM axle and there was also a little bit of movement on the yoke barrel as well. Will continue to monitor to ensure no leaking but otherwise the case is closed for now. Thanks again!

<blockquote class="imgur-embed-pub" lang="en" data-id="zQkKVlJ"><a href="https://imgur.com/zQkKVlJ">View post on imgur.com</a></blockquote><script async src="//s.imgur.com/min/embed.js" charset="utf-8"></script>
 
Last edited:
Great job bro! I will definitely look back at this for my next cv job. I've done it a few times before but having a write up like this on deck is always clutch to refresh the brain.
 
Updated axle nut solution - 90177A0023

This was a great write-up - I had book marked it shortly after getting my 4Runner a few years ago, and finally made use of it a couple weeks ago.

I did run into a small issue as I was finishing up the installs and have now spent entirely too much time trying to learn the answer over several weeks.

The new CV axles - 43430-60062 (replacing the 43430-60061) no longer has the cotter pin hole in the end of the axle. Instead it has a wedge cut out of the end of the axle. As such, it needs a different (single use) axle flange nut - 90177-A0023 which replaces the original 90179-28007 Nut, the 43525-35010 Front Wheel Adjusting Lock Caps, and the 95381-04045 Cotter pins (by punching the rim of the new nut with a punch into the cut-out wedge of the axle).

I'll see if I can link a few pictures here showing the issue I ran into.
<blockquote class="imgur-embed-pub" lang="en" data-id="a/NiMrTmz" ><a href="//imgur.com/a/NiMrTmz">4Runner CV Axles updated</a></blockquote><script async src="//s.imgur.com/min/embed.js" charset="utf-8"></script>

I found < Flange Nut #90178-28002 | Autoparts.toyota.com > which shows the two different methods of securing the axle. And once I started searching for the new axle part number - 43430-60062 - (per ToyotaPartsNow.com) along with "Flange Nut" I was then able to find < Just a moment... > which gave me the info I needed right up front.

Hopefully this helps someone else when they go to tackle this job. I've since also heard the newer generation 4Runner CV Axles fit (and are a lower price) the 4th Gens - would love it if someone could confirm or deny those rumors.

For those that are curious, I went over 10k miles knowing the driver's side inner boot had split (and was surprised how much grease was still in it). However things were getting a little noisy which is what prompted me to finally get the parts to replace the CV axles. I also discovered while removing the old ones that the steering stabilizer links (which I had previously decided I would replace at the same time) were in very bad shape.
 
This was a great write-up - I had book marked it shortly after getting my 4Runner a few years ago, and finally made use of it a couple weeks ago.

I did run into a small issue as I was finishing up the installs and have now spent entirely too much time trying to learn the answer over several weeks.

The new CV axles - 43430-60062 (replacing the 43430-60061) no longer has the cotter pin hole in the end of the axle. Instead it has a wedge cut out of the end of the axle. As such, it needs a different (single use) axle flange nut - 90177-A0023 which replaces the original 90179-28007 Nut, the 43525-35010 Front Wheel Adjusting Lock Caps, and the 95381-04045 Cotter pins (by punching the rim of the new nut with a punch into the cut-out wedge of the axle).

I'll see if I can link a few pictures here showing the issue I ran into.
<blockquote class="imgur-embed-pub" lang="en" data-id="a/NiMrTmz" ><a href="//imgur.com/a/NiMrTmz">4Runner CV Axles updated</a></blockquote><script async src="//s.imgur.com/min/embed.js" charset="utf-8"></script>

I found < Flange Nut #90178-28002 | Autoparts.toyota.com > which shows the two different methods of securing the axle. And once I started searching for the new axle part number - 43430-60062 - (per ToyotaPartsNow.com) along with "Flange Nut" I was then able to find < Just a moment... > which gave me the info I needed right up front.

Hopefully this helps someone else when they go to tackle this job. I've since also heard the newer generation 4Runner CV Axles fit (and are a lower price) the 4th Gens - would love it if someone could confirm or deny those rumors.

For those that are curious, I went over 10k miles knowing the driver's side inner boot had split (and was surprised how much grease was still in it). However things were getting a little noisy which is what prompted me to finally get the parts to replace the CV axles. I also discovered while removing the old ones that the steering stabilizer links (which I had previously decided I would replace at the same time) were in very bad shape.

Thank you for this!! Just put a newer 5th gen axle on my 2005 v8 4th gen and I needed to go buy one of these axle nuts mid job. Luckily my local Toyota dealer had one in stock.
 
I just wanted to thank the OP for this thread. It seriously saved my butt working on my 08 sr5 today. Did cv axles and all the seals as well as a bushing conversion from the needle bearing.
 

Members online

No members online now.

Forum statistics

Threads
278,310
Messages
3,554,080
Members
248,016
Latest member
Advally Service

Trending content

Back
Top