
You are using an out of date browser. It may not display this or other websites correctly.
You should upgrade or use an alternative browser.
You should upgrade or use an alternative browser.
Cytronus 2016 4Runner Trail Premium Build Thread (Pic Heavy)
- Thread starter Cytronus
- Start date

Cytronus
New member
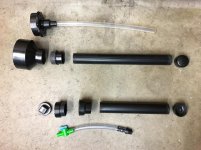
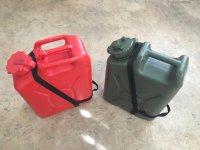
Home made water and fuel spout cases for jerry cans
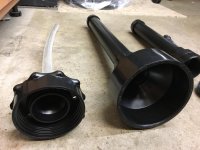
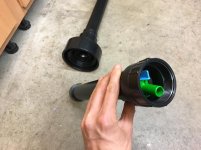
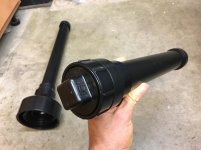
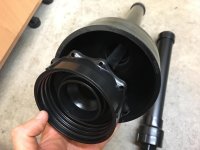
Using black ABS 1.5" tube and other plumbing components from Home Depot, I made water and fuel spout cases which will mount beneath each jerry can tray. These were inspired by JagMTE.
This will keep the spouts clean from off road dust, accessible quickly from the rear when needed and of course will keep the smell of gasoline out of the vehicle after fuel spout usage. I haven't mounted them yet but planning to use rubber lined P-Clamps that will attach to the screws & nuts already used to mount the trays.
Using black ABS 1.5" tube and other plumbing components from Home Depot, I made water and fuel spout cases which will mount beneath each jerry can tray. These were inspired by JagMTE.
This will keep the spouts clean from off road dust, accessible quickly from the rear when needed and of course will keep the smell of gasoline out of the vehicle after fuel spout usage. I haven't mounted them yet but planning to use rubber lined P-Clamps that will attach to the screws & nuts already used to mount the trays.
Attachments
Cytronus
New member
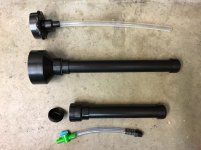
Spout cases completed!
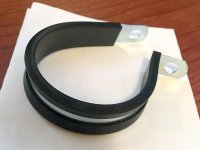
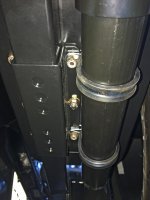
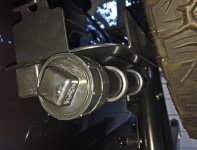
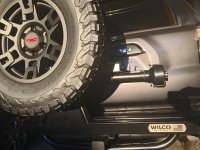
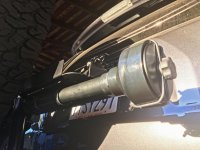
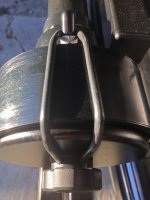
These are homemade ABS piping spout cases completed and mounted to the Wilco tire hitchgate, one under each jerry can. I wanted to to devise the cheapest, simplest way to mount the spout cases to the Wilco hitchgate and came up with these 47mm P-clamps I picked up on eBay for $10 for qty of 6 that fit the pipe circumference snugly with the rubber sleeves preventing any rattling. I only used 4 P clamps, 2 for each jerry can tray, mounted using the existing bolts and nuts that mount the tray to the hitchgate.
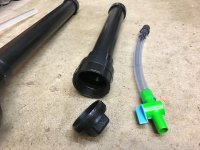
Also a bit tricky was creating a viable lid for the larger fuel spout case. I couldn't find anything readily available and cheap that would cover over the top's outside diameter but did find a standard 4" PVC cap that fit the inside diameter of the case opening well. I painted it satin black with a plastic-bonding paint, added a knob which I dremeled out of its base 2 channels to allow a rubber O ring to mount to it, having each end of the O ring wrap over 2 small bolts on the case exterior to the hold the lid on tight. I'll be adding magnets to the lid and inner spout case as a backup incase the O ring ever fails.
The cases will keep the spouts inside clean from off road dust and always ready for action on the road. I know the photos aren't great but will take some good photos of it fully loaded up once I finalize the details of the hitchgate.
These are homemade ABS piping spout cases completed and mounted to the Wilco tire hitchgate, one under each jerry can. I wanted to to devise the cheapest, simplest way to mount the spout cases to the Wilco hitchgate and came up with these 47mm P-clamps I picked up on eBay for $10 for qty of 6 that fit the pipe circumference snugly with the rubber sleeves preventing any rattling. I only used 4 P clamps, 2 for each jerry can tray, mounted using the existing bolts and nuts that mount the tray to the hitchgate.
Also a bit tricky was creating a viable lid for the larger fuel spout case. I couldn't find anything readily available and cheap that would cover over the top's outside diameter but did find a standard 4" PVC cap that fit the inside diameter of the case opening well. I painted it satin black with a plastic-bonding paint, added a knob which I dremeled out of its base 2 channels to allow a rubber O ring to mount to it, having each end of the O ring wrap over 2 small bolts on the case exterior to the hold the lid on tight. I'll be adding magnets to the lid and inner spout case as a backup incase the O ring ever fails.
The cases will keep the spouts inside clean from off road dust and always ready for action on the road. I know the photos aren't great but will take some good photos of it fully loaded up once I finalize the details of the hitchgate.
Attachments
Cytronus
New member
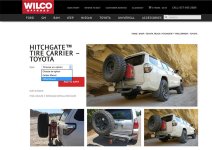
I ordered the "Hitchgate Tire Carrier Toyota" with offset tire so I would have visibility out the back window when looking over my right shoulder. Screen shot of their website below. I also added 2 Jerry can trays with the square tube bar, the Hi-Lift jack mount plate and the license plate relocation kit. I ordered the jerry can trays for metal jerry cans. There's a tray kit for plastic cans which I believe has a different dimension tray. The jerry kit for metal cans works best for the NATO compliant plastic jerry cans, which is what I got. I used Scepter brand plastic jerry cans with the NATO spec.
Call Erik over there and ask for help if needed. He's great. Note, their installation instructions aren't great so let me know if you have any trouble assembling or call Erik.
Call Erik over there and ask for help if needed. He's great. Note, their installation instructions aren't great so let me know if you have any trouble assembling or call Erik.
Maybe I missed it in the beginning of your post but which model wilco gate is this? I'm considering one too but trying to decide which model to get.
Sent from my iPhone using Tapatalk
Attachments
Last edited:
Cytronus
New member
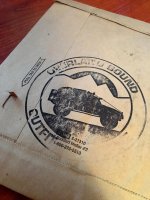
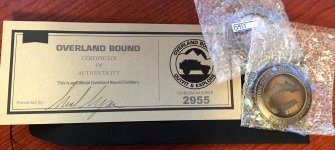
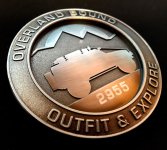
Joined the "Overland Bound" Community Today - Emblem # 2955
In its truest, most basic sense, overlanding is about vehicle-dependent travel, adventure, exploration and lighting the spiritual fire within us by connecting with nature. What vehicle we drive shouldn't prevent us from forming friendships and bonds with those who share our same love for outdoor adventure.
Overland Bound - Outfit and Explore!
I've been following Michael at Overland Bound for about a year now and find myself inspired by what he's done to bring together the often cliquey overlanding, community by conquering the typical walls built up between Toyota people, Jeep folks, Ford, etc.
Michael and his family are here in the S.F. Bay Area of California but the Overland Bound community and membership extends to thousands of like-minded folks around the world. It's a way of connecting to people with any vehicle, common interests, educating others, learning, getting ideas, making new friends and participating in group trips.
I've been intending on joining for some time so I finally pulled the trigger on signing up (www.overlandbound.com, emblem #2955, forum name FirstExile) and the YouTube channel with plenty of great vids. If you haven't heard of this community and are into overlanding at any level, off-roading or camping, I highly recommend this community.
Now to figure out where to mount the emblems...can't imagine them on my fenders...hmmmm.
In its truest, most basic sense, overlanding is about vehicle-dependent travel, adventure, exploration and lighting the spiritual fire within us by connecting with nature. What vehicle we drive shouldn't prevent us from forming friendships and bonds with those who share our same love for outdoor adventure.
Overland Bound - Outfit and Explore!
I've been following Michael at Overland Bound for about a year now and find myself inspired by what he's done to bring together the often cliquey overlanding, community by conquering the typical walls built up between Toyota people, Jeep folks, Ford, etc.
Michael and his family are here in the S.F. Bay Area of California but the Overland Bound community and membership extends to thousands of like-minded folks around the world. It's a way of connecting to people with any vehicle, common interests, educating others, learning, getting ideas, making new friends and participating in group trips.
I've been intending on joining for some time so I finally pulled the trigger on signing up (www.overlandbound.com, emblem #2955, forum name FirstExile) and the YouTube channel with plenty of great vids. If you haven't heard of this community and are into overlanding at any level, off-roading or camping, I highly recommend this community.
Now to figure out where to mount the emblems...can't imagine them on my fenders...hmmmm.
Attachments
Cytronus
New member
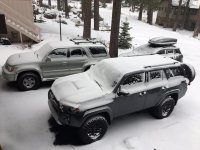
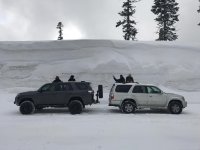
3rd & 5th Gen 4Runners in the Tahoe snow & a little 4WD problem
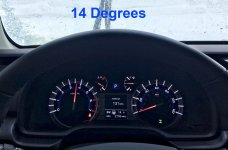
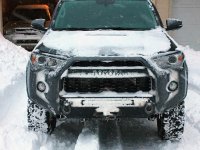
I finally had a chance to get both 4Runners up to Tahoe for a little ski vacation. The 5th Gen with 33" BFG KO2s and the lift absolutely dominate snowy and icey roads. The front and rear defrost, wipers and sprayers handled 20 degree temps and snowfall well.
One issue did arise which I've yet to repeat or figure out. While in 4 Low to climb an icy hill, upon reaching the top, stopping the car, holding my foot on break, putting the A/T shift lever in neutral and then attempting to shift the 4WD lever into 4 High, the lever would not go into position as it should and would grind. I've put the car in and out of 4H/4L many times before without a problem but all of a sudden, in the cold, it was a problem. The only thing I think it could be was the cold weather making it somehow get stuck.
To get into 4H, I kept the A/T lever in neutral, turned the engine off, shifted the 4WD lever into 4H, then turned the car on and get on the highway without an issue. Still though, this was concerning for a brand new vehicle with less 2500 miles on it. My trusty '99 Limited has never had a problem. I'll aim to repeat this issue next time I head up to the snow to confirm it has to do with the temp.
I finally had a chance to get both 4Runners up to Tahoe for a little ski vacation. The 5th Gen with 33" BFG KO2s and the lift absolutely dominate snowy and icey roads. The front and rear defrost, wipers and sprayers handled 20 degree temps and snowfall well.
One issue did arise which I've yet to repeat or figure out. While in 4 Low to climb an icy hill, upon reaching the top, stopping the car, holding my foot on break, putting the A/T shift lever in neutral and then attempting to shift the 4WD lever into 4 High, the lever would not go into position as it should and would grind. I've put the car in and out of 4H/4L many times before without a problem but all of a sudden, in the cold, it was a problem. The only thing I think it could be was the cold weather making it somehow get stuck.
To get into 4H, I kept the A/T lever in neutral, turned the engine off, shifted the 4WD lever into 4H, then turned the car on and get on the highway without an issue. Still though, this was concerning for a brand new vehicle with less 2500 miles on it. My trusty '99 Limited has never had a problem. I'll aim to repeat this issue next time I head up to the snow to confirm it has to do with the temp.
Attachments

Seattle206
Senior Member
Awesome photography and nice build too. Looks like you're having fun while you're at it.
Cytronus
New member
2016 4Runner Dual Battery Planning
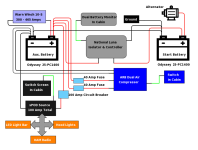
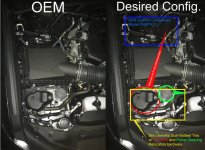
I'm starting in on the research for deploying a dual battery set up. Here's what I have so far:
Design considerations:
-Aux battery: Odyssey 25-PC1400 (850 CCA, 65 Hrs at 20 Hr Capacity)
-Aux battery tray: Shrockworks with air pump relocator
-National Luna Isolator and battery controller
-Support all non-factory accessories via an auxiliary battery
-Ability to jump start from the auxiliary battery
-Support Warn Xeon Platinum 10-S Winch (311 to 465 Amps)
-Support ARB Dual Air Compressor (CKMTA12) with room for bracket
-Power sPOD Source SE with 8 channels for smaller sub-30 Amp accessories
-Support future accessories: Inverter, camper trailer anderson plug, upgraded sound system
Per National Luna, no fuses are to be installed between the isolator and batteries, to ensure the winch may consume high non-continuous amperage draws from the system. Per Warn, no fuse or circuit breaker is installed between the winch and battery.
I'm starting in on the research for deploying a dual battery set up. Here's what I have so far:
Design considerations:
-Aux battery: Odyssey 25-PC1400 (850 CCA, 65 Hrs at 20 Hr Capacity)
-Aux battery tray: Shrockworks with air pump relocator
-National Luna Isolator and battery controller
-Support all non-factory accessories via an auxiliary battery
-Ability to jump start from the auxiliary battery
-Support Warn Xeon Platinum 10-S Winch (311 to 465 Amps)
-Support ARB Dual Air Compressor (CKMTA12) with room for bracket
-Power sPOD Source SE with 8 channels for smaller sub-30 Amp accessories
-Support future accessories: Inverter, camper trailer anderson plug, upgraded sound system
Per National Luna, no fuses are to be installed between the isolator and batteries, to ensure the winch may consume high non-continuous amperage draws from the system. Per Warn, no fuse or circuit breaker is installed between the winch and battery.
Attachments
Cytronus
New member
Trim I want? Check.
Rims I want? Check.
Tires I want? Check.
Lift I want? Check.
It's nice seeing the 4R I want to build get built months before I build it!
Thank you and glad you approve of the direction so far. Happy to help out a fellow bay area 5th Genner! What other plans do you have? PM if you want to get together sometime.
Thank you and glad you approve of the direction so far. Happy to help out a fellow bay area 5th Genner! What other plans do you have? PM if you want to get together sometime.
I'd actually love to see your truck in person. I'm in Santa Clara--will be in Tahoe this weekend but if you have time during the week to grab coffee that would be great.
Other things I'd like to add (once I get my 4R): roof rack, ladder, and front/rear aluminum bumpers + winch.
I did some research on aluminum vs. steel off-road bumpers available on the market and they're actually pretty close in terms of yield strength. I thought there would be a much larger difference.
For Hefty Fabworks off-road bumpers as an example:
Steel (A36): 250 MPa, 20% elongation at break
Aluminum (5052 H34): 235-285 MPa, 3-8% elongation at break
Depending on where the aluminum comes in, it's either slightly higher or slightly lower than steel in terms of yield strength. Steel is (obviously) more ductile and will absorb more energy before it breaks. However, it seems like unless you're doing some hardcore off-roading the aluminum (in the case of Hefty) makes more sense if you factor in weight.
Last edited:
Cytronus
New member
Updated dual battery wiring diagram after input from Paul Mayes at Equipt
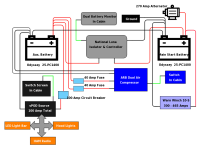
I called up Paul Mayes at Equipt Expedition Outfitters, a legend & knowledge king and all-around great guy in the off road community. He suggested to wire up the winch directly to the main starter battery, with everything else I'm planning to the Aux battery. Josh at sPOD Source suggested the same. NO FUSES between the winch and battery and no fuses necessary between the batteries and isolator.
Why winch from the main battery? The isolator prioritizes alternator charging to the starter battery first. While winching, the starter battery will drain quickly but will simultaneously be charged by the alternator, so essentially, the winch will run off the alternator. If the winch is connected to the Aux battery, it will drain quickly and if it drops below a certain point, will connect to the starter battery via the isolator for more power, thus routing current through the main battery, through the isolator, through the Aux battery, to the winch. If winching amperage draws are too high, it puts risk of fault and failure on the isolator. The National Luna isolator, and most others, are about 80-85 amps with peak load of about 400 amps. With a winch working hard, it can exceed 400 amps, although this is rare.
Here's the new diagram. I'll begin installing items over the next few weeks, then will estimate wiring lengths, will then calculate the wiring gauge needed based on those lengths and individual accessory max amperage draws.
I called up Paul Mayes at Equipt Expedition Outfitters, a legend & knowledge king and all-around great guy in the off road community. He suggested to wire up the winch directly to the main starter battery, with everything else I'm planning to the Aux battery. Josh at sPOD Source suggested the same. NO FUSES between the winch and battery and no fuses necessary between the batteries and isolator.
Why winch from the main battery? The isolator prioritizes alternator charging to the starter battery first. While winching, the starter battery will drain quickly but will simultaneously be charged by the alternator, so essentially, the winch will run off the alternator. If the winch is connected to the Aux battery, it will drain quickly and if it drops below a certain point, will connect to the starter battery via the isolator for more power, thus routing current through the main battery, through the isolator, through the Aux battery, to the winch. If winching amperage draws are too high, it puts risk of fault and failure on the isolator. The National Luna isolator, and most others, are about 80-85 amps with peak load of about 400 amps. With a winch working hard, it can exceed 400 amps, although this is rare.
Here's the new diagram. I'll begin installing items over the next few weeks, then will estimate wiring lengths, will then calculate the wiring gauge needed based on those lengths and individual accessory max amperage draws.
Attachments
Cytronus
New member
TRD Pro upper grille mesh and black cross bar installed
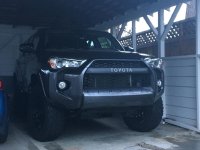
I knew it was only a matter of time before I added this. I spent some time attempting to vinyl wrap the stock crossbar but it ended up being fairly difficult in the corners. This thing goes on very easily and looks great but boy it's pricey.
I knew it was only a matter of time before I added this. I spent some time attempting to vinyl wrap the stock crossbar but it ended up being fairly difficult in the corners. This thing goes on very easily and looks great but boy it's pricey.
Attachments

The Gobbler
New member
As stated before, fantastic pictures!!! If you're not pro, you should be.
Cytronus
New member
100% chrome free! Nox Lux Painted Emblem Blackout Kit - Magnetic Gray (1G3)
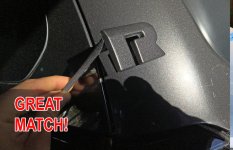
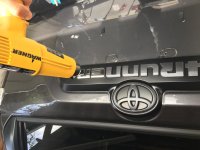
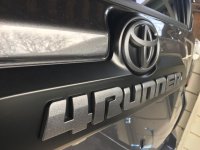
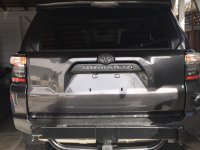
I finally got around to painting the Nox Lux emblem blackout kit for my 2016 Trail Premium. I only did the rear, since I have the TRD front grille which has dark silver painted "TOYOTA" lettering already. I would've painted the front grille Toyota "T" emblem if I had kept my original grille.
I decided the black-on-black wouldn't provide enough contrast of the lettering against the black Trail trim in the rear so I painted the black plastic letters with automotive touch up paint using the factory color for magnetic gray, 1G3, procured from what I think is the best automotive touch paint website out there, automotivetouchup.com.
If I were to do this over again, I would've used a plastic parts adhesion promoter before priming to prevent chipping and ensure paint bond longevity.
First was a test spray on the "SR5" part with a single coat of paint and 2 coats matte clear coat. The matte clear looked too dull when held up near the car. I wanted the look to be conceivably "factory" so I decided some gloss clear would go on last. From the test spray, just setting the lettering down on a flat surface did not permit adequate coverage on the sides of the letters and caused the lettering to stick the flat surface.
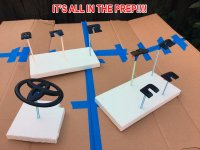
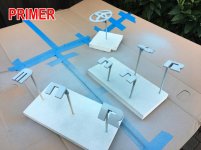
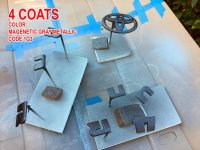
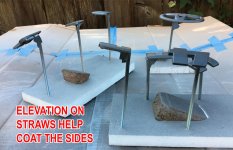
As they say, it's "all in the prep" so I used a styrofoam base with straws elevating the lettering so they could be spun around and sprayed from the sides and any angle easily. This worked very well and highly recommend this method if you paint your emblems. The steps performed were: prep, 3 light coats primer, 4 coats paint, 2 matte clear and 2 gloss clear for more of a satinish finish. I even like the texture, sort of similar to the emblem texture on the Limited.
Overall, I'm really pleased with the look. You can clearly read the lettering from afar and really makes the car look sinister yet, something that could've come from the factory. Now she's 100% chrome free!
I finally got around to painting the Nox Lux emblem blackout kit for my 2016 Trail Premium. I only did the rear, since I have the TRD front grille which has dark silver painted "TOYOTA" lettering already. I would've painted the front grille Toyota "T" emblem if I had kept my original grille.
I decided the black-on-black wouldn't provide enough contrast of the lettering against the black Trail trim in the rear so I painted the black plastic letters with automotive touch up paint using the factory color for magnetic gray, 1G3, procured from what I think is the best automotive touch paint website out there, automotivetouchup.com.
If I were to do this over again, I would've used a plastic parts adhesion promoter before priming to prevent chipping and ensure paint bond longevity.
First was a test spray on the "SR5" part with a single coat of paint and 2 coats matte clear coat. The matte clear looked too dull when held up near the car. I wanted the look to be conceivably "factory" so I decided some gloss clear would go on last. From the test spray, just setting the lettering down on a flat surface did not permit adequate coverage on the sides of the letters and caused the lettering to stick the flat surface.
As they say, it's "all in the prep" so I used a styrofoam base with straws elevating the lettering so they could be spun around and sprayed from the sides and any angle easily. This worked very well and highly recommend this method if you paint your emblems. The steps performed were: prep, 3 light coats primer, 4 coats paint, 2 matte clear and 2 gloss clear for more of a satinish finish. I even like the texture, sort of similar to the emblem texture on the Limited.
Overall, I'm really pleased with the look. You can clearly read the lettering from afar and really makes the car look sinister yet, something that could've come from the factory. Now she's 100% chrome free!
Attachments
Cytronus
New member
New mods: SSO front bumper, winch, LED, dual batt tray, ARB bracket
Lots of mods completed over the past 2 weeks:
...and lots more coming soon:
Recent trip to Tahoe and the ritual of donuts, drifts and reverse 180s in Sierra-at-Tahoe's epic E Lot!
Lots of mods completed over the past 2 weeks:
- SSO Slimline Hybrid front bumper with custom powder coat
- Warn Zeon Platinum 10-S with Factor 55 1.5" fairlead and flatlink
- Rigid 20" LED in bumper
- White Knuckle Offroad sliders with kick-out, custom powder coat
- Shrockworks dual battery tray and smog air pump relocation kit
- Bandi bracket for ARB twin air compressor & manifold
- Max 360 radar detector hard-wired, custom switch panel
- Matte black vinyl wrapped headlight top
- 35% front window tint
...and lots more coming soon:
- Dual battery (Odyssey 25-PC1400)
- National Luna Battery Isolator/Controller & custom bracket
- sPOD Source and custom bracket
- ARB twin air compressor & custom air tank
- Under hood LED strip with auto-on when hood opens
- RCI full skids, 1/4" aluminum (w/ custom powder coating to match others)
- Ecotechne roof rack with rack mounted LEDs
- Gobi ladder
- sPOD LED touch screen front cup holder custom bezel swap
- Matte black vinyl hood wrap
- Rear cargo drawer system for tools and recovery gear
- Rocket launcher
- Ejection seat
Recent trip to Tahoe and the ritual of donuts, drifts and reverse 180s in Sierra-at-Tahoe's epic E Lot!
Attachments
Cytronus
New member
ICON Stage 7 Coilover adjustment performed post SSO/Winch installation
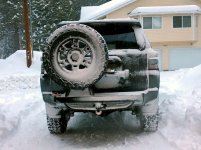
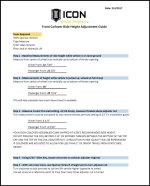
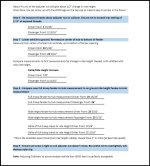
The SSO bumper weighs 70 lbs with Rigid SR-20 LED bar & hardware, winch weighs 80 lbs, fairlead and flatlink weigh 5.2 lbs, D shackles weigh 5 lbs. The stock components that were removed weigh 22.2 lbs so the net weight increase was 138 lbs up front. It dropped the front end about 1/16". Adjusted the front coilovers to add 1" more height to compensate for the added weight and coming added weight of a dual battery and skids.
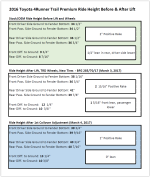
Post lift, bumper, winch and adjustments to correct minor KDSS lean, the front sits 5.25" higher than OEM. The rear 4.25" higher than OEM stance. The OEM rake was a positive 2", mine now sits at a positive 1" so half of OEM but still maintaining that good looking Toyota rake.
There's another 141 lbs soon going in up front between the sliders, dual battery, isolator, trays/brackets and ARB compressor. This will bring a total of 279 lbs on just the front suspension, not including the RCI full skid plates that are coming.
So far the ICON Stage 7 adjustable front coilovers are handling the added load like a boss, in terms of ride quality, body roll and stability. There's no softness or nose diving and as I add more weight, if needed, the ICON external reservoir valve knob can be adjusted to tame the effect. KDSS is helping fight body roll very well. I'm super pleased with the system so far. I'm tracking the weight of all components going on and off to track front-to-rear weight ratio, stability concerns, average MPG to added weight ratio, tire pressure, etc.
For reference, here are the figures and adjustments made:
The SSO bumper weighs 70 lbs with Rigid SR-20 LED bar & hardware, winch weighs 80 lbs, fairlead and flatlink weigh 5.2 lbs, D shackles weigh 5 lbs. The stock components that were removed weigh 22.2 lbs so the net weight increase was 138 lbs up front. It dropped the front end about 1/16". Adjusted the front coilovers to add 1" more height to compensate for the added weight and coming added weight of a dual battery and skids.
Post lift, bumper, winch and adjustments to correct minor KDSS lean, the front sits 5.25" higher than OEM. The rear 4.25" higher than OEM stance. The OEM rake was a positive 2", mine now sits at a positive 1" so half of OEM but still maintaining that good looking Toyota rake.
There's another 141 lbs soon going in up front between the sliders, dual battery, isolator, trays/brackets and ARB compressor. This will bring a total of 279 lbs on just the front suspension, not including the RCI full skid plates that are coming.
So far the ICON Stage 7 adjustable front coilovers are handling the added load like a boss, in terms of ride quality, body roll and stability. There's no softness or nose diving and as I add more weight, if needed, the ICON external reservoir valve knob can be adjusted to tame the effect. KDSS is helping fight body roll very well. I'm super pleased with the system so far. I'm tracking the weight of all components going on and off to track front-to-rear weight ratio, stability concerns, average MPG to added weight ratio, tire pressure, etc.
For reference, here are the figures and adjustments made:
Attachments
Last edited:
Cytronus
New member
Updated Mods list by stage and updated dual battery wiring diagram
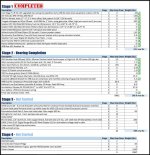
Here's the rig progress so far and what's next...5th Gen mod day in May anyone?
I decided to update the wiring diagram to wire the ARB twin air compressor directly to the main starter battery and not the aux. battery, since while at normal operating it draws 56 amps, it could kill the aux. battery fairly quickly, even while the engine is running, if the isolator is isolating charge from the aux and prioritizing charge to the main starter battery. With the new alternator, I've had plenty of amps supplying the main starter battery to run all vehicle systems and the air compressor. The plan is never to run both winch and air at the same time so having both of those connected directly to the main starter battery will provide the best reliability.
Here's the rig progress so far and what's next...5th Gen mod day in May anyone?
I decided to update the wiring diagram to wire the ARB twin air compressor directly to the main starter battery and not the aux. battery, since while at normal operating it draws 56 amps, it could kill the aux. battery fairly quickly, even while the engine is running, if the isolator is isolating charge from the aux and prioritizing charge to the main starter battery. With the new alternator, I've had plenty of amps supplying the main starter battery to run all vehicle systems and the air compressor. The plan is never to run both winch and air at the same time so having both of those connected directly to the main starter battery will provide the best reliability.
Attachments
Similar threads
- Replies
- 0
- Views
- 100
- Replies
- 1
- Views
- 308


- Replies
- 3
- Views
- 2K


