
You are using an out of date browser. It may not display this or other websites correctly.
You should upgrade or use an alternative browser.
You should upgrade or use an alternative browser.
Cytronus Build Thread (pic heavy)
- Thread starter Cytronus
- Start date

Wow that is crazy. You paid more in suspension than i put into the whole vehicle so far. And I just put on a lift and shocks.
As for the price on oem parts. It sounds like they doubled list price if not more. I live in CA also. I do like the new carpet and leather. I think that's totally worth it if you are keepin it for a while. I hate my carpet.
As for the price on oem parts. It sounds like they doubled list price if not more. I live in CA also. I do like the new carpet and leather. I think that's totally worth it if you are keepin it for a while. I hate my carpet.


Dirtyfingers
Senior Member
Dang that's how much I spent on just parts, $8500...I'm glad I did all of my own work or else I would be making my wallet go into a deep state of depression. Your rig looks good man! Reading the first part of your build reminds me of when I first got mine almost two years ago haha. I'm looking forward to doing the TBU soon. Going all OEM, did you get an option of what color the calipers were? I've seen some with red calipers and I want mine to be black..
katewilson56
New member
Great job done by you , i specially like your backup camera system and mirror.

LookAtThatDog
New member
What's that big fan under the passenger seat? (Ejector seat?)
What made you want to stay with the OEM color for seats and carpet? I probly would've done all black or grey or something.
What made you want to stay with the OEM color for seats and carpet? I probly would've done all black or grey or something.

infamousRNR
Senior Member
You got some nice updates to your rig! I like it... Sometimes it's the little things that matter and I can see you take pride in your vehicle. Sweet build!

Cytronus
New member
What's that big fan under the passenger seat? (Ejector seat?)
What made you want to stay with the OEM color for seats and carpet? I probly would've done all black or grey or something.
The fan under the front passenger seat provides air blower power to the rear zone heater & A/C.
I chose interior colors (carpet and leather) that were fairly close to stock because it aesthetically coordinstes with the Limited trim interior panel colors and faux wood trim pieces. Actually, the leather I chose is much lighter than stock and very unique to a 4Runner. I think if I were to redo the leather, I'd go with a dark brown and black carpet and black mats.
Last edited:
Cytronus
New member
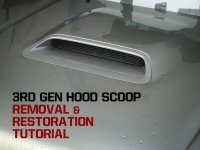
3rd Gen Hood Scoop Removal & Restoration Tutorial (pic heavy)
Well guys, after a couple of years of scouring the forums and wrecking yards, I'm stoked to finally have one of the most coveted 3rd Gen items - the sport hood!!! Courtesy of SURF RUNNER who sold and magnificently shipped it to me without incident via Greyhound from Bryon TX to Hayward CA.
For a tutorial on how to ship a hood the right way, check out SURF RUNNER's brilliant thread here: http://www.toyota-4runner.org/3rd-g...ng-sport-hood-greyhound-texas-california.html
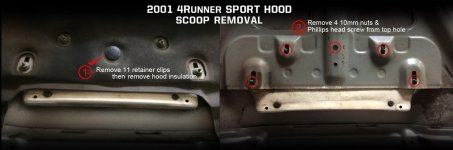
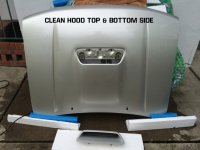
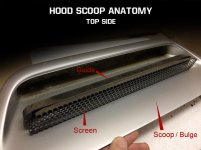
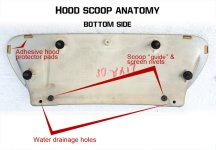
The following will also assist you in the removal and restoration of your OEM 3rd gen 4Runner hood scoop, if you're lucky enough to have one.
What you need:
1.5 - 2 hours
car wash / cleaning materials
10mm socket & socket wrench
standard size phillips head screwdriver
small flat head screw driver
dremel or drill with carbon grinding wheel
pliers
400 - 600 grit sandpaper
flat black spray paint (and your choice of color for personalization)
2 small black anodized screws and nuts (to replace removed OEM rivets)
OEM parts you may want if you're replacing plate and guide (Optional):
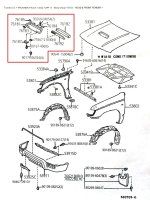
76192-35010 Plate (Mesh Screen), Hood Bulge ($13.20)
76182-35020 Guide, Hood Air ($13.58)
76183-12030 Protector, Hood ($0.71)
76187-35010 Retainer, Hood ($0.89)
Other parts noted in manufacturer diagram image in this thread
Well guys, after a couple of years of scouring the forums and wrecking yards, I'm stoked to finally have one of the most coveted 3rd Gen items - the sport hood!!! Courtesy of SURF RUNNER who sold and magnificently shipped it to me without incident via Greyhound from Bryon TX to Hayward CA.
For a tutorial on how to ship a hood the right way, check out SURF RUNNER's brilliant thread here: http://www.toyota-4runner.org/3rd-g...ng-sport-hood-greyhound-texas-california.html
The following will also assist you in the removal and restoration of your OEM 3rd gen 4Runner hood scoop, if you're lucky enough to have one.
What you need:
1.5 - 2 hours
car wash / cleaning materials
10mm socket & socket wrench
standard size phillips head screwdriver
small flat head screw driver
dremel or drill with carbon grinding wheel
pliers
400 - 600 grit sandpaper
flat black spray paint (and your choice of color for personalization)
2 small black anodized screws and nuts (to replace removed OEM rivets)
OEM parts you may want if you're replacing plate and guide (Optional):
76192-35010 Plate (Mesh Screen), Hood Bulge ($13.20)
76182-35020 Guide, Hood Air ($13.58)
76183-12030 Protector, Hood ($0.71)
76187-35010 Retainer, Hood ($0.89)
Other parts noted in manufacturer diagram image in this thread
Attachments
-
 3rd gen hood scoop.jpg125.2 KB · Views: 2,035
 -
 IMG_0066.jpg123.6 KB · Views: 1,872
 -
 hood scoop removal.jpg80.1 KB · Views: 1,857
 -
 IMG_0087.jpg128.4 KB · Views: 1,793
 -
 3rd gen bulge guide plate.jpg66.1 KB · Views: 2,165
 -
 hood scoop anatomy.jpg71.4 KB · Views: 1,929
 -
 IMG_0111.jpg132.1 KB · Views: 1,731
 -
 IMG_0115.jpg95.4 KB · Views: 1,799
Last edited:
Cytronus
New member
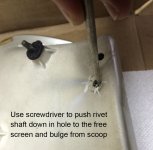
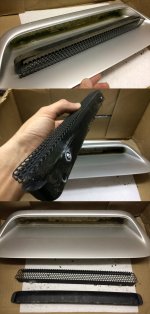
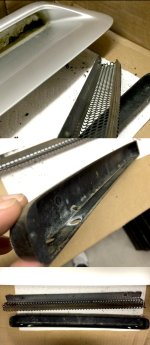
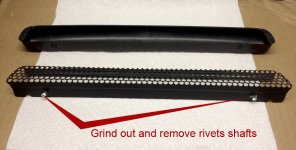
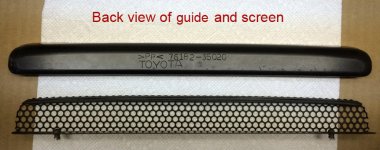
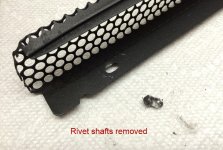
Continuing with guide and screen removal, grinding off and removing 2 rivet shafts
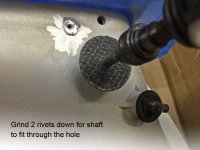
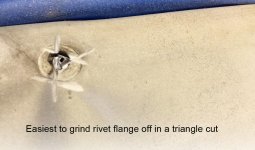
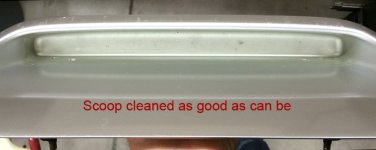
Once the rivet flanges are ground away to allow the rivet shaft to fit through the scoop hole, use a small flat head screw driver to push the rivet shafts down and pry shaft to push the screen and guide forward. Turn the scoop right-side-up and you should be able to grasp the edges of the screen with your fingers and pull both the screen and guide out of the scoop. Once the metal screen is out, grind off and remove the remaining rivet shafts being careful not to scratch the visible areas that can be seen when the screen is installed. Clean all parts (scoop, guide and screen) and prep for paint.
Once the rivet flanges are ground away to allow the rivet shaft to fit through the scoop hole, use a small flat head screw driver to push the rivet shafts down and pry shaft to push the screen and guide forward. Turn the scoop right-side-up and you should be able to grasp the edges of the screen with your fingers and pull both the screen and guide out of the scoop. Once the metal screen is out, grind off and remove the remaining rivet shafts being careful not to scratch the visible areas that can be seen when the screen is installed. Clean all parts (scoop, guide and screen) and prep for paint.
Attachments
Cytronus
New member
On to painting
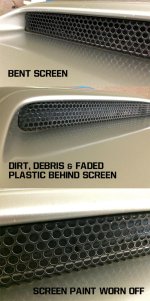
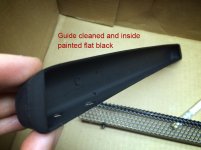
After cleaning the black plastic guide, it still had a milky white haziness so I decided to paint it flat black. One coat did the trick there.
My screen was bent on the left side so I used a small block of hard wood in a bench vise to work the screen against it by hand to put the shape back into place without any tools or hammering. It's quite forgiving and easy to manipulate with your fingers.
With fine sand paper (400 - 600 grit), give the metal mesh screen a few gentle passes and clean it with a solvent or soapy water to prep for paint.
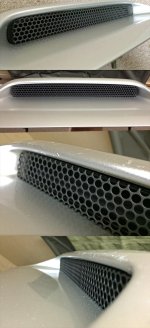
If you want the stock look, paint your metal screen flat black. I started out painting the screen flat black to provide a base for a personalized color.
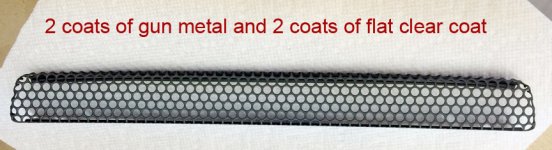
I decided to paint my metal screen a dark gun metal to really make it look like metal and to give it slightly more contrast and visibility. What I don't like about the stock/OEM flat black mesh screen is that it's difficult see when it's hiding in the shadow of the scoop. The gun metal will help it stand out subtly from the dark shadowy cavity and the guide backing. I think it nicely compliments the millennium silver ext. paint as well as closely matches the plastic trim colors in the front lower grille and rear bumper plastic trim so it still has that stock Toyota appeal with a little something extra. If I had a black 4Runner, I'd likely stick with the flat black screen.
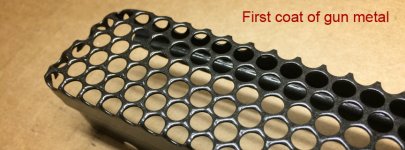
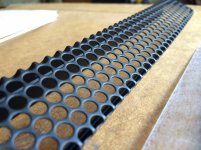
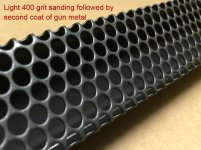
I applied 1 coat of gun metal, let it cure over night, then gave it a light sanding and applied a second coat of paint, followed by 2 coats of flat clear coat 20 minutes apart from one another.
It's important to paint the screen whilst level so the paint coats the perforations evenly and uniformly.
Lastly, after drying, I masked off the front and back of the mesh but left the lips exposed and painted those with 2 coats of flat black so that anything rearward of the screen and visible would be in flat black.
After cleaning the black plastic guide, it still had a milky white haziness so I decided to paint it flat black. One coat did the trick there.
My screen was bent on the left side so I used a small block of hard wood in a bench vise to work the screen against it by hand to put the shape back into place without any tools or hammering. It's quite forgiving and easy to manipulate with your fingers.
With fine sand paper (400 - 600 grit), give the metal mesh screen a few gentle passes and clean it with a solvent or soapy water to prep for paint.
If you want the stock look, paint your metal screen flat black. I started out painting the screen flat black to provide a base for a personalized color.
I decided to paint my metal screen a dark gun metal to really make it look like metal and to give it slightly more contrast and visibility. What I don't like about the stock/OEM flat black mesh screen is that it's difficult see when it's hiding in the shadow of the scoop. The gun metal will help it stand out subtly from the dark shadowy cavity and the guide backing. I think it nicely compliments the millennium silver ext. paint as well as closely matches the plastic trim colors in the front lower grille and rear bumper plastic trim so it still has that stock Toyota appeal with a little something extra. If I had a black 4Runner, I'd likely stick with the flat black screen.
I applied 1 coat of gun metal, let it cure over night, then gave it a light sanding and applied a second coat of paint, followed by 2 coats of flat clear coat 20 minutes apart from one another.
It's important to paint the screen whilst level so the paint coats the perforations evenly and uniformly.
Lastly, after drying, I masked off the front and back of the mesh but left the lips exposed and painted those with 2 coats of flat black so that anything rearward of the screen and visible would be in flat black.
Attachments
Cytronus
New member
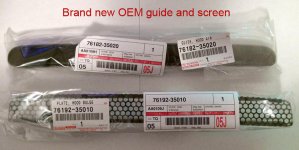
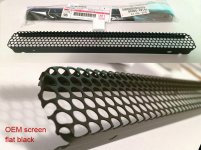
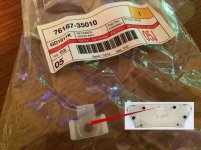
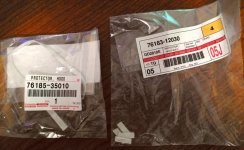
In case you want part numbers and brand new OEM mesh screen and guide...
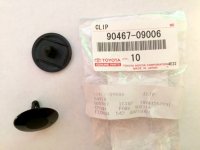
Below is the Toyota diagram for the 3rd gen hood scoop parts and what the real-life brand new OEM mesh screen looks like. I bought one just in case I couldn't bend my old one back into shape but I did so these new items will sit in my Yota box for a later restoration.
Below is the Toyota diagram for the 3rd gen hood scoop parts and what the real-life brand new OEM mesh screen looks like. I bought one just in case I couldn't bend my old one back into shape but I did so these new items will sit in my Yota box for a later restoration.
Attachments
Cytronus
New member
Cytronus
New member
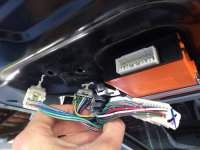
Stripping rear gate to have it painted + changing out license plate bezel
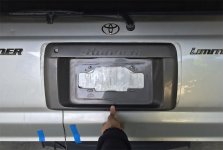
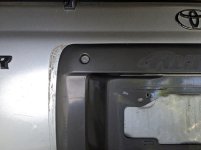
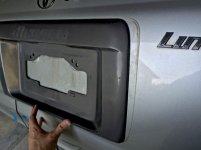
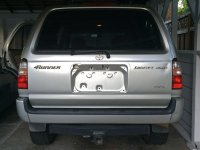
After a few dents, some deep scratches and a little rust on the rear gate, I've decided to have it repainted entirely, along with the license plate bezel. The black pearl emblem coating is peeling and chipping so those need to go too.
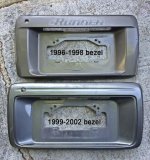
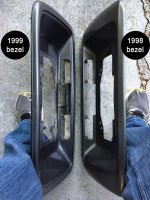
I'm more a fan of the 1996-1998 license plate bezel / frame than the 1999 - 2002 that I have so I've decided to swap that out and have it painted millennium silver to match the truck. IMO, the '96 - '98 bezel with its center-mounted "4Runner" emblem looks much better than with the emblem off to the left side of the gate as on the '99 - '02 years. Toyota apparently thinks so too since all the 5th gens have the "4Runner" emblem in the center above the license plate again now.
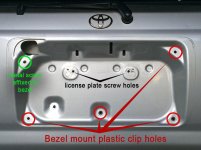
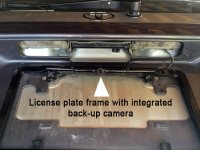
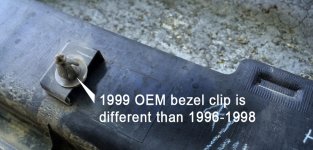
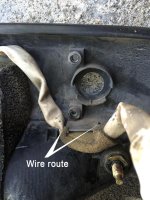
I've confirmed you can make the bezel the swap without issue. The license plate, plate illumination, gate latch handle, key lock hardware and clip locations are all transferable from your '99 - '02 to a '96 - '98 bezel. The plastic clips are a little different but either should work just fine.
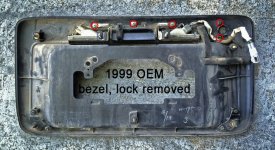
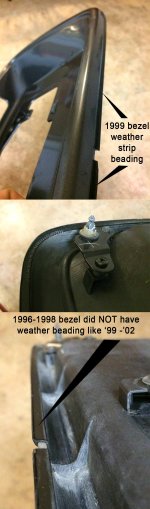
I did notice the '99 - '02 bezel has a very nice, high quality weather strip beading that the older 3rd gen bezels do not have. I'm going to try to buy the '99 stripping and retro fit it to the older '97 bezel I bought.
Lastly, if you decide you want to swap your bezel, there will be some marks in the paint around the edges where the larger bezel was. You can simply buff it out with a little Macguire's scratch remover or a similar polish that's paint friendly. Here's my progress so far.
After a few dents, some deep scratches and a little rust on the rear gate, I've decided to have it repainted entirely, along with the license plate bezel. The black pearl emblem coating is peeling and chipping so those need to go too.
I'm more a fan of the 1996-1998 license plate bezel / frame than the 1999 - 2002 that I have so I've decided to swap that out and have it painted millennium silver to match the truck. IMO, the '96 - '98 bezel with its center-mounted "4Runner" emblem looks much better than with the emblem off to the left side of the gate as on the '99 - '02 years. Toyota apparently thinks so too since all the 5th gens have the "4Runner" emblem in the center above the license plate again now.
I've confirmed you can make the bezel the swap without issue. The license plate, plate illumination, gate latch handle, key lock hardware and clip locations are all transferable from your '99 - '02 to a '96 - '98 bezel. The plastic clips are a little different but either should work just fine.
I did notice the '99 - '02 bezel has a very nice, high quality weather strip beading that the older 3rd gen bezels do not have. I'm going to try to buy the '99 stripping and retro fit it to the older '97 bezel I bought.
Lastly, if you decide you want to swap your bezel, there will be some marks in the paint around the edges where the larger bezel was. You can simply buff it out with a little Macguire's scratch remover or a similar polish that's paint friendly. Here's my progress so far.
Attachments
-
 bezel-compare3.jpg136.8 KB · Views: 2,295
 -
 bezel-compare-2.jpg139.6 KB · Views: 1,722
 -
 bezel-mounting-holes.jpg89.6 KB · Views: 1,936
 -
 1999-bezel-back.jpg118.1 KB · Views: 1,961
 -
 l-plate-frame-camera.jpg106.4 KB · Views: 2,047
 -
 disconnect-electric.jpg96.3 KB · Views: 1,619
 -
 1999-bezel-clip.jpg134.9 KB · Views: 1,632
 -
 1999-wire-route.jpg136.8 KB · Views: 1,642
Last edited:
Cytronus
New member
More pics
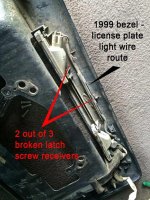
CAUTION: The 3 screw holes on the '99 bezel top are very brittle and break very easily. Be careful removing the latch handle assemble if you want to spare your '99 - '02 bezel. I broke 2 of 3 but will epoxy them back in place. I will have both the '97 bezel and my '99 bezel painted silver. If anyone is interested in my '99 bezel painted millennium silver to match your silver 4Runner, let me know.
CAUTION: The 3 screw holes on the '99 bezel top are very brittle and break very easily. Be careful removing the latch handle assemble if you want to spare your '99 - '02 bezel. I broke 2 of 3 but will epoxy them back in place. I will have both the '97 bezel and my '99 bezel painted silver. If anyone is interested in my '99 bezel painted millennium silver to match your silver 4Runner, let me know.
Attachments
Cytronus
New member
More pics
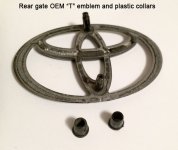
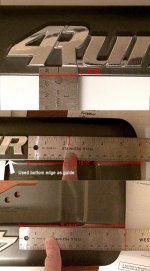
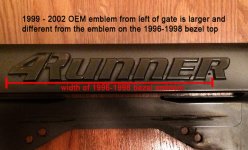
I removed the emblems from the gate using a heat gun and 30 lb fishing line. No problem at all. I also removed the emblem from the '97 bezel that will be painted silver. I measured the emblem placement just in case the new emblem doesn't have the flanges. The '96-'98 bezel emblem I removed had mounting flanges that fit into holes on the bezel.
Just out of curiosity, I measured the '99 gate left emblem against the emblem on the '97 license plate bezel and it turns out the '99 emblem is larger.
I removed the emblems from the gate using a heat gun and 30 lb fishing line. No problem at all. I also removed the emblem from the '97 bezel that will be painted silver. I measured the emblem placement just in case the new emblem doesn't have the flanges. The '96-'98 bezel emblem I removed had mounting flanges that fit into holes on the bezel.
Just out of curiosity, I measured the '99 gate left emblem against the emblem on the '97 license plate bezel and it turns out the '99 emblem is larger.
Attachments
Last edited:

absalom
New member
Wow you have amazing presentation skills when it comes to your posts; you'll certainly be a valuable asset to the board in no time at all.
But ... we gotta work on those negotiation skills! You got taken for a ride by your mechanic, absolute robbery.
Just teasing of course. Love the new seats and please keep on posting the good stuff.
But ... we gotta work on those negotiation skills! You got taken for a ride by your mechanic, absolute robbery.
Just teasing of course. Love the new seats and please keep on posting the good stuff.
Similar threads
- Replies
- 2
- Views
- 2K


