
You are using an out of date browser. It may not display this or other websites correctly.
You should upgrade or use an alternative browser.
You should upgrade or use an alternative browser.
DIY: Non-Sealed Transmission Service for 4th Gen T4R's and Prior
- Thread starter Mike the Wino
- Start date
Doubtful anyone will believe I have any character flaws :bigok:, but I do have one: I am a

However, this flaw comes in handy from time to time.
In the next post is Mike's excellent writeup, re-created as faithfully as possible.
Thanks JB! You are the Man!

johnnyd2723
New member
Nice write up. I'm signing off and headed outside for my tranny service.
Thanks again.
John
Thanks again.
John

CJ3Flyr
Super Moderator
Does this apply to an 05 2wd drive also?
Yes but you need to read the Sticky at the top Maint section for transmission servicing. The fill and level check procedure is a bit different for the '05 but the rest applies.
:cheers:
sparkoneus
New member
Comments
Since I had found Mike's write up on the tranny service, I thought I would share my experience with that service, which I performed over the weekend. First of all, his write up is basically very accurate and I executed his steps almost exactly (except for the beer part). But I ran into a couple of issues, only one of which was a bit difficult. I will say right off that I am very handy. I've done plenty of auto work over the years and lots of home improvement as well.
1) I put a big plastic tarp underneath the car to catch any fluid that came out and missed the drain pan for some reason. Trust me, there was some.
2) Dropping the tranny pan - This turned out to be rather difficult. Granted, my 4runner is a 2000 and it is now 10 years old (60K miles), but that gasket sealer between the pan and the tranny case wansn't easy to get thru. After removing all of the bolts, I had to resort to using a putty knife (I know, not the best thing) and a hammer. It took me a while to get all the way around 2 edges of the pan (drivers side & rear). I couldn't really get to either the front edge or the passenger side edge due to obstructions (frame, etc). So then I just kept working and bending the knife until I got it free. This took some patience. Do not use a screw driver for this or you might bend the pan at the gasket line. I looked over the case to be sure there was not marring/scarring, and it was fine.
3) The bolt holding the upper section of the dipstick tube is 12mm and angled down slightly. It took me forever to figure this out since you can't see the bolt, you just have to feel for it. It doesn't matter how much light you have, the view is completely obstructed. This irritated me, so hopefully having this information will prevent you from becoming irritated. I had to use a step stool to actually be able to reach in there and get that bolt off. Geez...
4) Once I had the pan off, I could not get it clear of the frame (WTF?). I saw in Mike's picture that he cleared it, but I have no idea how he did it. I had to move it all the way to the side (driver's side), remove the filter/screen, to allow enough clearance to then free the pan from the frame. Not too big of a deal, but noteworthy nonetheless. Maybe Mike's 2002 allows enough clearance for this without removing the screen, but not on my 2000.
5) Patience is required in grinding all of the gasket sealer off the pan and tranny case.
6) My strong advice would be to get the gasket lined up on the pan and push all of the screws into the gasket from below the pan while the pan is still off the truck. You will never get this done from underneath...don't ask me how I know this. I used a Beck Arnley filter/gasket kit which has a rubber gasket. It worked out very well since the rubber gasket holds those bolts very snugly and they won't fall out. I also did use Loctite 242 thread lock for the bolts according to Toyota. Probably doesn't matter much, I just did it to be safe. I have never known anyone to actually do this, including a very reputable local transmission shop.
7) I know that the torque spec on the pan bolts is 65 ft-lbs or so (maybe 69), but I was not comfortable with that much torque. When I got to 40, I could see the gasket getting crushed in there, so I actually stopped shy of 40. I have checked it over the course of a few days for leaks and nothing so far. I am thinking that the spec is based on having the permatex style sealer rather than a gasket. Maybe I am wrong and should go to 65, but that just seemed like way to much for me.
8) I now know what Mike was referring to with filling the dipstick tube slowly. It's not that the funnel will fill up and slowly go down. While this is true, it's not really the issue. The issue is that the new fluid will seep out of the seam between the upper and lower sections of the dipstick tube. I discovered this when I found a small puddle of new fluid under the truck after filling. Since you have to break the seal between the upper and lower sections of the tube, fluid will leak from there during the fill process, unless you pour REALLY slowly. This would take forever, so just put a pan under there and fill as fast as the funnel will take it. You won't lose that much new fluid.
All in all, Mike's directions were dead on. This took me a lot longer than 2 hours though, but I took my time to make sure I didn't mess anything up since I am a perfectionist. Probably took me more like 3 1/2 hours total, including cleanup. Two other things...check the fluid over the course of a day or two. Mine appeared full for the first several miles, but after 10 miles, it dropped a bit. Lastly, I did this with only jacking up the front driver's side. I didn't even have the tire all the way off the ground to fit under there with a creeper, but I'm a thin guy. As always, I used a jack stand...don't do this with just a jack.
Hope this helps.
Since I had found Mike's write up on the tranny service, I thought I would share my experience with that service, which I performed over the weekend. First of all, his write up is basically very accurate and I executed his steps almost exactly (except for the beer part). But I ran into a couple of issues, only one of which was a bit difficult. I will say right off that I am very handy. I've done plenty of auto work over the years and lots of home improvement as well.
1) I put a big plastic tarp underneath the car to catch any fluid that came out and missed the drain pan for some reason. Trust me, there was some.
2) Dropping the tranny pan - This turned out to be rather difficult. Granted, my 4runner is a 2000 and it is now 10 years old (60K miles), but that gasket sealer between the pan and the tranny case wansn't easy to get thru. After removing all of the bolts, I had to resort to using a putty knife (I know, not the best thing) and a hammer. It took me a while to get all the way around 2 edges of the pan (drivers side & rear). I couldn't really get to either the front edge or the passenger side edge due to obstructions (frame, etc). So then I just kept working and bending the knife until I got it free. This took some patience. Do not use a screw driver for this or you might bend the pan at the gasket line. I looked over the case to be sure there was not marring/scarring, and it was fine.
3) The bolt holding the upper section of the dipstick tube is 12mm and angled down slightly. It took me forever to figure this out since you can't see the bolt, you just have to feel for it. It doesn't matter how much light you have, the view is completely obstructed. This irritated me, so hopefully having this information will prevent you from becoming irritated. I had to use a step stool to actually be able to reach in there and get that bolt off. Geez...
4) Once I had the pan off, I could not get it clear of the frame (WTF?). I saw in Mike's picture that he cleared it, but I have no idea how he did it. I had to move it all the way to the side (driver's side), remove the filter/screen, to allow enough clearance to then free the pan from the frame. Not too big of a deal, but noteworthy nonetheless. Maybe Mike's 2002 allows enough clearance for this without removing the screen, but not on my 2000.
5) Patience is required in grinding all of the gasket sealer off the pan and tranny case.
6) My strong advice would be to get the gasket lined up on the pan and push all of the screws into the gasket from below the pan while the pan is still off the truck. You will never get this done from underneath...don't ask me how I know this. I used a Beck Arnley filter/gasket kit which has a rubber gasket. It worked out very well since the rubber gasket holds those bolts very snugly and they won't fall out. I also did use Loctite 242 thread lock for the bolts according to Toyota. Probably doesn't matter much, I just did it to be safe. I have never known anyone to actually do this, including a very reputable local transmission shop.
7) I know that the torque spec on the pan bolts is 65 ft-lbs or so (maybe 69), but I was not comfortable with that much torque. When I got to 40, I could see the gasket getting crushed in there, so I actually stopped shy of 40. I have checked it over the course of a few days for leaks and nothing so far. I am thinking that the spec is based on having the permatex style sealer rather than a gasket. Maybe I am wrong and should go to 65, but that just seemed like way to much for me.
8) I now know what Mike was referring to with filling the dipstick tube slowly. It's not that the funnel will fill up and slowly go down. While this is true, it's not really the issue. The issue is that the new fluid will seep out of the seam between the upper and lower sections of the dipstick tube. I discovered this when I found a small puddle of new fluid under the truck after filling. Since you have to break the seal between the upper and lower sections of the tube, fluid will leak from there during the fill process, unless you pour REALLY slowly. This would take forever, so just put a pan under there and fill as fast as the funnel will take it. You won't lose that much new fluid.
All in all, Mike's directions were dead on. This took me a lot longer than 2 hours though, but I took my time to make sure I didn't mess anything up since I am a perfectionist. Probably took me more like 3 1/2 hours total, including cleanup. Two other things...check the fluid over the course of a day or two. Mine appeared full for the first several miles, but after 10 miles, it dropped a bit. Lastly, I did this with only jacking up the front driver's side. I didn't even have the tire all the way off the ground to fit under there with a creeper, but I'm a thin guy. As always, I used a jack stand...don't do this with just a jack.
Hope this helps.
CJ3Flyr
Super Moderator
Since I had found Mike's write up on the tranny service, I thought I would share my experience with that service, which I performed over the weekend. First of all, his write up is basically very accurate and I executed his steps almost exactly (except for the beer part). But I ran into a couple of issues, only one of which was a bit difficult. I will say right off that I am very handy. I've done plenty of auto work over the years and lots of home improvement as well.
1) I put a big plastic tarp underneath the car to catch any fluid that came out and missed the drain pan for some reason. Trust me, there was some. Awesome tip:bigok:
2) Dropping the tranny pan - This turned out to be rather difficult. Granted, my 4runner is a 2000 and it is now 10 years old (60K miles), but that gasket sealer between the pan and the tranny case wansn't easy to get thru. After removing all of the bolts, I had to resort to using a putty knife (I know, not the best thing) and a hammer. It took me a while to get all the way around 2 edges of the pan (drivers side & rear). I couldn't really get to either the front edge or the passenger side edge due to obstructions (frame, etc). So then I just kept working and bending the knife until I got it free. This took some patience. Do not use a screw driver for this or you might bend the pan at the gasket line. I looked over the case to be sure there was not marring/scarring, and it was fine. Makes sense... Mikes write-up was based on a 1st year 4th gen (03). Maybe that explains some of the differences.
3) The bolt holding the upper section of the dipstick tube is 12mm and angled down slightly. It took me forever to figure this out since you can't see the bolt, you just have to feel for it. It doesn't matter how much light you have, the view is completely obstructed. This irritated me, so hopefully having this information will prevent you from becoming irritated. I had to use a step stool to actually be able to reach in there and get that bolt off. Geez...
4) Once I had the pan off, I could not get it clear of the frame (WTF?). I saw in Mike's picture that he cleared it, but I have no idea how he did it. I had to move it all the way to the side (driver's side), remove the filter/screen, to allow enough clearance to then free the pan from the frame. Not too big of a deal, but noteworthy nonetheless. Maybe Mike's 2002 2003allows enough clearance for this without removing the screen, but not on my 2000.
5) Patience is required in grinding all of the gasket sealer off the pan and tranny case.
6) My strong advice would be to get the gasket lined up on the pan and push all of the screws into the gasket from below the pan while the pan is still off the truck. You will never get this done from underneath...don't ask me how I know this. I used a Beck Arnley filter/gasket kit which has a rubber gasket. It worked out very well since the rubber gasket holds those bolts very snugly and they won't fall out. I also did use Loctite 242 thread lock for the bolts according to Toyota. Probably doesn't matter much, I just did it to be safe. I have never known anyone to actually do this, including a very reputable local transmission shop.
7) I know that the torque spec on the pan bolts is 65 ft-lbs ????? or so (maybe 69), but I was not comfortable with that much torque. When I got to 40, I could see the gasket getting crushed in there, so I actually stopped shy of 40. I have checked it over the course of a few days for leaks and nothing so far. I am thinking that the spec is based on having the permatex style sealer rather than a gasket. Maybe I am wrong and should go to 65, but that just seemed like way to much for me.
8) I now know what Mike was referring to with filling the dipstick tube slowly. It's not that the funnel will fill up and slowly go down. While this is true, it's not really the issue. The issue is that the new fluid will seep out of the seam between the upper and lower sections of the dipstick tube. I discovered this when I found a small puddle of new fluid under the truck after filling. Since you have to break the seal between the upper and lower sections of the tube, fluid will leak from there during the fill process, unless you pour REALLY slowly. This would take forever, so just put a pan under there and fill as fast as the funnel will take it. You won't lose that much new fluid.
All in all, Mike's directions were dead on. This took me a lot longer than 2 hours though, but I took my time to make sure I didn't mess anything up since I am a perfectionist. Probably took me more like 3 1/2 hours total, including cleanup. Two other things...check the fluid over the course of a day or two. Mine appeared full for the first several miles, but after 10 miles, it dropped a bit. Lastly, I did this with only jacking up the front driver's side. I didn't even have the tire all the way off the ground to fit under there with a creeper, but I'm a thin guy. As always, I used a jack stand...don't do this with just a jack.
Hope this helps.
Great info! Thanks for taking the time to type it out. Mike has an '03 which probably changes things a bit. the other thing is 65ft/lbs???? Maybe in/lbs???? 65 is WAY too much for pan bolts...
Very helpful, great write-up, thank-you

Last edited:
sparkoneus
New member
Hey there...I just double checked the specs on those pan bolts and you are correct...65 in-lbs, NOT ft-lbs. Very important distiction and thanks for that clarity. I would say that I probably have mine too tight though I know I was nowhere near 65 ft-lbs, but I only used a short 3/8 socket wrench with an extension, so I think I am probably ok. I checked it again over this past weekend and no leaks, so I'm not touching it. It's probably a good thing for me that the Beck Arnley kit came with a rubber gasket.
The other thing I noticed was Mike's picture of the dipstick tube from above the hood. The bolt on his is easily visible from above...not so on the 2000. Just another one of those slight differences.
The other thing I noticed was Mike's picture of the dipstick tube from above the hood. The bolt on his is easily visible from above...not so on the 2000. Just another one of those slight differences.
CJ3Flyr
Super Moderator
Safe to assume this will be about the same for the 5-speed tranny?
Yes, very similar! Read this post/response. http://www.toyota-4runner.org/570946-post2.html It'll help with which line to pull. The rest of Mike's procedure will be virtually identical even though his is a V6/4sp.
Last edited:
Yes, very similar! Read this post/response. http://www.toyota-4runner.org/570946-post2.html It'll help with which line to pull. The rest of Mike's procedure will be virtually identical even though his is a V6/4sp.
Read that one first. It lead me to this one
thanks as always Chris!:cheers:
Addendum for V-8 / A750F
After doing this on my '03 V8 4x4 last weekend, I realized Mike's write-up was for a V6 with the 4 speed auto. There are a couple of significant differences that might be useful before you attempt.
1) The most significant difference is exhaust routing. This is probably more a function of the V8 versus V6 than trans differences. On the V8, the exhaust crossover pipe runs directly under the middle of the trans pan. There is simply no way to drop the pan without first removing this crossover pipe. There's only about 1" clearance between the pipe and pan and the pan is boxed in on all sides by something...drive shaft/trans bell housing/frame cross member/main exhaust tube.
The crossover pipe only needs 2 bolts/2 nuts to remove. You'll need a 14mm deep well socket for the driver's side nuts. This was my first stumble because I found it on a Friday night after the stores had closed and after the fluid was already drained. I didn't have a 14mm deep well.
I would also recommend using some penetrating lube before attempting to remove...these things have been heat cycled quite a bit. I still managed to break an exhaust mounting stud when reassembling...think some debris got into the threads and wouldn't let the nut go either way until I brought in the breaker bar, which snapped the stud...fortunately still leaving enough for reassembly. The exhaust tubing is held under tension so you'll need a bit of muscle to get the crossover reinstalled.
In addition to the deep well socket, you'll want to have some bungee cords or similar before you remove the crossover. The driver's side has an O2 sensor in the downpipe. I couldn't easily determine how to unclip the sensor's electrical harness. I opted instead to susped the crossover using bungees, simliar to suspending a brake caliper when replacing pads/rotors.
2) The dipstick tube doesn't mount to a head bolt like the V6. The trans tube is bolted to the oil dipstick tube...not sure what supports the oil tube. Maybe it's cast into the block? Anyway, the bolt holding the upper trans tube faces down. You can't reach it from the engine bay. I could get a 24" socket extension with U-joint onto it from below, but wasn't sure I'd be able to reinstall it. Looks like you really need to remove the wheel and wheel well liner to do it right. I opted to try to drop the pan without removing it.
When reinstalling the pan, you'll find the upper trans tube is about an 1" from where you want it. You have to flex it back into position, while maneuvering the pan around the valve body and back into place. I put the dipstick back in and used it as a guide to help on the reinstall.
3) If you let it drain over night (remember that missing deep well socket), you'll end up putting back in 6 quarts of T-IV. The trans will drain for a while and stop. Let it sit until it cools, assuming you started the drain on a warm trans, and then something burps, probably the torque converter. Found the evidence the next morning as I'd move the catch pan to catch the drips while I tried to figure out the crossover pipe. Based on "evidence" found the next morning, the pan was out of position when the trans burped.
4) Practice installing the pan without hitting anything before you do it for real if you're using the FIPG. My service counter kept saying that's what they used and the computer didn't show a regular gasket for my VIN. Somehow the computer suddenly showed that gasket when I found one installed from the factory on my truck, but by then I had dropped the pan and couldn't wait for the fiber gasket to be ordered.
Lesson learned. Apparently, you can easily damage the shift solenoids when dropping the pan. DAMHIK. When reinstalling the pan (and practicing), I know I made some contact with the valve body, but I didn't think it was that hard. Upon startup, I immediately got a CEL. Code turned out to be P0778, shift control solenoid SL2. Either I pinched/disconnected the wire going to SL2 or actually damaged SL2 with the pan to valve contact. Of course, it's also possible the valve was already marginal and being allowed to dry out for some 36 hours was enough to finish it off. Currently waiting for an SL2 to come in, but I'm letting a local shop do the repair this time...it's too hot here for one thing, and I'd rather not risk breaking something again or fight with removing the FIPG. At least it didn't leak after reinstalling.
-Brent
After doing this on my '03 V8 4x4 last weekend, I realized Mike's write-up was for a V6 with the 4 speed auto. There are a couple of significant differences that might be useful before you attempt.
1) The most significant difference is exhaust routing. This is probably more a function of the V8 versus V6 than trans differences. On the V8, the exhaust crossover pipe runs directly under the middle of the trans pan. There is simply no way to drop the pan without first removing this crossover pipe. There's only about 1" clearance between the pipe and pan and the pan is boxed in on all sides by something...drive shaft/trans bell housing/frame cross member/main exhaust tube.
The crossover pipe only needs 2 bolts/2 nuts to remove. You'll need a 14mm deep well socket for the driver's side nuts. This was my first stumble because I found it on a Friday night after the stores had closed and after the fluid was already drained. I didn't have a 14mm deep well.
I would also recommend using some penetrating lube before attempting to remove...these things have been heat cycled quite a bit. I still managed to break an exhaust mounting stud when reassembling...think some debris got into the threads and wouldn't let the nut go either way until I brought in the breaker bar, which snapped the stud...fortunately still leaving enough for reassembly. The exhaust tubing is held under tension so you'll need a bit of muscle to get the crossover reinstalled.
In addition to the deep well socket, you'll want to have some bungee cords or similar before you remove the crossover. The driver's side has an O2 sensor in the downpipe. I couldn't easily determine how to unclip the sensor's electrical harness. I opted instead to susped the crossover using bungees, simliar to suspending a brake caliper when replacing pads/rotors.
2) The dipstick tube doesn't mount to a head bolt like the V6. The trans tube is bolted to the oil dipstick tube...not sure what supports the oil tube. Maybe it's cast into the block? Anyway, the bolt holding the upper trans tube faces down. You can't reach it from the engine bay. I could get a 24" socket extension with U-joint onto it from below, but wasn't sure I'd be able to reinstall it. Looks like you really need to remove the wheel and wheel well liner to do it right. I opted to try to drop the pan without removing it.
When reinstalling the pan, you'll find the upper trans tube is about an 1" from where you want it. You have to flex it back into position, while maneuvering the pan around the valve body and back into place. I put the dipstick back in and used it as a guide to help on the reinstall.
3) If you let it drain over night (remember that missing deep well socket), you'll end up putting back in 6 quarts of T-IV. The trans will drain for a while and stop. Let it sit until it cools, assuming you started the drain on a warm trans, and then something burps, probably the torque converter. Found the evidence the next morning as I'd move the catch pan to catch the drips while I tried to figure out the crossover pipe. Based on "evidence" found the next morning, the pan was out of position when the trans burped.
4) Practice installing the pan without hitting anything before you do it for real if you're using the FIPG. My service counter kept saying that's what they used and the computer didn't show a regular gasket for my VIN. Somehow the computer suddenly showed that gasket when I found one installed from the factory on my truck, but by then I had dropped the pan and couldn't wait for the fiber gasket to be ordered.
Lesson learned. Apparently, you can easily damage the shift solenoids when dropping the pan. DAMHIK. When reinstalling the pan (and practicing), I know I made some contact with the valve body, but I didn't think it was that hard. Upon startup, I immediately got a CEL. Code turned out to be P0778, shift control solenoid SL2. Either I pinched/disconnected the wire going to SL2 or actually damaged SL2 with the pan to valve contact. Of course, it's also possible the valve was already marginal and being allowed to dry out for some 36 hours was enough to finish it off. Currently waiting for an SL2 to come in, but I'm letting a local shop do the repair this time...it's too hot here for one thing, and I'd rather not risk breaking something again or fight with removing the FIPG. At least it didn't leak after reinstalling.
-Brent

blade4runner
New member
My '06 4runner's transmission shifts pretty rough when I'm slowing down and stopping in particular. It mat sit there for 10 secs and then change gears. What should be done? Is this what may happen if tranny fluid is low or needs to be changed?
CJ3Flyr
Super Moderator
very possible. At the very least confirm the fluid level is correct.My '06 4runner's transmission shifts pretty rough when I'm slowing down and stopping in particular. It mat sit there for 10 secs and then change gears. What should be done? Is this what may happen if tranny fluid is low or needs to be changed?
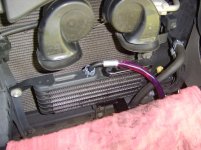
Addendum #2 for the V8
Unlike the V6 guys, we don't have to go fumbling around under the vehicle to find the cooler return line if you want to do a cooler line flush. To make it easy for anyone looking to do this, here's the correct connection point for the factory installed external trans cooler. Use 3/8" ID tubing, same as for the coolant block drains.
Unlike the V6 guys, we don't have to go fumbling around under the vehicle to find the cooler return line if you want to do a cooler line flush. To make it easy for anyone looking to do this, here's the correct connection point for the factory installed external trans cooler. Use 3/8" ID tubing, same as for the coolant block drains.
Attachments
My mother has a 2004 v6 sr5 2wd. I am also gonna do the tranny flush. Her car is in very good condition. Never towed anything at all. Has 60k and tranny fluid never been changed. I have done most of the oil changed with mobil 1 syntec. My question is, Do i really have to do a complete flush on it? I am thinking just draining the fluid and replacing the filter.
I have been calling 3 dealers and they keep telling me you don't have to change the filter on the 2004 4runner 6cylinder. They told me that is just a metal screen and you can take it out and wash it. I was looking at auto parts store and autozone has a filter kit with gasket for $28. Dealer wants $70+$30 for gasket maker.
BTW, Can someone tell me how many quarts should i buy when just draining the fluid and replacing the filter. I am not gonna do a flush.
BTW, Can someone tell me how many quarts should i buy when just draining the fluid and replacing the filter. I am not gonna do a flush.


pdx650
Member
How about the torque on the pan bolts for a 4wd if you have a 2.7 liter, 4 cylinder 3RZ-FE engine. I'd like to guess that 65 in/lbs is the same here. The pan has 19 bolts and is rectangular in shape as seen from below and mounted as normal. Is there an official repair manual I can buy rather than going with a Haynes I could pick up at any auto parts store. I feel those manuals are not as informative as a shop manual you could find at a stealership.
Too much or too little ATF?
I followed Mike's drain, flush and refill process on my 2005 V6 Limited and it worked like a champ. I then found myself obsessing over the ATF fluid level. I did the jumper trick to get the A/T Temp correct and made sure there was a trickle coming out of the check plug, so it 'seemed' I had a 'good enough' level. But in my experience, most transmissions are very sensitive to the ATF level. Just a little too much or a little too little and the car will drive differently.
So my question is, when I'm stopped on a downhill slope, then accelerate, it seems to take a few seconds longer for the transmission to change gears. Would that mean I have too much or too little ATF? Does anyone know any performance checks to tell if ones transmission has too much or too little ATF?
I followed Mike's drain, flush and refill process on my 2005 V6 Limited and it worked like a champ. I then found myself obsessing over the ATF fluid level. I did the jumper trick to get the A/T Temp correct and made sure there was a trickle coming out of the check plug, so it 'seemed' I had a 'good enough' level. But in my experience, most transmissions are very sensitive to the ATF level. Just a little too much or a little too little and the car will drive differently.
So my question is, when I'm stopped on a downhill slope, then accelerate, it seems to take a few seconds longer for the transmission to change gears. Would that mean I have too much or too little ATF? Does anyone know any performance checks to tell if ones transmission has too much or too little ATF?
Similar threads


- Replies
- 2
- Views
- 3K

- Replies
- 8
- Views
- 4K

- Replies
- 10
- Views
- 13K

Forum statistics
Trending content
-

-

-
-
-
Thread 'Fixed: Dead Instrument Cluster in 2003 Toyota 4Runner (Corrosion Issue)'
- TheSpeakGeek
Replies: 9