Auntie Soshul
New member
Since buying my 2013 SR5 new three years ago, I’ve been craving for better sound. It came with the basic, 8-speaker, non-JBL, non-nav audio system. Within a couple of months or so after buying it, I changed all the factory speakers, which made a terrific improvement. I kept the system in party mode constantly, and adjusted the treble and bass. The result wasn’t too bad, but I wanted better, and I didn’t want to go through everything that’s involved in changing the head unit (new SiriusXM add-on, Sirius antenna adapter, steering wheel control adapter, USB adapter, etc), so I decided to go with a digital signal processor (DSP) and a small amp, and keep the stock head unit.
I wanted the amp and DSP to fit under the driver’s seat, so I needed items that were small enough to fit there, yet provide quality sound. After much research, I chose the AudioControl DQ-61 for the DSP because of its small footprint, great reviews, and capability of manual tuning (I don’t own a laptop to adjust the EQ settings). For the amp, I chose an Alpine MRV-F300 because it also has a reputation for providing clean sound, has a small footprint, and enough power for my needs.
I measured the usable space under the driver’s seat, and it came to about 13½” x 9½”. I knew the height under the seat would be tight and that the heat vent under the seat shouldn’t be blocked. So, I traced the DSP and amp on pieces of cardboard to see how best to configure them to fit under the seat. Then, I got a 2’x2’ piece of ¼” MDF at Home Depot and cut it to the size of the maximum available space. After determining the best orientation of the equipment using the cardboard pieces, I placed them on the MDF and they fit, but barely.
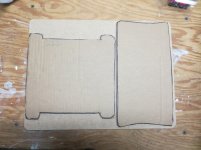
I painted the MDF black so it wouldn’t be so noticeable, then mounted the two pieces of electronics on the MDF with screws. The heat vent under the seat sits ½” above the rest of the carpet, so I used longer screws on the back and left side of the MDF. This lifts the MDF and keeps it from sitting directly on the carpet and blocking the heat vent.
Taking a cue from Axxman’s audio post, I wanted to be able to connect everything without cutting or splicing into any of the vehicle’s wiring, and be able to disconnect everything when I eventually trade vehicles or make another mod to the audio system. So, I bought a radio wiring harness (Metra 70-1761) and a reverse radio harness (Scosche). I found out later that Metra also makes a reverse harness (71-1761), but I had already bought the Scosche. Since there would be 8 wires going from the head unit’s speaker outputs to the DQ-61, and 8 more going back to the speaker plug behind the head unit, I bought a 20 ft section of Stinger 9-conductor cable, cut it in half, and had plenty for the task.
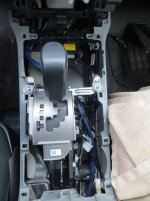
After crimping all the wires in the two pieces of 9-conductor cable to the two wiring harnesses, I taped them together to keep them out of the way of whatever is already in the vehicle. I ran the cables down the front of the dash and through the console, exiting from the rear bottom of the console to under the driver’s seat. (See Antman’s thread on how to remove the top part of the console and how to run the power cable from the battery to the front seat.) There is no need to remove either the main shift knob or the 4WD knob when removing the console.
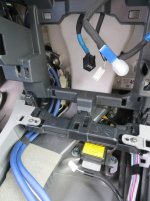
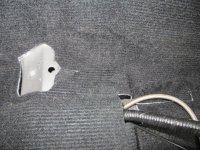
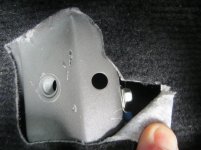
To ground both the amp and DSP, I drilled a hole through the piece of metal cross-bracing that the front of the seat bolts to. The seat bolts were too big to go through the terminals on the ground wires. Otherwise, I would have used one of the seat bolts, per Antman. For the power to the DSP, I used an add-a-tap in an unused slot in the fuse block under the dash. For reference, the 4Runner uses fuse type ATM-LP. LP stands for low-profile, but the add-a-tap doesn’t use low-profile fuses, so you’ll need to get “regular” ATM fuses for that.
Next, it was just a matter of hooking up the speaker wiring from the radio to the DSP, and hooking up the return wiring from the amp back to the speaker plugs.
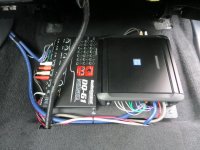
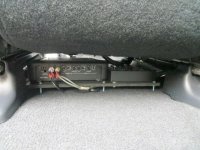
The result: fantastic sound. A couple of tweaks to the EQ settings on the DSP were needed, but just a shot-in-the-dark tuning made an amazing difference. All four of the rear speakers are still functional. Party mode still works, but there is no real reason to use party mode anymore. One downside to the mod: if you want to adjust the EQ on the DSP, you need to remove the four bolts holding the driver’s seat, and tilt the seat back to have access to the EQ buttons. The upside is, once the EQ is set, there is no reason to ever monkey with the adjustments again. I got the adjustments pretty well perfect by downloading a pink noise track from the net and used the AudioContol RTA app on my iPad to read the result.
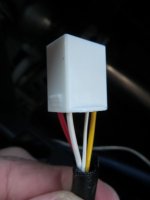
As an aside, I found that both the Metra and Scosche harnesses have only four terminals for the rear speaker harness. The plug going into the back of the OEM radio has five terminals. I wasn’t able to identify what the fifth wire went to. It’s a white wire about twice the diameter of a hair. I decided to go ahead with the assembly and see what didn’t work after the install. Turns out, the small white wire controls the nighttime illumination of the radio face. The daytime illumination (headlights off) was fine; it was only when the headlights were on that there was no illumination on the radio at all. So, I removed the head unit again, swapped an unused terminal from one of the plugs to the Metra and Scosche harness plugs, and connected those terminals together. All is now good. I’m wondering, though, if that small white wire can somehow be tweaked to provide brighter (like daytime) illumination to the head unit when the headlights are on. Maybe a more adventurous and knowledgeable modder can take that on.
I wanted the amp and DSP to fit under the driver’s seat, so I needed items that were small enough to fit there, yet provide quality sound. After much research, I chose the AudioControl DQ-61 for the DSP because of its small footprint, great reviews, and capability of manual tuning (I don’t own a laptop to adjust the EQ settings). For the amp, I chose an Alpine MRV-F300 because it also has a reputation for providing clean sound, has a small footprint, and enough power for my needs.
I measured the usable space under the driver’s seat, and it came to about 13½” x 9½”. I knew the height under the seat would be tight and that the heat vent under the seat shouldn’t be blocked. So, I traced the DSP and amp on pieces of cardboard to see how best to configure them to fit under the seat. Then, I got a 2’x2’ piece of ¼” MDF at Home Depot and cut it to the size of the maximum available space. After determining the best orientation of the equipment using the cardboard pieces, I placed them on the MDF and they fit, but barely.
I painted the MDF black so it wouldn’t be so noticeable, then mounted the two pieces of electronics on the MDF with screws. The heat vent under the seat sits ½” above the rest of the carpet, so I used longer screws on the back and left side of the MDF. This lifts the MDF and keeps it from sitting directly on the carpet and blocking the heat vent.
Taking a cue from Axxman’s audio post, I wanted to be able to connect everything without cutting or splicing into any of the vehicle’s wiring, and be able to disconnect everything when I eventually trade vehicles or make another mod to the audio system. So, I bought a radio wiring harness (Metra 70-1761) and a reverse radio harness (Scosche). I found out later that Metra also makes a reverse harness (71-1761), but I had already bought the Scosche. Since there would be 8 wires going from the head unit’s speaker outputs to the DQ-61, and 8 more going back to the speaker plug behind the head unit, I bought a 20 ft section of Stinger 9-conductor cable, cut it in half, and had plenty for the task.
After crimping all the wires in the two pieces of 9-conductor cable to the two wiring harnesses, I taped them together to keep them out of the way of whatever is already in the vehicle. I ran the cables down the front of the dash and through the console, exiting from the rear bottom of the console to under the driver’s seat. (See Antman’s thread on how to remove the top part of the console and how to run the power cable from the battery to the front seat.) There is no need to remove either the main shift knob or the 4WD knob when removing the console.
To ground both the amp and DSP, I drilled a hole through the piece of metal cross-bracing that the front of the seat bolts to. The seat bolts were too big to go through the terminals on the ground wires. Otherwise, I would have used one of the seat bolts, per Antman. For the power to the DSP, I used an add-a-tap in an unused slot in the fuse block under the dash. For reference, the 4Runner uses fuse type ATM-LP. LP stands for low-profile, but the add-a-tap doesn’t use low-profile fuses, so you’ll need to get “regular” ATM fuses for that.
Next, it was just a matter of hooking up the speaker wiring from the radio to the DSP, and hooking up the return wiring from the amp back to the speaker plugs.
The result: fantastic sound. A couple of tweaks to the EQ settings on the DSP were needed, but just a shot-in-the-dark tuning made an amazing difference. All four of the rear speakers are still functional. Party mode still works, but there is no real reason to use party mode anymore. One downside to the mod: if you want to adjust the EQ on the DSP, you need to remove the four bolts holding the driver’s seat, and tilt the seat back to have access to the EQ buttons. The upside is, once the EQ is set, there is no reason to ever monkey with the adjustments again. I got the adjustments pretty well perfect by downloading a pink noise track from the net and used the AudioContol RTA app on my iPad to read the result.
As an aside, I found that both the Metra and Scosche harnesses have only four terminals for the rear speaker harness. The plug going into the back of the OEM radio has five terminals. I wasn’t able to identify what the fifth wire went to. It’s a white wire about twice the diameter of a hair. I decided to go ahead with the assembly and see what didn’t work after the install. Turns out, the small white wire controls the nighttime illumination of the radio face. The daytime illumination (headlights off) was fine; it was only when the headlights were on that there was no illumination on the radio at all. So, I removed the head unit again, swapped an unused terminal from one of the plugs to the Metra and Scosche harness plugs, and connected those terminals together. All is now good. I’m wondering, though, if that small white wire can somehow be tweaked to provide brighter (like daytime) illumination to the head unit when the headlights are on. Maybe a more adventurous and knowledgeable modder can take that on.