E-Locker and Differential Breather install, Trail Edition

Does anyone know what diameter barb fitting to use to connect to the e-locker tubing end? Obviously the end that connects to the ATB tubing is 5/16 (8mm).

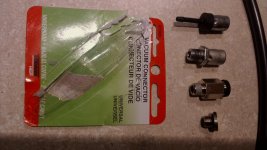
Will have to see what the diameter of the barb is if I still have it. Here's some pics of the fittings.
 

Attachments

  • IMG_20160508_093026.jpg
    IMG_20160508_093026.jpg
    132.7 KB · Views: 2,001
  • Pic_1.jpg
    Pic_1.jpg
    17.3 KB · Views: 1,915
Does anyone know what diameter barb fitting to use to connect to the e-locker tubing end? Obviously the end that connects to the ATB tubing is 5/16 (8mm).


Answered my own question.
E locker is 1/8 barb
A 1/8 barb x 1/4 barb would have been ideal. However this was not available anywhere local. Also I don't know how well a poly tube would hold a barb.

Parts I used- purchased at Home Depot
Brass 1/8 barb x 1/4 MIP adapter - LFA-85
659fafa9321f24769bf0f6f51d4e0339.jpg

Brass 1/4 FIP x 1/8 FIP coupling - LFA-734
824c2dad81b24028f8662ea6f3ac9e6f.jpg


5459b250cd249fcf4b19771692eea9c9.jpg
 
Last edited:
I haven't seen this mentioned elsewhere, but is the Elocker unit completely sealed off from the rest of the axle housing? Because if not, it seems to me the elocker vent is in a good location to prevent most water intrusion into the axle assembly short of really high axle oil temps and quickly getting to deep deep water. Sorry, I'm new to toyotas.
 
I haven't seen this mentioned elsewhere, but is the Elocker unit completely sealed off from the rest of the axle housing? Because if not, it seems to me the elocker vent is in a good location to prevent most water intrusion into the axle assembly short of really high axle oil temps and quickly getting to deep deep water. Sorry, I'm new to toyotas.


The e-locker breather is for the electric motor and switches inside the actuator. It's a separate compartment from the inside of the axle tube which is why it requires its own breather. Getting gear oil in there would be an expensive proposition as those actuators aren't cheap.
 
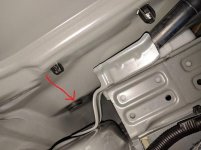
I'm trying to work my way through this mod, but I'm having trouble routing the lines. Considering how I have the ARB kit and it does not provide enough tubing to run two parallel lines up to the engine bay, I've decided to go up into the jack compartment. I think I have found the grommet that others have cut to run the lines through. Please see the picture below and confirm that I've got the right one.

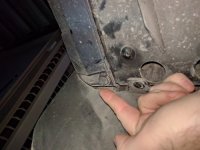
I read someone's write-up that said it was difficult to reinstall the grommet once the lines were routed. After trying to get my hand down there to touch it, I can see why. I'd like to apply some silicone once the lines are routed and accessing it from inside looks very difficult. But I saw some of you have removed a small panel on the bottom and even the side bumper panel. In my second picture, I'm pointing out a clip holding on the bottom panel. I can't tell how I'm supposed to remove that thing. What's the trick? And if I want to remove the side bumper panel, how do I do that? I'm hoping if I remove these I can access that grommet and seal it up once the lines are routed.

 

Attachments

  • IMG_20171229_121825.jpg
    IMG_20171229_121825.jpg
    46.1 KB · Views: 1,379
  • IMG_20171229_174513.jpg
    IMG_20171229_174513.jpg
    122.6 KB · Views: 1,363
I'm trying to work my way through this mod, but I'm having trouble routing the lines. Considering how I have the ARB kit and it does not provide enough tubing to run two parallel lines up to the engine bay, I've decided to go up into the jack compartment. I think I have found the grommet that others have cut to run the lines through. Please see the picture below and confirm that I've got the right one.

I read someone's write-up that said it was difficult to reinstall the grommet once the lines were routed. After trying to get my hand down there to touch it, I can see why. I'd like to apply some silicone once the lines are routed and accessing it from inside looks very difficult. But I saw some of you have removed a small panel on the bottom and even the side bumper panel. In my second picture, I'm pointing out a clip holding on the bottom panel. I can't tell how I'm supposed to remove that thing. What's the trick? And if I want to remove the side bumper panel, how do I do that? I'm hoping if I remove these I can access that grommet and seal it up once the lines are routed.

Can’t help with what you are doing but there have been people successful in running two lines with the ARB kit to the engine bay. I thought originally in my write-up that there was just enough for one run, but others have done two.

I believe [MENTION=29376]sandcrawler[/MENTION] has done it, Post #30 in the thread below.

http://www.toyota-4runner.org/5th-gen-t4rs/215741-rear-differential-breather-mod-dummies.html
 
I'm trying to work my way through this mod, but I'm having trouble routing the lines. Considering how I have the ARB kit and it does not provide enough tubing to run two parallel lines up to the engine bay, I've decided to go up into the jack compartment. I think I have found the grommet that others have cut to run the lines through. Please see the picture below and confirm that I've got the right one.

I read someone's write-up that said it was difficult to reinstall the grommet once the lines were routed. After trying to get my hand down there to touch it, I can see why. I'd like to apply some silicone once the lines are routed and accessing it from inside looks very difficult. But I saw some of you have removed a small panel on the bottom and even the side bumper panel. In my second picture, I'm pointing out a clip holding on the bottom panel. I can't tell how I'm supposed to remove that thing. What's the trick? And if I want to remove the side bumper panel, how do I do that? I'm hoping if I remove these I can access that grommet and seal it up once the lines are routed.


So, if your lazy like me, you'll just buy extra fuel line and use that as the second line. There is not enough for two separate lines and I hate redoing things :p
 
[MENTION=120701]Cymon[/MENTION] thanks for pointing me to that post reporting that the ARB kit does provide enough length to route to the engine bay. It took some time, but I did manage to route two equal halves of the ARB line with adequate slack in the back.
[MENTION=147623]funshot[/MENTION] - I tried finding the same size line. I went to Home Depot, two auto parts stores, and a ma & pop hardware store. Nobody had the right size.

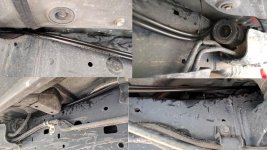
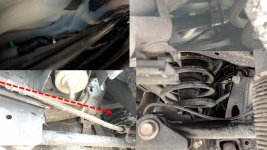
I'll share some photos of my routing in hopes that it'll help someone else trying to run two lines from the engine bay to the rear differential. Sorry that they're all squished together. I don't know how to better format images that are attached via the forum attachment manager.

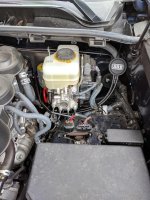
In the first image, you can see where I placed my breather block and filter. I just zip-tied it to a cable harness. If it has issues I can always attach it to the wall later. I ran the lines as close to the rear of the wheel well as possible.

In the second image (a composite of two photos side-by-side), you can see how I zip-tied the lines to some hard lines running along the engine bay side of the wheel well. This was to keep the breather lines from getting too close to the steering shaft. From there, the lines go over the driver front suspension.

In the third image (a composite of four photos 2x2), you can see I follow the driver side frame rail. I drop down to zip tie the lines to what I think are some KDSS lines. Then back up on top of the rail to the aft suspension.

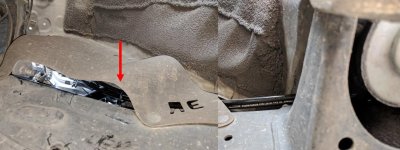
In the fourth image (a composite of four photos 2x2), I'm trying to show how I snuck the lines over the gas tank. This was the most difficult part. I had to fish a straightened coat hanger from the rear of the vehicle forward to get through that space. Then I taped the breather lines to the coat hanger to pull them through. The top left part shows how tight the space is. The two images on the right show how the lines end up passing on the inner side of the driver-rear suspension. If you look closely you can see how I zip-tied to another hard-line to keep the breather lines from getting caught in the suspension.

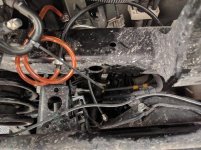
The final image shows my routing at the rear diff looking vehicle-forward. I routed the lines over what I think is the line from the gas door to the tank. I had plenty of slack for the line to the diff. For the line to the e-locker, I had to be a little creative to get a sealed connection from the ARB tube to the tiny stock line from the e-locker. I found some orange-colored tube at Home Depot that had an inner diameter almost the same size as the outer diameter of the little tube left after removing the e-locker breather stub. This Home Depot tube had an outer diameter almost small enough to fit inside the ARB line. So with a drill, I bored out one end of the orange tube so it would mate with the e-locker breather stub. Then with a dremel, I shaved down the outer diameter of the other end of the orange tube so it would fit into the ARB line. I used some hose clamps that may or may not help keep these sealed. There was quite a bit of resistance sliding these connections together, so I think it's good to go. Maybe another day I'll slop some silicone over these.
 

Attachments

  • IMG_20171230_143319-engine bay.jpg
    IMG_20171230_143319-engine bay.jpg
    138.5 KB · Views: 1,425
  • past-front-suspension.jpg
    past-front-suspension.jpg
    88.2 KB · Views: 1,341
  • routing along driver frame rail.jpg
    routing along driver frame rail.jpg
    137.3 KB · Views: 1,408
  • route past rear suspension.jpg
    route past rear suspension.jpg
    122.1 KB · Views: 1,369
  • IMG_20171230_144321.jpg
    IMG_20171230_144321.jpg
    89.9 KB · Views: 1,429
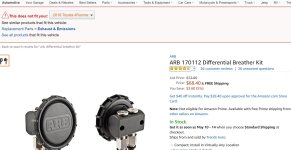
This will be my next mod. I just went to Amazon to order and for some reason I got this warning in the upper left - is this the wrong kit??? Lower in the questions section someone asks if it will work with their '17 and the answer is yes it works with all 5th Gens - why did I get this warning about my '18?
 

Attachments

  • ARB Diff Breather Kit Amazon.jpg
    ARB Diff Breather Kit Amazon.jpg
    126.5 KB · Views: 1,188
This will be my next mod. I just went to Amazon to order and for some reason I got this warning in the upper left - is this the wrong kit??? Lower in the questions section someone asks if it will work with their '17 and the answer is yes it works with all 5th Gens - why did I get this warning about my '18?

It will work, this kit is about as Universal as you can get. If you need any reference I have the install linked in my signature.
 
This will be my next mod.

I just went to Amazon to order and for some reason I got this warning in the upper left - is this the wrong kit???

Lower in the questions section someone asks if it will work with their '17 and the answer is yes it works with all 5th Gens -

why did I get this warning about my '18?

Amazon is typically a model year behind on most items I have researched.

I usually plug in the prior year and it will give me a better indication of compatibility with my 4runner, as the 5th gen is largely unchanged for the bulk of the generation.

When in doubt I go to the manufacturer's website or contact them directly.

As mentioned above, this kit is generic and not at all model or year specific.
 
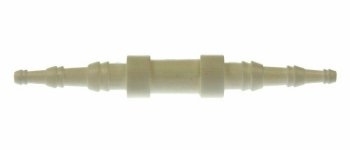
I used the universal barb fitting pictured above and ran that and the diff breather line up the gas fill tube with some two way toyota breathers to cap 1/4” fuel lines. I DID NOT drill through the gas cap plate to poke the breathers through plate to the outside. Doesn’t make sense to me.
 
Last edited:
Wouldn't that location vent nasty smelling diff fluid vapors into the cabin?


.

For over a year I never had any sort of gear oil smell inside the cab. I changed all of the gear oil (FR diff, RR diff, T-case) to Redline at 35k and I started getting an intermittent gear oil smell. Usually when going uphill, and it was amplified with the climate control set to recirculation. I checked under the vehicle with zero leaks or visible seeping. I also checked the area where the diff breathers vent, with no obvious smell coming from in the jack compartment. Today it is rare to get that smell, so I have just written it off as being "one of those things" that I just deal with when it comes up.
 
Nobody here seems to have ever reported issues of water intrusions to either Diff or E Locker, just that it could theoretically happen.

My ARB diff breather is done and routed to engine copartment. What is the risk of the E-locker reaming OEM? Does it heat up and have seals that could theoretically allow/suck water in during a crossing?
Thanks
 
Thanks everyone for a great thread.

When I do this it'll be with the ARB kit although some of you have had some great ideas (MTN4RNR, etc).

Firstly, I've heard some proclaim that the elocker and diff vents "share" the same "airspace" in the case so one line to the filter for both vents is fine. Then some say that one needs 2 lines to prevent oil vapor from getting into the elocker electronics? Which is it please?

There seems to be questions as to the amount of "airflow" or ability to equalize necessary with this mod also and must say that one 1/8" ID line has more than enough internal volume and "airflow" capability for 20 vents, don't worry about impeding "airflow". You can almost breath through that done very slowly.

For those who are running their lines up to the engine compartment, can you please explain your chosen route towards the front of your vehicle and through the firewall?

Thanks
 

Members online

Forum statistics

Threads
278,316
Messages
3,554,120
Members
248,016
Latest member
Advally Service

Trending content

Back
Top