Fightman's Build Thread

nice! do our trucks have a light under the hood? if there's wires i gotta do this!

No, theres no wiring, but its extremely easy to hook up. All you need is some wire, contact switch, inline fuse, and your lights.

I have to inquire about the school bus.

The lights look good all around!

His wife drives bus. I was going to steal her muffler for my CR-V, but she didnt like the idea for some reason.

~Lee
 
Thanks for all the comments guys! 2X on what Lee said.... My wife drives school buses part time...... :D

BTW, thought I'd have a Bigfish moment.... and share my injury with you guys! lol! I bashed the top of my head on the business end of a pitchfork I had hanging in the garage, while looking for a washer on the ground.... lol!

422898_402451659768373_100000106275922_1768435_22677041_n.jpg~original


So I can also say that the 4Runner has caused me to bleed for it! :) Luckily.... it was only a scratch....lol!
 
Last edited:
I don't know about any other members here, but my bus drivers always looked like the bus driver who picked up Forrest Gump or Chris Farley in "Billy Madison". I had a substitute one who liked to drink out of a paper sack from time to time (I'll bet the VA board of education did not know about this one).

Heal up there Fightman.
 
Little Ceasar, I feel really bad for you man... a lot of my bus drivers were cute when I was growing up! The one who drives the bus in the pics above, looks like this:

P1130474.jpg~original


Granted, she doesn't wear the swimsuit while driving.... lol!


Anyway, this morning, I decided to finish what we had started last night, and ran the rest of the wiring for the reverse lights.

Last night, we installed the reverse lights on my tire carrier, and fastened the ground wire to the pivoting points on the lights.

DSCF6499.jpg~original


We then ran a signal wire from the stock reverse light, through the driver side wiring grommet behind the cargo side panel, and then under and across the lift gate door sill plate to the passenger side pillar panel, and into the storage compartment. We then ran a power wire from the new reverse lights, through a passage between the rear bumper and body into the door jam, behind the passenger side tail lights, through the wiring grommet into the back of the passenger side panel of the cargo area and into the storage compartment. We then left all the wiring in the compartment, along with a relay, and called it a night.

This morning, I fastened the relay to the back side of the storage compartment.

DSCF6501.jpg~original


I then tucked the main power wire behind the entire length of the side panel, toward the front of the truck, using the door sill plates to hide the wire.

DSCF6502.jpg~original


DSCF6503.jpg~original


Once I got to the front, I tucked the wire behind the passenger side kick panel, under the dash, and under the top of the carpeting to the center console:

DSCF6504.jpg~original


I then ran the wire across the transmission hump, and again under the top of the carpet to driver side lower dash area:

DSCF6505.jpg~original


I then tucked it behind the driver side kick panel, and up to a pre-existing hole that I had drilled to run my auxiliary driving lights:

DSCF6506.jpg~original


DSCF6508.jpg~original


The hole leads to the engine compartment, right here:

DSCF6509.jpg~original


I then ran the wire to a fusible link and tucked that between the battery and fuse box:

DSCF6510.jpg~original


Next, I fastened the power wire to the positive post, along with all the rest of my auxiliary lights:

DSCF6511.jpg~original


All capped off:

DSCF6512.jpg~original


Ready to test them!

DSCF6514.jpg~original


With the transmission in reverse:

DSCF6515.jpg~original


Another project done on the 4Runner.... so many more to go!
 
Last edited:
I'd still be on the bus if any of my drivers had been in the same postal/zip code.

I like the rear lights. Now you are getting to the fun stuff (no more bad injectors). Enjoy.
 
Nice work, man! You really went all out knocking this lighting projects in a hurry. I'm also glad to see you getting back to modding..

Cheers!
 
Hey Fightman, sorry if this has already been mentioned but how are those hood lights held on? I was just thinking how much it would suck if one of them came loose while the engine was running.
 
Hey Fightman, sorry if this has already been mentioned but how are those hood lights held on? I was just thinking how much it would suck if one of them came loose while the engine was running.

No problem Brian, the LED Lights are actually fastened to the hood braces using some self taping metal screws. Very Secure.... :)
 
Another mod!

So, today I ran an idea that I've have brewing in my head for years with LDForget. It was another lighting project I wanted to do, since I had my Monte Carlo, but never did it.

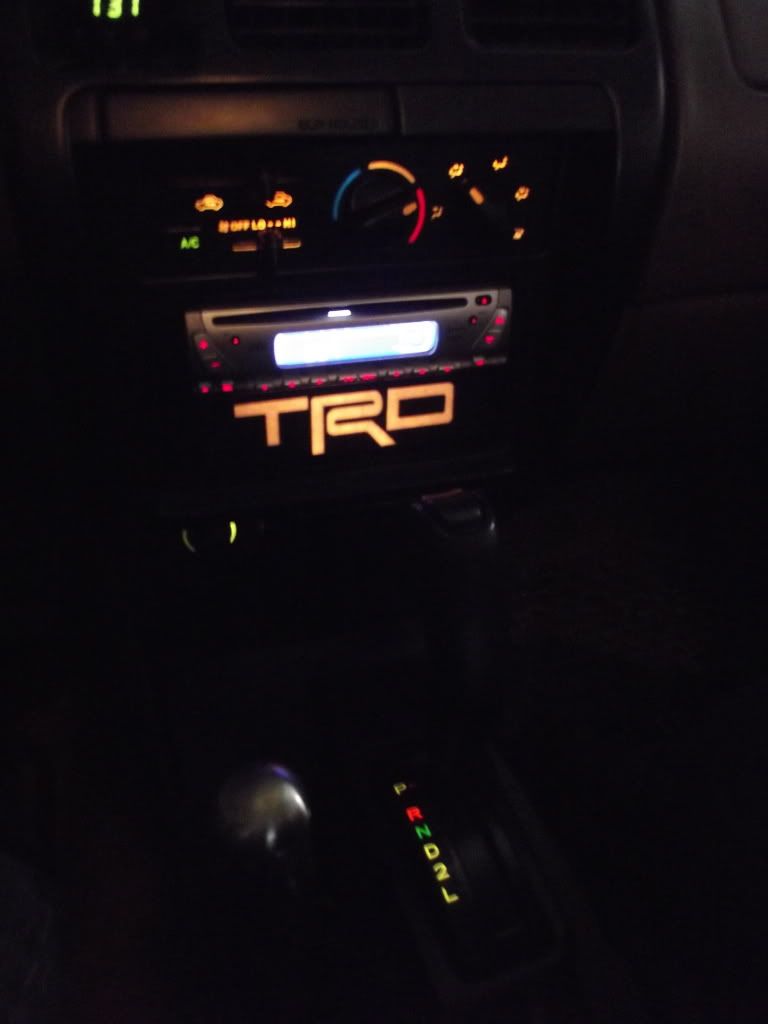
With the Monte, the idea was to add a back lighted Batman Symbol in the dash, (Corny I know...). This time around I decided I wanted a SuperMan Emblem!! ........I'm just kidding!!! LOL! For real though, we decided to throw in a TRD Logo back lit in the dash.

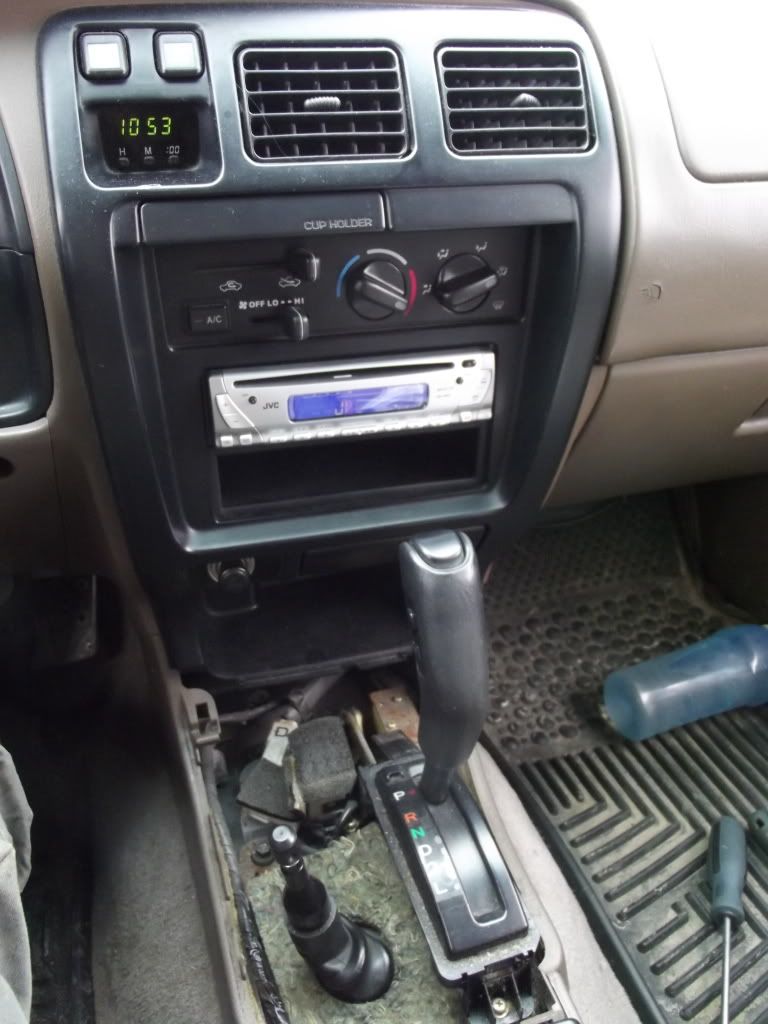
First thing's first, I needed to take the center radio control Bezel apart, and get to work. I always hated how useless the little cubby was under the radio, so I decided to use this area to do my mod.

Here's a reference pic for good measure:

DSCF6516.jpg~original


Pic of the radio bezel, and all the other stuff taken apart:

DSCF6517.jpg~original


I moved on to figuring out how I was going to make this work. I needed some sort of lense or plastic to put the TRD emblem on, so I went hunting around the house for something I could use! After about 10 minutes, I found what I needed! My Samsung Printer, had a plastic cover over the paper tray, that quite frankly was annoying to mess with. So off it went!

Pic of the plastic cover already in the cutting process:

DSCF6518.jpg~original


I marked out the dimensions of the center cubby on the plastic, and then got to work cutting it using my dremmel and a cutoff wheel.

DSCF6519.jpg~original


After we cut it down to a rough form, we used the bench grinder to trim the remaining plastic, so that it would sit even with the edges of the cubby. Once that was done, we headed to the Automotive store, and got a hold of an small Automotive Marker Light Socket and bulb. We then wired it into the illumination wire behind the radio, and grounded it using the same ground as the radio.

DSCF6525.jpg~original


Once that was figured out, we decided to turn our attention to the TRD emblem. At first we were just going to mask and paint the plastic, but took the easy way out, and used my computer and Printer again! We printed a couple of copies of the TRD emblem onto paper, and then cut them to size.

DSCF6520.jpg~original


We then taped them to the back of the plastic lense piece we fabricated, and then glued the lens piece to the cubby.

432187_403589269654612_100000106275922_1771880_1640579729_n.jpg~original


We then popped in the DVD player a copy of Dukes of Hazzard (Johny Knocksville, Sean William Scott, etc..) and actually fell asleep for an hour! lol!

DSCF6521.jpg~original


Once we woke up, the movie was over, and we continued with the mod. We got on our boots, headed to the shop, and installed the new TRD light mod.

Here's some pics of the mod, kinda cheesy with the yellow lighting, but we took the little green "Condoms" off the illumination bulbs from the Temp Controls, and I find it ties in a little better!

Pic of the little green "Condoms":

DSCF6535.jpg~original


DSCF6527.jpg~original


DSCF6532.jpg~original


And finally, all assembled, and ready to roll! :)

DSCF6533.jpg~original


All in all, took a decent part of the day (with Nap), but for under $11.00, I got something I'm pretty happy with. Now I just have to explain to the wife, why the printer looks like this:

DSCF6536.jpg~original


:wink2:
 
Last edited:
The way it loaded because of the pictures I saw:

1. Dude giving thumbs up
2. The words "little condoms"
3. Dude asleep

Good work though. :D
 
Because I pay for the slowest internet, it makes the page move weird, so thats what I saw...

I was admiring your tire carrier the other day. Don't know why people were on you about structure. Seems more than fine. And obviously is.
 
Because I pay for the slowest internet, it makes the page move weird, so thats what I saw...

I was admiring your tire carrier the other day. Don't know why people were on you about structure. Seems more than fine. And obviously is.

HA HA HA! I saw what you spoke of.... which is why I thought it to be funny too! :)

As for the tire carrier, they just didn't like the weight of the tire sitting on those 2 hinges. However, I had one certified welder/fabricator, and the counter guy at the local fabrication store, tell me they were more than strong enough. I proved the naysayers anyway, it's been a few years since I've build it, and the hinges have not given me any grief! :)

dang that looks cool, another one to add to list!!

Thanks buddy! I was picturing your light mods in my head, when I decided to go ahead with my mod. I wanted something different, that nobody else here had done yet....so went with this! I'd like to take the rest of the dash apart, and buy some LED's to replace the tired old bulbs, but may just hold off on that one.

I've got a few more little projects in the works, nothing crazy, but more stuff that will keep me busy over the next little while! :)
 
looks awesome fightman. I wonder if you can add a little hinge to the top of it and use it as a little door/flap to open up and keep things in the little cubby w/o them falling out.
 

Members online

Forum statistics

Threads
278,309
Messages
3,554,068
Members
248,016
Latest member
Advally Service

Trending content

Back
Top