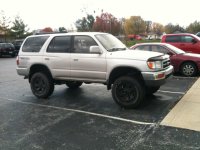
I've had my "98 SR5 for just over a year now, and I'm just now making a build thread for it. This will be mostly a step by step list of the mods I've done, since I didn't do a good job of taking pics of the process itself(until the next mod of course  )
)
It doesn't look like I have any pictures of it when I bought it, so here's exactly what it looked like when I picked it up.

First thing I did was go do a thorough cleaning and replace ALL fluids. Looked like the previous owner did a decent job of keeping the truck maintained. Truck had (2)265/70/16 Firestone Destination AT and (2)Goodyear Wrangler AT tires. Not ideal, but they 3/4 tires have almost new tread, so I'm not in a hurry to upgrade the tires quite yet. Only repairs I had to do right away was a pair of sway bar linkages and a rear lower control arm.
1) First mod was doing the ol sticking the index cards in between the wheel and tire to paint deal.
-Used aircraft stripper on wheels to get it down to bare metal.
-Next step was self etching primer
-Several coats of semi-gloss black
-Several coats of clear coat
The paint has held up 100x better than I thought it would. A little over a year of the paint being on there, only minor wear marks in a few lug holes, and minor chipping on a few of the rim areas. When I pick up a spare set of wheels, I will be re-doing this process instead of powdercoating.
2) Purchased Husky liners for the front seats. Didn't purchase the rear, due to the fact that I don't have people in the back very often. Will purchase the Cargo liner before winter hits this year.
3) Next was taking the Running boards off....No explanation needed.
4) Next up was the lift. Didn't want a stiff ride, so I went all Bilstein and OEM Toyota springs.
-purchased TRD Tundra shocks/springs from a local junkyard and put them on in between one of my work trips. Looked like a pre-runner until the I got the LC springs and Bilstein 5125's(from Toytec) put on, then it became apparent that I needed a little more lift in the front to even it out. While there was nothing wrong with the TRD Tundra shocks, I didn't want to do a spacer lift. I ordered the Bilstein 5100 height adjustable shocks, also from Toytec. I set them on the middle setting and the truck sits dead even.
5) Revtek Differential drop purchased from a local vendor(Tru Motorsports), no explanation needed here either.
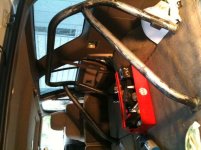
6) Was bored one day browsing the classifieds section on yota-tech(I rarely get on there), and came across an ad for a free 1st gen rollbar. Kicker was, he wasn't willing to ship. Lucky for me he was located here in Indianapolis.
-Brought it home and did a quick sand/paint and sat it in the back of the 4Runner. Wasn't happy with it, but it ended up sitting at my work for a few weeks until I had time to do a thorough strip and paint.
-Put several coats of VHT rollcage paint. No primer, no clear coat.
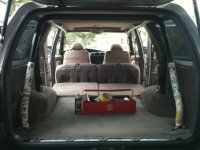
-After I let the paint dry for a day(hey, I wanted to be completely sure it was done lol), I completely wrapped the rollbar in newspaper so it didn't scratch up the paint when putting it through the rear seats.
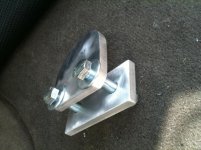
-Now that it was in, it was time to install it. The mounts obviously won't hold up in the unlikely event of a high speed rollover, but maybe if it were to tip at low speed, it will help....who knows. Made spacers for the rear legs, and backing plates for the bottom of all 4 posts.
-Planning to line the areas of the rollbar where the cargo cover rubs with heli-tape....that way I can still use the cover if needed without rubbing the paint off.
7) Finally picked up some OEM mud guards for the front wheel wells. Luckily the rocker panels didn't get scratched up from going without protection since I took the running boards off. Looks a lot better too!
8) I hate the chrome lined SR5 fender trim, but didn't want to take it off, or pay out the A$$ for the limited or sport fender trim and then get it repainted Desert Dune. I used to have a Lincoln LS, and one of the the common "free mods" was using using electrical tape to black out some of the chrome trim. Decided I would try it out on the fender, so I threw it on quickly one night. It still looks good after a few months, so I'll probably redo it and spend a little more time on it(In my haste I didn't quite get the lengths 100%, and a little chrome shows on a few ends). Is a little more involved than just slapping tape on it, so I can do a short write-up on it if anyone wants...? For the time spent, it's one of my favorite mods.
9) Had some high quality "TRD Off Road" decals made by Freelance Imaging. I do a little vinyl graphics installing at work on our equipment, so I threw these on myself.
10) B&M tranny cooler install. Straight forward, don't need to explain.
)It doesn't look like I have any pictures of it when I bought it, so here's exactly what it looked like when I picked it up.
First thing I did was go do a thorough cleaning and replace ALL fluids. Looked like the previous owner did a decent job of keeping the truck maintained. Truck had (2)265/70/16 Firestone Destination AT and (2)Goodyear Wrangler AT tires. Not ideal, but they 3/4 tires have almost new tread, so I'm not in a hurry to upgrade the tires quite yet. Only repairs I had to do right away was a pair of sway bar linkages and a rear lower control arm.
1) First mod was doing the ol sticking the index cards in between the wheel and tire to paint deal.
-Used aircraft stripper on wheels to get it down to bare metal.
-Next step was self etching primer
-Several coats of semi-gloss black
-Several coats of clear coat
The paint has held up 100x better than I thought it would. A little over a year of the paint being on there, only minor wear marks in a few lug holes, and minor chipping on a few of the rim areas. When I pick up a spare set of wheels, I will be re-doing this process instead of powdercoating.
2) Purchased Husky liners for the front seats. Didn't purchase the rear, due to the fact that I don't have people in the back very often. Will purchase the Cargo liner before winter hits this year.
3) Next was taking the Running boards off....No explanation needed.
4) Next up was the lift. Didn't want a stiff ride, so I went all Bilstein and OEM Toyota springs.
-purchased TRD Tundra shocks/springs from a local junkyard and put them on in between one of my work trips. Looked like a pre-runner until the I got the LC springs and Bilstein 5125's(from Toytec) put on, then it became apparent that I needed a little more lift in the front to even it out. While there was nothing wrong with the TRD Tundra shocks, I didn't want to do a spacer lift. I ordered the Bilstein 5100 height adjustable shocks, also from Toytec. I set them on the middle setting and the truck sits dead even.
5) Revtek Differential drop purchased from a local vendor(Tru Motorsports), no explanation needed here either.
6) Was bored one day browsing the classifieds section on yota-tech(I rarely get on there), and came across an ad for a free 1st gen rollbar. Kicker was, he wasn't willing to ship. Lucky for me he was located here in Indianapolis.
-Brought it home and did a quick sand/paint and sat it in the back of the 4Runner. Wasn't happy with it, but it ended up sitting at my work for a few weeks until I had time to do a thorough strip and paint.
-Put several coats of VHT rollcage paint. No primer, no clear coat.
-After I let the paint dry for a day(hey, I wanted to be completely sure it was done lol), I completely wrapped the rollbar in newspaper so it didn't scratch up the paint when putting it through the rear seats.
-Now that it was in, it was time to install it. The mounts obviously won't hold up in the unlikely event of a high speed rollover, but maybe if it were to tip at low speed, it will help....who knows. Made spacers for the rear legs, and backing plates for the bottom of all 4 posts.
-Planning to line the areas of the rollbar where the cargo cover rubs with heli-tape....that way I can still use the cover if needed without rubbing the paint off.
7) Finally picked up some OEM mud guards for the front wheel wells. Luckily the rocker panels didn't get scratched up from going without protection since I took the running boards off. Looks a lot better too!
8) I hate the chrome lined SR5 fender trim, but didn't want to take it off, or pay out the A$$ for the limited or sport fender trim and then get it repainted Desert Dune. I used to have a Lincoln LS, and one of the the common "free mods" was using using electrical tape to black out some of the chrome trim. Decided I would try it out on the fender, so I threw it on quickly one night. It still looks good after a few months, so I'll probably redo it and spend a little more time on it(In my haste I didn't quite get the lengths 100%, and a little chrome shows on a few ends). Is a little more involved than just slapping tape on it, so I can do a short write-up on it if anyone wants...? For the time spent, it's one of my favorite mods.
9) Had some high quality "TRD Off Road" decals made by Freelance Imaging. I do a little vinyl graphics installing at work on our equipment, so I threw these on myself.
10) B&M tranny cooler install. Straight forward, don't need to explain.