

Jetboy
New member
This is a common problem for me. So I thought I'd share how i fix them.
First thing's first - The hardware on the 5th gen sucks. It's not properly coated to prevent corrosion and the threads on the fasteners (bolts - and machine screws) are poorly formed, and the nuts are often not great either. You can avoid a lot of pain and frustration by doing 3 things. First - run a tap through the nuts at least once after the first time you disassemble anything underneath - and equally important I've found, run a die over the bolts. I'm amazed how much metal I cut off of some of them. Second, put locktite or antiseize on all fo them. They don't have the same coating as your old Toyota. I don't know why. I never had this issue on even my 70's toyotas. And 3rd, don't install with an impact. All of the ones I've broken have been done with a 20v impact. It's easy to underestimate the torque they have. It's also very hard to identify a problem before it's too late.
That said, here's how I do it.
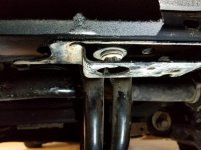
First I make a weld-nut. I typically purchase a flange nut in the proper thread size and pitch. In this case it was an 8mm x 1.25 pitch in the front crossmember under the radiator where the skid plate brackets mount. I swap from the TRD Pro skid for summer to the OEM Trail skid for winter because my snow plow bracket doesn't fit with the TRD Pro skid. I broke the welded nut off inside the crossmember.
I start by cutting a short length of flat bar. Then I drill a hole larger than the hole of the fastener. Then I weld the flange nut to a small length of flat bar. Maybe 1.5 inches long. The width is dependent on where I'm trying to fit it in. Next I use a disc sander to round all of the corners and cleanup any sharp points. Then I run a tap through to make sure I haven't damaged the threads.
This is not my picture - but similar idea.


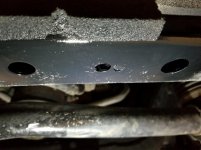
Then I drill two holes approx .25 dia. on either side of the frame hole where the weld nut needs to go.
Then I use either a magnetic tool or a piece of wire to work the part into the location above the hole where the nut needs to be welded in.
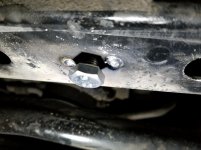
Once in location I use a bolt and thread it into the weld nut so I can firmly hold it in place while I weld it. In the case of this example I used a long bolt to run though the weldnut and all the way up to the top of the crossmember. The result was that it was pushing the weld nut down firmly in place - although it looks like it's not tight.
Then I use the two .250 holes to weld the new weld nut fixture into place. My tip here is if you're a novice welder - crank up the juice and weld it in hot. It's easy to make a good looking weld that doesn't penetrate well or at all and it'll look fine until you put some torque on it and it breaks loose. Don't do that. You can see in this example I didn't get the hole completely filled on the right hand side hole. I could have done a better job, but I wasn't all that concerned about it.
Then grind the surface smooth. Touch up the paint with some good quality spray paint. I also try my best to paint inside - but it's never going to get a great coat inside. It's kinda just spray and pray through the holes in the rail.
Hope that helps someone in a similar situation. The entire process - not counting removal of the parts and re-assembly takes about 45 minutes - I'm fortunate enough to have a stock of various flat bars and all the tools setup and easy to use. If you don't have any of that - you can buy weldnuts from various suppliers that would be ready to trim to fit though whatever hold you're inserting through, and weld into place. You can probably also do pretty well with good quality epoxy. Some epoxies are as strong or stronger than welding like I did. I just didn't want to go through the effort to mix an epoxy glue and the mess that goes along with it.
I didn't take a lot of pics along the way - but hopefully this helps give you the idea.
First thing's first - The hardware on the 5th gen sucks. It's not properly coated to prevent corrosion and the threads on the fasteners (bolts - and machine screws) are poorly formed, and the nuts are often not great either. You can avoid a lot of pain and frustration by doing 3 things. First - run a tap through the nuts at least once after the first time you disassemble anything underneath - and equally important I've found, run a die over the bolts. I'm amazed how much metal I cut off of some of them. Second, put locktite or antiseize on all fo them. They don't have the same coating as your old Toyota. I don't know why. I never had this issue on even my 70's toyotas. And 3rd, don't install with an impact. All of the ones I've broken have been done with a 20v impact. It's easy to underestimate the torque they have. It's also very hard to identify a problem before it's too late.
That said, here's how I do it.
First I make a weld-nut. I typically purchase a flange nut in the proper thread size and pitch. In this case it was an 8mm x 1.25 pitch in the front crossmember under the radiator where the skid plate brackets mount. I swap from the TRD Pro skid for summer to the OEM Trail skid for winter because my snow plow bracket doesn't fit with the TRD Pro skid. I broke the welded nut off inside the crossmember.
I start by cutting a short length of flat bar. Then I drill a hole larger than the hole of the fastener. Then I weld the flange nut to a small length of flat bar. Maybe 1.5 inches long. The width is dependent on where I'm trying to fit it in. Next I use a disc sander to round all of the corners and cleanup any sharp points. Then I run a tap through to make sure I haven't damaged the threads.
This is not my picture - but similar idea.
Then I drill two holes approx .25 dia. on either side of the frame hole where the weld nut needs to go.
Then I use either a magnetic tool or a piece of wire to work the part into the location above the hole where the nut needs to be welded in.
Once in location I use a bolt and thread it into the weld nut so I can firmly hold it in place while I weld it. In the case of this example I used a long bolt to run though the weldnut and all the way up to the top of the crossmember. The result was that it was pushing the weld nut down firmly in place - although it looks like it's not tight.
Then I use the two .250 holes to weld the new weld nut fixture into place. My tip here is if you're a novice welder - crank up the juice and weld it in hot. It's easy to make a good looking weld that doesn't penetrate well or at all and it'll look fine until you put some torque on it and it breaks loose. Don't do that. You can see in this example I didn't get the hole completely filled on the right hand side hole. I could have done a better job, but I wasn't all that concerned about it.
Then grind the surface smooth. Touch up the paint with some good quality spray paint. I also try my best to paint inside - but it's never going to get a great coat inside. It's kinda just spray and pray through the holes in the rail.
Hope that helps someone in a similar situation. The entire process - not counting removal of the parts and re-assembly takes about 45 minutes - I'm fortunate enough to have a stock of various flat bars and all the tools setup and easy to use. If you don't have any of that - you can buy weldnuts from various suppliers that would be ready to trim to fit though whatever hold you're inserting through, and weld into place. You can probably also do pretty well with good quality epoxy. Some epoxies are as strong or stronger than welding like I did. I just didn't want to go through the effort to mix an epoxy glue and the mess that goes along with it.
I didn't take a lot of pics along the way - but hopefully this helps give you the idea.
Attachments
Last edited:


