Folding Mirror kit - anyone try this yet?

Shot a video demonstrating the slow open and close of the drivers mirror. As stated in the video, I currently only have the 12V power connected so the mirrors are controlled solely by the included button. I don't think it'd make a difference to tap into the lock/unlock as the toggle...

Smee, tapping into the lock/unlock circuit won't make a difference in opening speed. Looking at the video, both mirrors appear to swing at the same degrees-per-second (but can't tell scientifically). I'm thinking that the total arc of the passenger side mirror is less than the total arc of the driver's side mirror. Can you measure that?

Edit: I think that's exactly what's going on. I couldn't stand not knowing (and my kit just arrived today), so I went out and measured. When unfolded, the passenger mirror is at least 3.5 cm closer to the passenger door window than the driver's mirror is to the driver's door window. This makes sense, because the angle needed to see correctly in the passenger mirror is less (far edge closer to the car) than the angle needed for the driver's mirror.

Conclusion: I think the speed is the same, it's the duration that's different, and that's because the driver's mirror has more distance (arc) to travel.
 
Last edited:
Good call. I PM'd you because I don't have Facebook and need help finding Sevag on messenger.

I'll record a video showing the slow mirror today.

I’m here guys, but it’s touch to TS in here and follow, I have 80+ messages a day, only on messenger. So if you need anything, contact me on messenger ...

Or join the group Toyota 4Runner
 
Smee, tapping into the lock/unlock circuit won't make a difference in opening speed. Looking at the video, both mirrors appear to swing at the same degrees-per-second (but can't tell scientifically). I'm thinking that the total arc of the passenger side mirror is less than the total arc of the driver's side mirror. Can you measure that?

Edit: I think that's exactly what's going on. I couldn't stand not knowing (and my kit just arrived today), so I went out and measured. When unfolded, the passenger mirror is at least 3.5 cm closer to the passenger door window than the driver's mirror is to the driver's door window. This makes sense, because the angle needed to see correctly in the passenger mirror is less (far edge closer to the car) than the angle needed for the driver's mirror.

Conclusion: I think the speed is the same, it's the duration that's different, and that's because the driver's mirror has more distance (arc) to travel.

My wife drives a GX460 (which is similar to the Toyota 4Runner in several ways), and I can confirm that the passenger mirror closes before the driver's mirror. I too agree that the driver's mirror on the GX has more arc to travel. Hope that helps.
 
Smee, tapping into the lock/unlock circuit won't make a difference in opening speed. Looking at the video, both mirrors appear to swing at the same degrees-per-second (but can't tell scientifically). I'm thinking that the total arc of the passenger side mirror is less than the total arc of the driver's side mirror. Can you measure that?

Edit: I think that's exactly what's going on. I couldn't stand not knowing (and my kit just arrived today), so I went out and measured. When unfolded, the passenger mirror is at least 3.5 cm closer to the passenger door window than the driver's mirror is to the driver's door window. This makes sense, because the angle needed to see correctly in the passenger mirror is less (far edge closer to the car) than the angle needed for the driver's mirror.

Conclusion: I think the speed is the same, it's the duration that's different, and that's because the driver's mirror has more distance (arc) to travel.

My wife drives a GX460 (which is similar to the Toyota 4Runner in several ways), and I can confirm that the passenger mirror closes before the driver's mirror. I too agree that the driver's mirror on the GX has more arc to travel. Hope that helps.

Okay this all makes MUCH more sense now. I'm not at all worried about it and [MENTION=54749]LakeRunr[/MENTION], you're totally right... the mirrors are swinging at the same degrees-per-second and even the sound of the motors are at the same "bzzzzzz" tone. I never realized that the mirrors are set at a different distance/angle.

Been enjoying the folding mirrors!
 
Thought I would share my install experience as I just wrapped up tonight. Overall the install is not bad but I did break out the soldering gun (my kit did not come with "Vampire" clips for splicing into the factory wires (x3) and I am not a huge fan of using them anyhow so I solder those connections and then replaced the in door connector (x4) to the mirrors with my own as they were a bit sketchy.

Over all the DIY instructions were excellent - my two sticking points in the install were separating the factory wiring connector - first step in part two and then fishing the wires through the door grommet. Both were doable but the only time were it took multiple attempts

Only time will tell how long they last. I got a very odd e-mail from CTH from someone claiming to be employed by them and urging me to cancel the order saying they are known to be defective products and fail after a couple months - it was strange, needless to say I didn't cancel and will just see how long they last.
 
Thought I would share my install experience as I just wrapped up tonight. Overall the install is not bad but I did break out the soldering gun (my kit did not come with "Vampire" clips for splicing into the factory wires (x3) and I am not a huge fan of using them anyhow so I solder those connections and then replaced the in door connector (x4) to the mirrors with my own as they were a bit sketchy.

Over all the DIY instructions were excellent - my two sticking points in the install were separating the factory wiring connector - first step in part two and then fishing the wires through the door grommet. Both were doable but the only time were it took multiple attempts

Only time will tell how long they last. I got a very odd e-mail from CTH from someone claiming to be employed by them and urging me to cancel the order saying they are known to be defective products and fail after a couple months - it was strange, needless to say I didn't cancel and will just see how long they last.


I would ignore that email as cth was hacked. That guy was sending emails to recent customers while asking for ransom.
 
Thought I would share my install experience as I just wrapped up tonight. Overall the install is not bad but I did break out the soldering gun (my kit did not come with "Vampire" clips for splicing into the factory wires (x3) and I am not a huge fan of using them anyhow so I solder those connections and then replaced the in door connector (x4) to the mirrors with my own as they were a bit sketchy.

Over all the DIY instructions were excellent - my two sticking points in the install were separating the factory wiring connector - first step in part two and then fishing the wires through the door grommet. Both were doable but the only time were it took multiple attempts

Only time will tell how long they last. I got a very odd e-mail from CTH from someone claiming to be employed by them and urging me to cancel the order saying they are known to be defective products and fail after a couple months - it was strange, needless to say I didn't cancel and will just see how long they last.

Any tips for separating the factory connector? I've seen several people mention that it was a pain
 
Any tips for separating the factory connector? I've seen several people mention that it was a pain

Best bet is a second person as you need two hands to push in both clips that are holding the inner connector in (one on each side) one uses a small flat head screw driver the other I used small Phillips. but you need a third hand or in my case a screw driver against my stomach to allow you to push the inner clip out go the housing - I don't suggest pulling by the wires but I guess thats always an option
 
I just completed this install, with the modification that instead of having the mirrors fold/unfold based on locking/unlocking the truck, I have them folding with the key in the OFF position, and unfolding with the key in ACC or better (ON or START). I did this by soldering in a small, simple 12v relay to the existing control box.

Thanks to daytonaviolet for the PDF writeup with pictures. It helped immensely. Honestly, I don't know how you'd get the motors installed without that PDF.

I do have a couple of things to add, based on my experience doing this:

1. My mirror connector was round instead of double-square, so I didn't have to separate the halves. (My 4R is a 2018 SR5 with no puddle lights or integrated turn signals, but it does have the heated mirrors.) The inner plug does have to be separated from the barrel though. In the second picture, you can see the tab that has to be pulled back to allow the plug to be pushed out (toward the wires). There's also a wedge on the other side of the barrel that has to be pryed.

50796054256_745718f51f_c.jpg


50795306948_9181b78f22_c.jpg


2. Toyota included a hook-tab on the mirror base where it goes into the door, so that you can remove the 3 nuts holding the mirror to the door and not worry about the mirror falling out onto the ground. This is the kind of thing that I love about Toyota engineers.

3. I didn't tap any of the stock wires. Since I didn't use the lock/unlock signals, my only external connection was B+ always-on 12v power, which I got from an add-a-fuse into the "passenger power seat" fuse.

4. I routed the 2 motor wires through the stock wiring sleve, to protect them the same way the stock mirror wires are protected.

5. I routed the passenger-side control wires (red & black pair) from the driver's side kick panel, under the steering column, behind the HVAC control panel, down to the area right above the passenger knee airbag, then over to the passenger-side kick panel, and then into the door grommet from there. The included control wires were plenty long, with about a foot or 2 to spare.

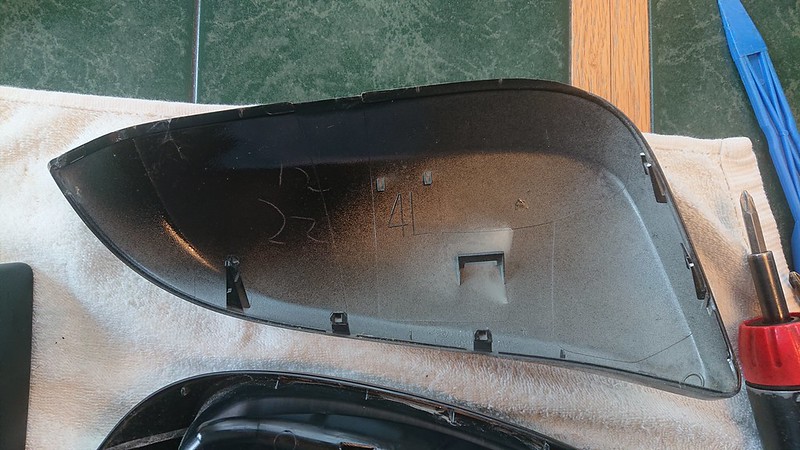
I've also included a picture of the back of the painted cover piece, so you can see how to remove it. I think I pryed starting from the pointy part and working my way around the bottom.

50796054631_94d6989dd5_c.jpg


Finished and tucked in:
50795307418_f211836c9d_c.jpg
 
Last edited:
In action:

<iframe width="560" height="315" src="https://www.youtube.com/embed/-WzX6R0KjTs" frameborder="0" allow="accelerometer; autoplay; clipboard-write; encrypted-media; gyroscope; picture-in-picture" allowfullscreen></iframe>

.
 
Last edited:
In action:

<iframe width="560" height="315" src="https://www.youtube.com/embed/-WzX6R0KjTs" frameborder="0" allow="accelerometer; autoplay; clipboard-write; encrypted-media; gyroscope; picture-in-picture" allowfullscreen></iframe>

Curious how you got it to open and close with the key instead of the lock/unlock?
 
Curious how you got it to open and close with the key instead of the lock/unlock?
  1. Don't connect either the Lock Detection or Unlock Detection wires to the truck's wiring.
  2. Add a simple 12v relay as shown. The Power Line wire is connected to the normally-closed relay terminal. The Lock Detection wire is connected to the common relay terminal.

I used a tiny 12v relay that was so small that it would fit inside the CQ-TY02 control box. I did all the connections via soldered wire inside the control box, but it could be done outside on the harness's wires instead.

The reason this works is that the control box already has a function that forces the mirrors to unfold/deploy when the key is in the ACC position or better (via the "ACC/ON" white wire). So all I had to do was trick it into seeing a "lock detection" trigger when the key is turned to OFF. With this circuit, turning the key to OFF depowers the ACC/ON lead, which returns the relay to it's "normal" (rest) state, which connects constant power to the Lock Detection wire. (BTW, the instructions that came with the kit are wrong about the blue/lock-detection wire...they say "negative charge will be sent when the door lock closed". The correction is that momentary (or constant) power to the blue wire tells the control box to fold the mirrors.)

Hand diagram by me:

50797600641_70141e0310_c.jpg
 
thanks for the info. yea i figured the non premium trucks would have a diffrent plug. perhaps i can add your pictures to the DIY.

I just completed this install, with the modification that instead of having the mirrors fold/unfold based on locking/unlocking the truck, I have them folding with the key in the OFF position, and unfolding with the key in ACC or better (ON or START). I did this by soldering in a small, simple 12v relay to the existing control box.

Thanks to daytonaviolet for the PDF writeup with pictures. It helped immensely. Honestly, I don't know how you'd get the motors installed without that PDF.

I do have a couple of things to add, based on my experience doing this:

1. My mirror connector was round instead of double-square, so I didn't have to separate the halves. (My 4R is a 2018 SR5 with no puddle lights or integrated turn signals, but it does have the heated mirrors.) The inner plug does have to be separated from the barrel though. In the second picture, you can see the tab that has to be pulled back to allow the plug to be pushed out (toward the wires). There's also a wedge on the other side of the barrel that has to be pryed.

50796054256_745718f51f_c.jpg


50795306948_9181b78f22_c.jpg


2. Toyota included a hook-tab on the mirror base where it goes into the door, so that you can remove the 3 nuts holding the mirror to the door and not worry about the mirror falling out onto the ground. This is the kind of thing that I love about Toyota engineers.

3. I didn't tap any of the stock wires. Since I didn't use the lock/unlock signals, my only external connection was B+ always-on 12v power, which I got from an add-a-fuse into the "passenger power seat" fuse.

4. I routed the 2 motor wires through the stock wiring sleve, to protect them the same way the stock mirror wires are protected.

5. I routed the passenger-side control wires (red & black pair) from the driver's side kick panel, under the steering column, behind the HVAC control panel, down to the area right above the passenger knee airbag, then over to the passenger-side kick panel, and then into the door grommet from there. The included control wires were plenty long, with about a foot or 2 to spare.

I've also included a picture of the back of the painted cover piece, so you can see how to remove it. I think I pryed starting from the pointy part and working my way around the bottom.

50796054631_94d6989dd5_c.jpg


Finished and tucked in:
50795307418_f211836c9d_c.jpg
 
yea i just wanted to add pictures of the non-premium harness as they are different.

open the mirror housing? you mean ripping the covers off :high5: sure i'll add something. i assumed everyone knew how to take the covers off.

thanks..

They're a little out of focus, but feel free to use them.

If you're going to edit the DIY, can you add a few words about how you opened the mirror housing itself?
 

Members online

Forum statistics

Threads
278,313
Messages
3,554,090
Members
248,016
Latest member
Advally Service

Trending content

Back
Top