• If you plan to post to Classified forums, you must follow these rules, or your post will be deleted.

    1. Thread title must include at a minimum: FS or FT, Item(1st, 2nd, 3rd, 4th or 5th gen), Price and Location. For Example: FS: 4th GEN Carpet Floor Mats - Tan, $50 Denver, CO.
    2. All Threads must contain the following information
      • What is for sale/trade (model, specs, etc.)
      • Condition
      • Price/What you want to trade for
      • Location of item
      • At least one picture of the item for sale or for trade
    3. No "Feeler" Threads - Its either for sale or it isn't.
    4. Moderators lock Classified Threads that have not had any activity in 90 days or when the part is announced SOLD.
    5. Threads not complying with the rules will be deleted without notice.

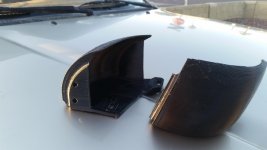
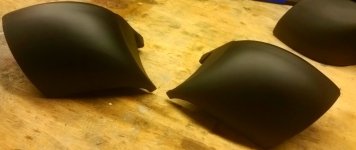
FS: 3d Printed SR5 Flare Caps $80 3rd gen

Hey guys, semesters over and was able to get my printer going again. I should have 5 "RAW 3D PRINTED" sets ready on monday. When I have them done, I will pm the first 5 people to post after this post that are ready to pay. They are $80. If you dont know how 3d printing works, do some research so you know what to expect.

If you plan to finish them yourself, I suggest using a sandable self leveling primer on top($6 at autozone), and then painting with a trim paint or flat black paint. I think they actually look good raw, they blend in pretty well after going wheeling a few times.

Thanks.
 

Attachments

  • 20150521_190037.jpg
    20150521_190037.jpg
    133.2 KB · Views: 372
Last edited:
Im going to get the raw ones out of the way first, the process for the smooth ones takes more time, and I will make another post when I smoothed sets available.
 
pm sent.

Also im making the tutorial on how to finish them right now, it will have everything you need to finish them yourselves.
 
[MENTION=101831]C-RAIG[/MENTION]
[MENTION=76881]squabeggz[/MENTION]
[MENTION=73515]ajonesnv[/MENTION]
[MENTION=96718]twaite88[/MENTION]
[MENTION=120611]geezerr54[/MENTION]
[MENTION=115592]bugman-74[/MENTION]
[MENTION=121873]trd4x4[/MENTION]
[MENTION=107706]gneissguy[/MENTION]
[MENTION=117137]jonasty[/MENTION]
[MENTION=112621]drdvlmark[/MENTION]


Alright I figured I might as would tag everyone here. I am printing a huge batch of caps, thats what im calling them now. Keep an eye on the thread if you are interested in the smoothed ones. if you want a raw 3d printed set pm me I have two left right now ready to ship out

as far as the smooth ones go, I may or may not be moving away from the acetone. I have thickened certain parts of the flare to make it stronger so strength is not an issue, but its very hard to get the finish consistently smooth with no bubbles or melted features. As of right now no smooth sets are available until I figure out a more streamlined process. I will post when there are sets available and I am currently printing sets pretty much non-stop. A lot of times a smooth set will get messed up and I have to make a new set, and so this is why it takes longer sometimes to make them.

Im also going to put some blemished ones up for a heavy discount, so if you are on a budget keep an eye out

Thanks,
D Farms
 
Flare caps

I'm still interested in a smooth set. I sent a p.m. but I guess it didn't go through. Not sure why? Please let me know when a set is available. Thanks.
 
[MENTION=101831]C-RAIG[/MENTION]
[MENTION=76881]squabeggz[/MENTION]
[MENTION=73515]ajonesnv[/MENTION]
[MENTION=96718]twaite88[/MENTION]
[MENTION=120611]geezerr54[/MENTION]
[MENTION=115592]bugman-74[/MENTION]
[MENTION=121873]trd4x4[/MENTION]
[MENTION=107706]gneissguy[/MENTION]
[MENTION=117137]jonasty[/MENTION]
[MENTION=112621]drdvlmark[/MENTION]


Alright I figured I might as would tag everyone here. I am printing a huge batch of caps, thats what im calling them now. Keep an eye on the thread if you are interested in the smoothed ones. if you want a raw 3d printed set pm me I have two left right now ready to ship out

as far as the smooth ones go, I may or may not be moving away from the acetone. I have thickened certain parts of the flare to make it stronger so strength is not an issue, but its very hard to get the finish consistently smooth with no bubbles or melted features. As of right now no smooth sets are available until I figure out a more streamlined process. I will post when there are sets available and I am currently printing sets pretty much non-stop. A lot of times a smooth set will get messed up and I have to make a new set, and so this is why it takes longer sometimes to make them.

Im also going to put some blemished ones up for a heavy discount, so if you are on a budget keep an eye out

Thanks,
D Farms

I'm still in for a normal set or a blemish set if you end up with any. Thanks dude!!
 
Last edited:
I will take what ever set you have available first. I do a lot of wheeling and the truck is rarely good looking. Couldn't care less about finish. I can PP you when ever you have a set ready to go.
 
HOW TO: FINISH RAW 3d PRINTED PARTS

Ok so a bunch of you guys have ordered the raw ones now and this is a tutorial on how to finish them.

Materials:
Raw Flare caps
Rustoleum 2-in-1 Filler primer
Your favorite Flat black paint
Sand paper/ sanding block/ or headlight polishing kit if your fancy(it has a rotary attachment that works wonders and you can get a glossy finish
Knife

Step 1: Check Fit and Adjust
Check to see if the part fits correctly, bolt it on using the coarse thread screws, any of a similar size to oem will work. There is some play in the fitment, as there are slots designed in, but not all of them come out exactly the same and sometimes the fit can be slightly off. if the fit is not perfect, dont worry, hit it with a heat gun or blowdryer and you can actually reshape the plastic to fit perfectly. Even if it just needs to be flexed a bit make sure to hit it with the heatgun to relax the plastic, this will prevent the paint from cracking when you put it on later, and also having a part under stress reduces its life. If you are having problems with the fitment, send me a pm

DO NOT USE THE HEATGUN AFTER ITS BEEN PAINTED, OR ACETONE TREATED!

Step 2: Prep
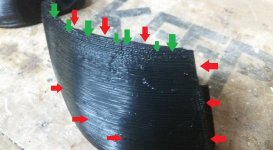
Get a knife and scrape off any boogers on the surface, specifically right where the red arrows are in picture 1. if you scrape down the surface layers to be more flat where the green arrow is pointing, it will make it a lot easier later on.

Step 3: Filling and Priming
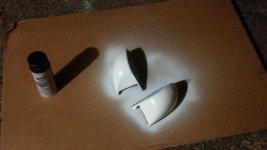
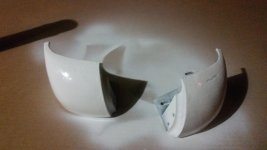
After all the boogers are gone, blow off any plastic shavings from scraping and set your pieces up, alternate between the positions in picture 2 and 3 so you get everything. Get out the 2 in 1 filler and primer and start laying down coats, just dont overdo it to the point where its running. I found it helps to have a fan pointed at the parts while they are drying inbetween coats, but make sure no debris gets on them! Id put probably between 6-8 or more coats on them. you should alternate the part between the two positions to get even coverage.

Step 4: Sanding
Wait the full 4 hours before doing this step, trust be its worth waiting. you can use a foam sanding block or whatever you have to sand the filler down until its smooth, from my experience in order to get rid of the ridges, it had to be sanded even though it was supposedly self leveling. sand it down till the ridges are gone, then wipe off with a damp rag.

Step 5: Final Paint
hit it with a couple light coats of the primer and then 2-3 coats of your favorite black paint or truck bed liner. wait for it to dry then install.
 

Attachments

  • 20150523_224228.jpg
    20150523_224228.jpg
    135.8 KB · Views: 378
  • 20150523_225331.jpg
    20150523_225331.jpg
    139.3 KB · Views: 387
  • 20150523_225941.jpg
    20150523_225941.jpg
    136.7 KB · Views: 380
  • 20150526_023739.jpg
    20150526_023739.jpg
    97.6 KB · Views: 377
ok I guess I have a smooth set, im confused asked first but there is one available now, and im working more too.

by smooth i mean the process in the tutorial above, and ready to bolt on.

They are $95 plus $15 shipping, so $110.

Thanks,

D Farms
 

Members online

Forum statistics

Threads
278,315
Messages
3,554,102
Members
248,016
Latest member
Advally Service

Trending content

Back
Top