You are using an out of date browser. It may not display this or other websites correctly.
You should upgrade or use an alternative browser.
You should upgrade or use an alternative browser.
Got my 1.5" BL today
- Thread starter 810moto
- Start date
Register to hide this ad

ARK_SWAMP_RIDER
New member
There's a install thread on 120 that's very helpful. I wish you the best, please share some pics when you're done! I've been considering this as well, just don't wanna get too much lift for my 32's.

zstampe
New member
Like it states, got my body lift today and headed down now to start working on it. Hopefully if the kids will let me, I will be done by bed time.
One man show on a mission.......again. If you have tips in the mean time, chime on in.
thanks and here goes nothing.
Moto.
Pics or it didn't happen!! Ha ha can't wait to see it, good luck.

810moto
New member
well good morning. what a freakin night. got done about 12:30 this morning with the lift. all that needs to be done now is all the interior trim pieces put back, new tires and rims put on today, button up the exterior. I did end up having to call Roger Brown and thank God he answered the phone. Come to find out, I did not need the steering ext afterall. He went into great detail in regards to the steering and types and how it all works with the extention. HUGE thanks to him for taking the time to give some good old fashion customer service. I will say that the front 2 bolts on the lift were an absolute PITA! Not a clue why there were so difficult to get down so I could get the nut on but it sucked big time.
Well thats it for now. My hands are killin me and I have to get the kids off to camp.
I will have pics up tonight.
Well thats it for now. My hands are killin me and I have to get the kids off to camp.
I will have pics up tonight.
ARK_SWAMP_RIDER
New member
1.5" BL and no steering extension? That goes against everything I've read. Even his site says the steering extension is required on all above 1" and recommended on the 1" kit. I spoke with Toytec about their 1" kit, and they had said they wouldn't install the 1" without it (which is why it's included in their kit). Look forward to those pics!!!

techmen17
New member
Yea I know what you mean, I have heard a lot of talk back and forth of whether or not the steering spacer is needed, especially over on 120. I couldn't for the life of me get enough clearance to even get my spacer in. I tried for hours...So instead I just made sure I loosened the steering shaft clamp in the engine bay while I was lifting up the vehicle so that there wouldn't be too much pressure on the shaft. And I took out the old shorter screws in the steering shaft, inside the vehicle, and replaced them with the longer bolts that came with the steering shaft spacer. Tightened it all up and seems fine so far. No stress on components or on the rubber spacer on the shaft so far. But I will keep an eye on it.1.5" BL and no steering extension? That goes against everything I've read. Even his site says the steering extension is required on all above 1" and recommended on the 1" kit. I spoke with Toytec about their 1" kit, and they had said they wouldn't install the 1" without it (which is why it's included in their kit). Look forward to those pics!!!
810moto
New member
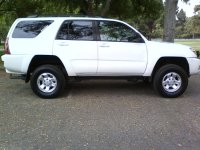
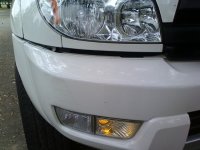
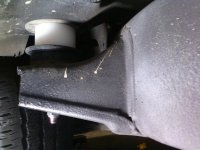
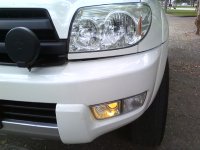
Well here are a few pics. I now need to figure out how and where to fix this gap in the bumper. The pass. side seems to have more than the driver side does for some reason. Also I now have a rake again of 39R &37F, not sure why and does not make any sense to me. Maybe I am missing something.
Attachments
ARK_SWAMP_RIDER
New member
810moto
New member
I kept the bumper on then entire install. As far as the blocks go, I had [email protected]" OD and 2@2" OD. All were 1.5" tall. Just kind of odd to have a rake after all is said and done. Owell, no biggie.Did you take the bumper off for installation? I didn't, and I don't have a gap like that at all.
Also did you take note of the different sized pucks for the front body mounts?
The bumper will have to be adjusted by moving it up a notch but will most likely hit that on Monday. My hands are shot.
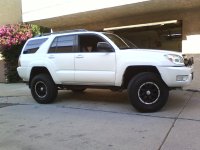
Here is a photo from my phone of the BL, Nitto 285/75's and Helo rims. Test drove it earlier and those E-Load tires are certainly stiff.
Attachments
810moto
New member
I did some pretty serious trimming to solve 99% of the rubbing. there is a small small area that needs to be done but it is only on the inner wheel liner. I will most likely just move it forward like I did before and it should technically solve the last 1%. truck rides super good even with the E load tires.
As far as the gap goes, I think I have it figured out why there is a gap there. My light bars are squashing the front bumper down so i will take those off today and see how much it lets the bumper come back up. I hope that is the problem, if not then I will move the bumper up a notch. You can see how the lights are over firmly sitting on the bumper.
Better pics coming this weekend. My phone sure isn't a Nikon, thats for sure.
As far as the gap goes, I think I have it figured out why there is a gap there. My light bars are squashing the front bumper down so i will take those off today and see how much it lets the bumper come back up. I hope that is the problem, if not then I will move the bumper up a notch. You can see how the lights are over firmly sitting on the bumper.
Better pics coming this weekend. My phone sure isn't a Nikon, thats for sure.
Attachments

4Runners
New member
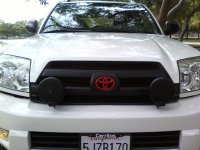
Well that's good. You should probably get yourself a grille guard/bull bar or better yet a shockworks bumper or one from here: :: Tactical Armor Group :: Store It'll add the aggressiveness factor to your rig. If i ever lift mine and add large tires i'd probably do the same! Overall that looks like it took alot of work to lift by yourself but it looks great! BTW how did you make the front emblem red?
Last edited:
810moto
New member
Thanks for the link 4Runners. Texas huh. Boomer Sooner here but stuck in California!
I have done all of my own work. Just dont see why I would pay a shop to do it when I like to think of myself as pretty good with a wrench. The BL took me a super long time by myself, almost 9.5hrs but that is becuase I ran into a few issues and the kids and neighbors kept coming down to the garage slowing me down. All in all, a great learning tool doing it myself.
As far as the front toyota being red, Carefully unsnap it from the grille, take some 400+ wet/dry sand paper and scuff it up a little. Not too much becuase it is plastic. I then took some rustoleum primer with 2 light coats and then hit it with 2 coats of rustoleum red gloss paint. let it dry over night and snap it back on. total cost..about 10 bucks in material with plenty left over for other things like my custom skid plates.
http://www.toyota-4runner.org/class...cial-ads-please/90723-4th-gen-front-skid.html
I have done all of my own work. Just dont see why I would pay a shop to do it when I like to think of myself as pretty good with a wrench. The BL took me a super long time by myself, almost 9.5hrs but that is becuase I ran into a few issues and the kids and neighbors kept coming down to the garage slowing me down. All in all, a great learning tool doing it myself.
As far as the front toyota being red, Carefully unsnap it from the grille, take some 400+ wet/dry sand paper and scuff it up a little. Not too much becuase it is plastic. I then took some rustoleum primer with 2 light coats and then hit it with 2 coats of rustoleum red gloss paint. let it dry over night and snap it back on. total cost..about 10 bucks in material with plenty left over for other things like my custom skid plates.
http://www.toyota-4runner.org/class...cial-ads-please/90723-4th-gen-front-skid.html
810moto
New member
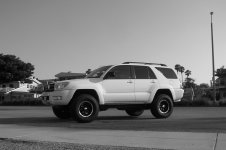
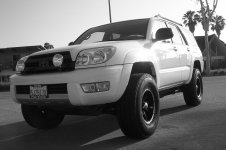
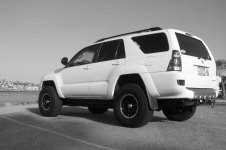
Lift and tires done
So the 1.5" BL is done. 285/75-16 Nittos and Helo Max rims on. Bumper relocated and sittin pretty now.
I had some more plans but some jacka@# hacked my account and took all my money. Bas****!
Any hoot, I still have more to do but for now I think she looks sweet.
So the 1.5" BL is done. 285/75-16 Nittos and Helo Max rims on. Bumper relocated and sittin pretty now.
I had some more plans but some jacka@# hacked my account and took all my money. Bas****!
Any hoot, I still have more to do but for now I think she looks sweet.