
You are using an out of date browser. It may not display this or other websites correctly.
You should upgrade or use an alternative browser.
You should upgrade or use an alternative browser.
Hard to find Specs, Info & Measurements on 231mm 13WL Tundra Calipers & Rotors
- Thread starter BigFishAllDay
- Start date


Brian757
New member
I got most of my gear from Advance Auto ONLINE ONLY, because they were offering something similar to: 20% off, or $30 off of $75, $50 off of $100 or something like that. I ended up doing around 6 orders (To Save $$$) for my entire Tundra 13WL brake upgrade and ended up spending around $300 and I got the more expensive of everything. I went with Wagner ThermoQuiet Ceramic brakes, etc.
I HIGHLY suggest doing it this way, you'll end up paying around $275-$330 for the entire job, for name brand parts and new equipment.
Here are some PROMO codes, use these upon checkout online at AdvanceAutoparts.com
Advance Auto Parts Coupons: Get $30 Off w/ 2013 Coupon Codes, Promo Code
The ones I used:
P20 - 20% off Entire Order
HUGE30 - $30 off of Orders $90+
HUGE50 - $50 off of Orders $175+
MY PERSONAL FAVORITE:
A124 - $10 Off $30 or $25 Off $70 or $40 Off $110 orders.
These codes work for EVERYTHING needed to do the brake upgrade. As far as I have used it, and known, they do NOT work with any Engine oils/oil filters. Advance usually has sales on their oil so the promos don't work.
For Parts:
Use, like an above poster said, FOR 231mm - the 2005 Toyota Tundra SR5 (4WD/2WD Doesnt matter) - Front Left/Right Calipers, Rotors, and Pads. (Most often times, depending on brands, the calipers and pads come with hardware, like the "M" clips and such.)
If you want the 199mm - Ask for a 2002 Toyota Tundra SR5 (4WD/2WD Doesnt matter) - Front Left/Right Calipers, Rotors, and Pads.
ENJOY!!!
I HIGHLY suggest doing it this way, you'll end up paying around $275-$330 for the entire job, for name brand parts and new equipment.
Here are some PROMO codes, use these upon checkout online at AdvanceAutoparts.com
Advance Auto Parts Coupons: Get $30 Off w/ 2013 Coupon Codes, Promo Code
The ones I used:
P20 - 20% off Entire Order
HUGE30 - $30 off of Orders $90+
HUGE50 - $50 off of Orders $175+
MY PERSONAL FAVORITE:
A124 - $10 Off $30 or $25 Off $70 or $40 Off $110 orders.
These codes work for EVERYTHING needed to do the brake upgrade. As far as I have used it, and known, they do NOT work with any Engine oils/oil filters. Advance usually has sales on their oil so the promos don't work.
For Parts:
Use, like an above poster said, FOR 231mm - the 2005 Toyota Tundra SR5 (4WD/2WD Doesnt matter) - Front Left/Right Calipers, Rotors, and Pads. (Most often times, depending on brands, the calipers and pads come with hardware, like the "M" clips and such.)
If you want the 199mm - Ask for a 2002 Toyota Tundra SR5 (4WD/2WD Doesnt matter) - Front Left/Right Calipers, Rotors, and Pads.
ENJOY!!!
Last edited:

SCRunner12
New member
I suggest people also look into parts yard calipers and rotors. I got OEM 231mm calipers with almost brand new pads and OEM rotors for $100. I got the rotors turned and swapped everything on with no problems. My entire swap cost $150 and all OEM parts.

itsgabriel
New member
After over a year of procrastinating, I finally upgraded my stock 01' 4runner brakes.
Here's what I went with and where I got the parts:
toyotapartszone.com
- OEM Brake Pads P/N 04465-35290 ($62.60)
- OEM Shim Kit P/N 04945-35120 ($39.55)
- OEM Rotors x2 P/N 43512-0C011 ($81.04 each)
Autozone:
- Duralast Reman/Brake Caliper P/N C9951 ($77.99 after core charge) (this is the drivers side caliper which was not very clear on Autozone's site)
- Duralast Reman/Brake Caliper P/N C9950 ($77.99 after core charge) (this is the passangers side caliper)
Total $440.60 (including tax)
Installation was very clear thanks to the amazing write up by BigFishAllDay, and the rest of the useful posts found in this thread. It took me (not very experienced) about 2-3 hours to do the job.
I encourage anybody who has been debating making this upgrade to pull the trigger. The results are immediate, braking feels responsive and strong.
After lurking around since Febuary of 2012 I figured this would be a worthy first post.
Here's what I went with and where I got the parts:
toyotapartszone.com
- OEM Brake Pads P/N 04465-35290 ($62.60)
- OEM Shim Kit P/N 04945-35120 ($39.55)
- OEM Rotors x2 P/N 43512-0C011 ($81.04 each)
Autozone:
- Duralast Reman/Brake Caliper P/N C9951 ($77.99 after core charge) (this is the drivers side caliper which was not very clear on Autozone's site)
- Duralast Reman/Brake Caliper P/N C9950 ($77.99 after core charge) (this is the passangers side caliper)
Total $440.60 (including tax)
Installation was very clear thanks to the amazing write up by BigFishAllDay, and the rest of the useful posts found in this thread. It took me (not very experienced) about 2-3 hours to do the job.
I encourage anybody who has been debating making this upgrade to pull the trigger. The results are immediate, braking feels responsive and strong.
After lurking around since Febuary of 2012 I figured this would be a worthy first post.
Last edited:


Srt4runner
New member
Just wanted to update this thread with some useful info. I installed the exact combination as the original poster today and wow did it make a huge difference. The only thing I did differently was I added stainless steel brake lines and stainless steel speed bleeders to the new calipers. The speed bleeders made it super easy to bleed the brakes, which is a whole controversy with the 4runner in itself.
I am posting what worked for me to bleed the brakes and have a perfectly firm pedal which I copied and slightly modified from "Greasefingers" in this thread:http://www.toyota-4runner.org/maintenance-detailing/23526-bleeding-brakes.html
Note: I have a 2001 4runner with speedbleeders installed in each caliper, so do not attempt this procedure without speedbleeders.
1. Clean the area around the brake fluid reservoir. Open and set the cap off to the side. get as much of the old fluid out with a turkey baster. Refill with new brake fluid.
2. With the ignition off pump the brake pedal around 20 times or until it's somewhat firm.
3. put the key in the ignition and turn it to accessory (don't start it). The electronic pump will go on for about 45 seconds. Wait for the electronic pump to turn off.
4. with the key still on accessory, crack open the speed bleeder a half turn on the rear passenger side. Place plastic tubing at the end of the bleeder into a container to collect the old fluid.
5. start pumping the brakes being careful not to press the pedal down too far (this could damage the master cylinder). Some people will place books under the pedal to prevent over traveling of the pedal. Watch the fluid level, DO NOT allow the brake reservoir to run dry.
5. When no more bubbles come out of the bleeder and the fluid is clean, tighten the speed bleeder.
6. Next do the rear driver's side, then front passenger side, then the front driver's side.
*NOTES*
A.) When I first started doing this, I had the truck completely turned off (no key in the ignition). I started pumping the pedal and nothing came out of the rear passenger side brake line. I thought the speed bleeder was broken. I then attempted this method with the key on "accessory." The electronic pump would then go off as I was pumping and then the fluid would go through the speed bleeders like it should.
B.) The electronic pump will go off as you're pumping the brakes. If you continue to pump it will make a high pitched alert noise. When this noise started, I would then stop pumping the brakes and give the electronic pump time to "catch up." Once it stopped, I would then start pumping the brakes again and continue this process until all the old fluid and air bubbles were out.
This is the method that worked for me. I used to have a large "dead zone" in my brake pedal and now it feels like its a brand new vehicle. I hope this helps someone. :bigok:
I am posting what worked for me to bleed the brakes and have a perfectly firm pedal which I copied and slightly modified from "Greasefingers" in this thread:http://www.toyota-4runner.org/maintenance-detailing/23526-bleeding-brakes.html
Note: I have a 2001 4runner with speedbleeders installed in each caliper, so do not attempt this procedure without speedbleeders.
1. Clean the area around the brake fluid reservoir. Open and set the cap off to the side. get as much of the old fluid out with a turkey baster. Refill with new brake fluid.
2. With the ignition off pump the brake pedal around 20 times or until it's somewhat firm.
3. put the key in the ignition and turn it to accessory (don't start it). The electronic pump will go on for about 45 seconds. Wait for the electronic pump to turn off.
4. with the key still on accessory, crack open the speed bleeder a half turn on the rear passenger side. Place plastic tubing at the end of the bleeder into a container to collect the old fluid.
5. start pumping the brakes being careful not to press the pedal down too far (this could damage the master cylinder). Some people will place books under the pedal to prevent over traveling of the pedal. Watch the fluid level, DO NOT allow the brake reservoir to run dry.
5. When no more bubbles come out of the bleeder and the fluid is clean, tighten the speed bleeder.
6. Next do the rear driver's side, then front passenger side, then the front driver's side.
*NOTES*
A.) When I first started doing this, I had the truck completely turned off (no key in the ignition). I started pumping the pedal and nothing came out of the rear passenger side brake line. I thought the speed bleeder was broken. I then attempted this method with the key on "accessory." The electronic pump would then go off as I was pumping and then the fluid would go through the speed bleeders like it should.
B.) The electronic pump will go off as you're pumping the brakes. If you continue to pump it will make a high pitched alert noise. When this noise started, I would then stop pumping the brakes and give the electronic pump time to "catch up." Once it stopped, I would then start pumping the brakes again and continue this process until all the old fluid and air bubbles were out.
This is the method that worked for me. I used to have a large "dead zone" in my brake pedal and now it feels like its a brand new vehicle. I hope this helps someone. :bigok:
madetomeasure
New member
Here's what I went with and where I got the parts:
Amazon.com shipped free with my Prime acct...
- Wagner ThermoQuiet QC976 ceramic pads ($32)
- X2 Raybestos 96931R Rotos ($38/each)
local salvage yard
- X2 OEM calipers off of a 2006 Sequoia with 99k miles ($95 for both)
(purchased complete with pads (of course I didnt use the pads.. but I used the Toyota OEM shims off of them)
Total $220 (including tax)
plus DOT4 fluid and a caliper painting kit... ($30 additional for both)
and I had to run 1/4" spacers ($17 for both) to clear my split-3's 'til I can swap out the wheels
So fantastic to not have a death wobble at 50-60mph when i tapped the brakes for traffic. Planning on bedding the pads in tonight.
Thanks [MENTION=44220]BigFishAllDay[/MENTION]! :hail:
Amazon.com shipped free with my Prime acct...
- Wagner ThermoQuiet QC976 ceramic pads ($32)
- X2 Raybestos 96931R Rotos ($38/each)
local salvage yard
- X2 OEM calipers off of a 2006 Sequoia with 99k miles ($95 for both)
(purchased complete with pads (of course I didnt use the pads.. but I used the Toyota OEM shims off of them)
Total $220 (including tax)
plus DOT4 fluid and a caliper painting kit... ($30 additional for both)
and I had to run 1/4" spacers ($17 for both) to clear my split-3's 'til I can swap out the wheels
So fantastic to not have a death wobble at 50-60mph when i tapped the brakes for traffic. Planning on bedding the pads in tonight.
Thanks [MENTION=44220]BigFishAllDay[/MENTION]! :hail:
madetomeasure
New member
Code:
Anyone know what rims these are and if they fit the brakes? I think they are off a 2005 4runner. I can snag them for $150

yes.

wheelds
New member
so here's a big noob question for everyone. My calipers each came with 2 "W" clips each. What is the reason behind using only 1 clip, like what is shown in all reference pictures? is there a reason to not use the "W" pins on both bolts?
I will be doing the brake upgrade this weekend. I can't think of a good reason not to use both clips on the pads if i have them available. I cant find any info on this.

0xfded
New member
At some point in the past, my 98 acquired a set of OEM Tundra 16" tires:
Factory OEM Wheels | 2000 TOYOTA TUNDRA Rims | A-69395U10

Would it be unreasonable to assume that OEM Tundra wheels are likely to fit over the 231 calipers? Has anyone reported these fitting?
I'm planning on replacing them eventually (don't care for the looks), but that's a lower priority for me than getting the brakes themselves squared away. The stocks are showing signs of wear and if I'm going to replace them, it's going to be with more robust parts.
Factory OEM Wheels | 2000 TOYOTA TUNDRA Rims | A-69395U10
Would it be unreasonable to assume that OEM Tundra wheels are likely to fit over the 231 calipers? Has anyone reported these fitting?
I'm planning on replacing them eventually (don't care for the looks), but that's a lower priority for me than getting the brakes themselves squared away. The stocks are showing signs of wear and if I'm going to replace them, it's going to be with more robust parts.

01thunder
New member
Just wanted to update this thread with some useful info. I installed the exact combination as the original poster today and wow did it make a huge difference. The only thing I did differently was I added stainless steel brake lines and stainless steel speed bleeders to the new calipers. The speed bleeders made it super easy to bleed the brakes, which is a whole controversy with the 4runner in itself.
I am posting what worked for me to bleed the brakes and have a perfectly firm pedal which I copied and slightly modified from "Greasefingers" in this thread:http://www.toyota-4runner.org/maintenance-detailing/23526-bleeding-brakes.html
Note: I have a 2001 4runner with speedbleeders installed in each caliper, so do not attempt this procedure without speedbleeders.
1. Clean the area around the brake fluid reservoir. Open and set the cap off to the side. get as much of the old fluid out with a turkey baster. Refill with new brake fluid.
2. With the ignition off pump the brake pedal around 20 times or until it's somewhat firm.
3. put the key in the ignition and turn it to accessory (don't start it). The electronic pump will go on for about 45 seconds. Wait for the electronic pump to turn off.
4. with the key still on accessory, crack open the speed bleeder a half turn on the rear passenger side. Place plastic tubing at the end of the bleeder into a container to collect the old fluid.
5. start pumping the brakes being careful not to press the pedal down too far (this could damage the master cylinder). Some people will place books under the pedal to prevent over traveling of the pedal. Watch the fluid level, DO NOT allow the brake reservoir to run dry.
5. When no more bubbles come out of the bleeder and the fluid is clean, tighten the speed bleeder.
6. Next do the rear driver's side, then front passenger side, then the front driver's side.
*NOTES*
A.) When I first started doing this, I had the truck completely turned off (no key in the ignition). I started pumping the pedal and nothing came out of the rear passenger side brake line. I thought the speed bleeder was broken. I then attempted this method with the key on "accessory." The electronic pump would then go off as I was pumping and then the fluid would go through the speed bleeders like it should.
B.) The electronic pump will go off as you're pumping the brakes. If you continue to pump it will make a high pitched alert noise. When this noise started, I would then stop pumping the brakes and give the electronic pump time to "catch up." Once it stopped, I would then start pumping the brakes again and continue this process until all the old fluid and air bubbles were out.
This is the method that worked for me. I used to have a large "dead zone" in my brake pedal and now it feels like its a brand new vehicle. I hope this helps someone. :bigok:
what are speed bleeders?

downpour11
New member

CaptainGiggity
New member
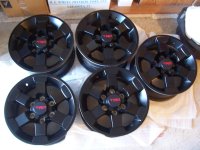
I don't know if this was already mentioned but I ran out of will power 9 pages into the write-up which is fantastic might I add!! I also used your write up on changing the rear axle seals and it saved me tremendous amounts of money doing it myself! but does anyone know if the 231mm calipers will fit inside an fj cruiser trail team 16" rim?
But I also have a 17" aftermarket rim on my runner right now do you think I really need to worry about clearance issues due to the larger rim?
But I also have a 17" aftermarket rim on my runner right now do you think I really need to worry about clearance issues due to the larger rim?
Attachments
Last edited:

BigFishAllDay
New member
I don't know if this was already mentioned but I ran out of will power 9 pages into the write-up which is fantastic might I add!! I also used your write up on changing the rear axle seals and it saved me tremendous amounts of money doing it myself! but does anyone know if the 231mm calipers will fit inside an fj cruiser trail team 16" rim?
But I also have a 17" aftermarket rim on my runner right now do you think I really need to worry about clearance issues due to the larger rim?
Thanks for the compliments on the write-ups, CaptainGiggity.
All styles of FJ wheels that I've seen people running have cleared the 231's with no issues, so I would GUESS that those will work just fine. No guarantees, but it looks like you already have the wheels so you should try it out and let us know. I'd be glad to add that info to the "wheels that fit" list if you can confirm that they clear the calipers.
If not, you should just send those wheels to me... they suck, but I'll run them so you don't have to...

0xfded
New member
Picked up my 231 calipers today. Going to be cleaning them up, but I had a question:
The calipers came with the flexible lines still attached. They appear to be in good condition--is there any reason to not use them instead of the stainless steel lines from Wheeler's Off-Road?
I've read that the 231s sometimes don't retract properly with stock lines, and that the stiffer steel lines address that. But presumably the stock OEM lines from the '03 Sequoia these calipers came from wouldn't have that issue, right?
I want to be using reliable parts, but at the same time, I can think of better things to spend the $72 on.
The calipers came with the flexible lines still attached. They appear to be in good condition--is there any reason to not use them instead of the stainless steel lines from Wheeler's Off-Road?
I've read that the 231s sometimes don't retract properly with stock lines, and that the stiffer steel lines address that. But presumably the stock OEM lines from the '03 Sequoia these calipers came from wouldn't have that issue, right?
I want to be using reliable parts, but at the same time, I can think of better things to spend the $72 on.

Robb235
Senior Member
Picked up my 231 calipers today. Going to be cleaning them up, but I had a question:
The calipers came with the flexible lines still attached. They appear to be in good condition--is there any reason to not use them instead of the stainless steel lines from Wheeler's Off-Road?
I've read that the 231s sometimes don't retract properly with stock lines, and that the stiffer steel lines address that. But presumably the stock OEM lines from the '03 Sequoia these calipers came from wouldn't have that issue, right?
I want to be using reliable parts, but at the same time, I can think of better things to spend the $72 on.
Just curious, but where did you read that? I ask because I haven't heard of that, nor have I experienced it with my 231mm calipers.
0xfded
New member
Honestly, I can't remember if I read it here, or on YT, or CustomTacos. It was an older thread where a fellow was trying to troubleshoot a dragging pad after the 231 swap. Switching to braided steel lines fixed it for him, and someone else suggested that the stock lines might be pinching with the higher vacuum load.Just curious, but where did you read that? I ask because I haven't heard of that, nor have I experienced it with my 231mm calipers.
Perhaps it was a different problem. Either way, while I'm throwing overengineered brakes on there, I'm inclined to overengineer the other components too.

Similar threads
- Replies
- 3
- Views
- 2K


- Replies
- 5
- Views
- 4K


- Replies
- 2
- Views
- 3K


