Has Anyone Tried These Raptor Lights?

The reason Ronnieboy recommends removal of the grill is so you can superglue some screws to the back of the grill. It's the cleanest install Ive seen.

Or for $99, you can install the made in the USA yota leds in 10 minutes....with no super glue and zip ties. I wouldn’t call having to use glue and having to remove your grill a “clean” install.
 
Or for $99, you can install the made in the USA yota leds in 10 minutes....with no super glue and zip ties. I wouldn’t call having to use glue and having to remove your grill a “clean” install.

Clean is a reference to how it looks.

For $50 you can order everything from Amazon, make your own brackets and install it yourself.

And if you really gave a shit about "Made in the USA", you wouldn't have bought a 4Runner.
 
Last edited:
Clean is a reference to how it looks.

For $50 you can order everything from Amazon, make your own brackets and install it yourself.

And if you really gave a shit about "Made in the USA", you wouldn't have bought a 4Runner.

Yeah...but that’s not what we’re discussing. The OP kit is not a DIY project from Amazon....not sure what installation video you are watching.
 
Just ordered the Ronnieboy Fabrication ones...
For me the care and detail in the wiring harness, the lights, and the AOB switch is worth it.
 
Just ordered the Ronnieboy Fabrication ones...
For me the care and detail in the wiring harness, the lights, and the AOB switch is worth it.

You'll be happy; now I just hope he sends me one of those better matched AOB switched sooner than later!

Cheers - JC
 
Just ordered the Ronnieboy Fabrication ones...
For me the care and detail in the wiring harness, the lights, and the AOB switch is worth it.

Anyone who gets a new switch installed, please post picture so we can see match to OE illumination.

Thanks

JC
 
Just got these installed...
super easy and high quality.

attachment.php


attachment.php
 

Attachments

  • IMG_5941.jpg
    IMG_5941.jpg
    95.2 KB · Views: 1,845
  • IMG_5940.jpg
    IMG_5940.jpg
    79.7 KB · Views: 1,515
Last edited:
switch light

I got my cartrimhome lights installed with the ebay switch (linked in my prior post on this thread) over the weekend.

I followed the wiring instructions from Rock Creek Overland like many before, only I added the switch so I can turn them off. Here is the link: Amber marker lights in grille | Rock Creek Overland

The first two pictures, the ones that are actually good, are from the link. I ran the wires through the firewall in the smaller plugged hole that is up and to the left from the main wiring pass through when viewed from under the hood. You have to feed quite a bit of wire through to be able to reach it once you feed it through the firewall as it comes in through a kind of awkward place on the interior behind pedals and carpet. I bought a cheap kit of miscellaneous wiring connections from Harbor Freight and used the miscellaneous pieces out of it to do the job. It is handy to have around for a hack like me. The Harbor Freight wiring for dummies kit has a grommet just the right size to let the two wires through and fit into the hole after the plug was popped out. I wouldn't recommend leaving the wires passing through the bare metal firewall without something there to protect them and keep the elements out.

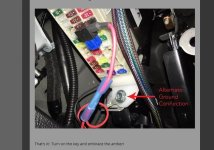
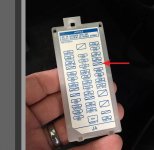
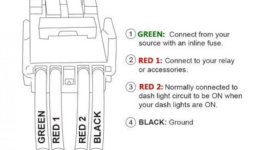
I put the the add a fuse in the open location highlighted by RCO. The diagram is what I used to wire the switch. The green from the switch goes to the add a fuse with the butt splice that is already on the add a fuse. The red 1 goes to the red wire from the light kit with a butt splice from the HF kit. The black is the ground, and I connected to the "alternate ground location" highlighted by RCO for both the black wire from the light kit and the black wire from the switch. I added a terminal ring to each. Actually, the black wire from the switch is too short to reach a convenient ground location, so I had to butt splice in a foot-long wire segment I had from a prior project to make it long enough to reach with the switch in place. I didn't add any relays since the leds are such a small draw, and I used 3 amp fuses. I also learned that the add a fuse I had laying around wouldn't work since the 4Runner uses mini fuses under the dash. Just be warned when you go to buy one. With the add a fuse in place, you can't put the cover back on the under-dash fuse bock. I put it and a selection of mini-fuses together in a zip lock and will keep it in the car (under my newly installed sliding tray).

The fourth red wire from the switch hasn't yet been wired to anything. That would light up the symbol on the switch, so I need to connect that to the 7.5 amp panel light in the fuse box with another add a fuse, I believe, so I can dim it with the other panel lights. Alternatively, I think I could probably just put my current add a fuse in that location with both red wires and be done. I will play around with that when I get some additional time. My car wiring experience is pretty limited (a couple of fog light additions to prior cars), so if anyone has any better suggestions, I'm all ears!

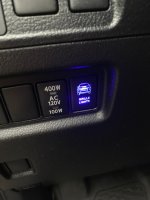
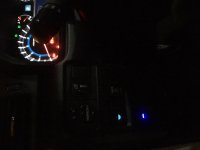
In the meantime, the crappy dark and sideways picture is of the "on" light for the ebay switch (under the wiper heater switch). I'm happy with the match, but will be happier when it lights up with the panel as a whole.

 

Attachments

  • add a fuse locate.jpg
    add a fuse locate.jpg
    65.8 KB · Views: 1,675
  • fuse box.jpg
    fuse box.jpg
    53.9 KB · Views: 2,043
  • diagram.jpg
    diagram.jpg
    47.4 KB · Views: 1,677
  • switch light.jpg
    switch light.jpg
    144.8 KB · Views: 1,547
Last edited:
I got my cartrimhome lights installed with the ebay switch (linked in my prior post on this thread) over the weekend.

I put the the add a fuse in the open location highlighted by RCO. The diagram is what I used to wire the switch. The green from the switch goes to the add a fuse with the butt splice that is already on the add a fuse. The red 1 goes to the red wire from the light kit with a butt splice from the HF kit. The black is the ground, and I connected to the "alternate ground location" highlighted by RCO for both the black wire from the light kit and the black wire from the switch. I added a terminal ring to each. Actually, the black wire from the switch is too short to reach a convenient ground location, so I had to butt splice in a foot-long wire segment I had from a prior project to make it long enough to reach with the switch in place. I didn't add any relays since the leds are such a small draw, and I used 3 amp fuses. I also learned that the add a fuse I had laying around wouldn't work since the 4Runner uses mini fuses under the dash. Just be warned when you go to buy one. With the add a fuse in place, you can't put the cover back on the under-dash fuse bock. I put it and a selection of mini-fuses together in a zip lock and will keep it in the car (under my newly installed sliding tray).

The fourth red wire from the switch hasn't yet been wired to anything. That would light up the symbol on the switch, so I need to connect that to the 7.5 amp panel light in the fuse box with another add a fuse, I believe, so I can dim it with the other panel lights. Alternatively, I think I could probably just put my current add a fuse in that location with both red wires and be done. I will play around with that when I get some additional time. My car wiring experience is pretty limited (a couple of fog light additions to prior cars), so if anyone has any better suggestions, I'm all ears!

In the meantime, the crappy dark and sideways picture is of the "on" light for the ebay switch (under the wiper heater switch). I'm happy with the match, but will be happier when it lights up with the panel as a whole.

Aren't you supposed to use a relay (like the diagram suggests) with the electric push button switches to prevent them from burning out or is that just with higher power LED bars and such? PS - if you want an exact color match, I found that AOB switches come in a "new blue" color that exactly matches the blue interior illumination.

JC
 
Last edited:
Clean is a reference to how it looks.

For $50 you can order everything from Amazon, make your own brackets and install it yourself.

And if you really gave a shit about "Made in the USA", you wouldn't have bought a 4Runner.

I bought the 4Runner because of the power back window.:yield:
 
Anyone who gets a new switch installed, please post picture so we can see match to OE illumination.

Thanks

JC

I can say that it doesn't match the stock illumination perfectly. It's more of a deep blue and it's bright. Maybe that's something that Daniel can remedy on the next batch?
 
I can say that it doesn't match the stock illumination perfectly. It's more of a deep blue and it's bright. Maybe that's something that Daniel can remedy on the next batch?

The light in the picture is a $12 ebay switch that pops right into the blank. I have’nt yet seen what the text looks like illuminated, just the “on” light. For the cost, it’s close enough for me.
 
The light in the picture is a $12 ebay switch that pops right into the blank. I have’nt yet seen what the text looks like illuminated, just the “on” light. For the cost, it’s close enough for me.

I was referring to the switch that is supplied with the Ronnieboy Fabrication grille lights. The lighting on your switch is the same color and intensity that I have from Daniel.
 
I was referring to the switch that is supplied with the Ronnieboy Fabrication grille lights. The lighting on your switch is the same color and intensity that I have from Daniel.

First of all I'll provide a link to the AOB list of swtiches that exactly match the 4runner's interior illumination. Per Air on Board these are called "new Blue" and will match so anyone who wants exact color match can buy anything off this list for $20-ish...

Toyota Push Switches - Switches - Products -Air On Board

Now with the color issue out of the way, would anyone with electrical knowledge care to address the relay question I pose above? Per the wiring schematic that comes with these switches, you are supposed to run a 4 pin 30 amp relay in the engine compartment with direct fused power to battery terminal in order to avoid burning out the push button style electric switch. Now I am not sure if that is just a requirement for higher draw more powerful LED bar lights vs. this simple small led markers in the grill but I have seen a YouTube where the guy was complaining that his push switch "broke" after only few uses and wondered if that is because people ignore the relay and bur out the switch. Any informed comments on this would be much appreciated!

JC
 
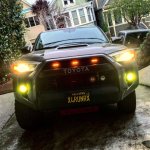
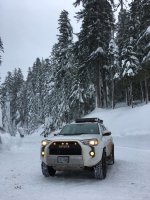
I installed the grill lights from Cartrimhome yesterday. Very easy install.

Nice. Did you wire in a switch? I actually haven’t turned them off since installing the switch
 

Attachments

  • 58421E57-1876-4242-A5D5-1CF4B9690EAE.jpg
    58421E57-1876-4242-A5D5-1CF4B9690EAE.jpg
    139.8 KB · Views: 2,536

Members online

Forum statistics

Threads
278,316
Messages
3,554,113
Members
248,016
Latest member
Advally Service

Trending content

Back
Top