Havin fun's build

As far as the rear pinch welds. I snipped about 1.5" at the top then folded them in and pounded them back about 2 inches. Picture was before the rear bumper.


/\ Pretty much what I did. Don't think I will have to cut the bumper for 34" though.

I might have to pull the bumper off and smash the inner body in some so I can add some extra steel at a 90* angle on the ends @ the wheel well area. noticed it pushes in at that area when taking a hit.
 
Last edited:
Boy I be slacking here.... Lets see, put the new OEM CVs in and boxed the old ones for spares now.
Been having like a heat shield vibration and think it has been my muffler kinda separating on the outer wrapped sheet metal part, so I through some tack welds on it and It changed it's tone a little. I guess I got to get out there and smash it up some more to where I have to replace it with a smaller sized one.
Had a little bang sound in the back n thought it was the small bottle jack bouncing in the cubby hole.... Nope, bottom pinch welds from the wheel well to the rear of the ride. Bumper bottom/sides I guess was just enough bounce in there to make this sound, cure, 12lb sledge, beat the shit out of that area, no sound now.

Sitting on 122k miles and have done 3 drain/fills to the tranny starting at 60k. Drained again and pulled the pan. Just a slight film on the magnets that looked like grafefite grease, so got brave and did a complete drain of the old fluid from the trans lines and replaced with new. I can't even tell it is shifting. It was a smooth shift before I did it also.
So if this thing does blow out the seal trans, I post it up as why some say not to do a complete fluid exchange on a sealed trans.

Oh had a slight squeak in the front while turning the steering at a stop, Dayum stud/spacers for the uniball. Stud was turning/pivoting on the steering knuckle, Added some locktight to the stud and bumped up the torque spects on it. Squeak gone.

That's it for now, she's ready to take out this season and get abused some more.
 
The top pipe WAS parallel with body line at one point, the design wasn't design to getting sideways in the snow at high speed and slaming into snow banks. Was Fun though.
View attachment 188924

When I get the larger tires, will knock out the pinch weld, and put some 1/4" plates going into the wheel well area to reinforce the strength on the sides. I'll hook up my ratching straps up and straighten out the body line look first before the welds.
View attachment 188925


Just found these pics. Looks good.

Do you notice any flex on the tire carrier? That's my biggest concern with 4x4labs design.
 
Just found these pics. Looks good.

Do you notice any flex on the tire carrier? That's my biggest concern with 4x4labs design.

I don't think the (any) flex is in the tire carrier, I do believe it is coming more from any bumper mounting to the frame. As my SW front and others, they have a gap below the body line for this.

Mine as far as the rear on the stoppers, as I put in that build thread, the location spot, place it on the bumper and make sure your hatch door clears it for location. I put mine a little closer, so I had to cut the height down a little. So in doing so, on flex, allowed it to bunny hop above it once. I added a bead line weld on the stoppers themselves.

I do believe when I do go to larger tires and can determine if I have to cut/shape the wheel well section to clear ( if needed), I can add gussets to that area also, and would help with flexing from that area transferring to the swing arm section.

I will add photos latter on the stopper area for better understanding. I have also been tightening the latch arm also as it has it's tightening flex to it and has been helping with any movement. Was getting the bang sound from stopper banging in close position.
The season is just getting started so I can get out and really put the flex stress on it on the trails.

 
Last edited:
I don't think the (any) flex is in the tire carrier, I do believe it is coming more from any bumper mounting to the frame. As my SW front and others, they have a gap below the body line for this.

Mine as far as the rear on the stoppers, as I put in that build thread, the location spot, place it on the bumper and make sure your hatch door clears it for location. I put mine a little closer, so I had to cut the height down a little. So in doing so, on flex, allowed it to bunny hop above it once. I added a bead line weld on the stoppers themselves.

I do believe when I do go to larger tires and can determine if I have to cut/shape the wheel well section to clear ( if needed), I can add gussets to that area also, and would help with flexing from that area transferring to the swing arm section.

I will add photos latter on the stopper area for better understanding. I have also been tightening the latch arm also as it has it's tightening flex to it and has been helping with any movement. Was getting the bang sound from stopper banging in close position.
The season is just getting started so I can get out and really put the flex stress on it on the trails.

Awesome thanks for the quick and through response.
When I spoke to Luke about this kit for my 4th gen he stated that the horizontal tube that the tire carrier mounts to is the source of the flex, as it wants to twist from the weight of the wheel and tire in regards to how the tire carrier mounts to that horizontal tube.
Thats why i'm asking so much. I'm trying to understand how much, if any gusseting will help. Or if its even an issue.

Really like the way your bumper came out though. It looks fantastic. I think on mine i'll either use large diameter tube for the top of the bumper or fab it so that it sticks out more. I have a terrible habit of backing into trees and having some material standing off the bumper would be useful to me.
 
Awesome thanks for the quick and through response.
When I spoke to Luke about this kit for my 4th gen he stated that the horizontal tube that the tire carrier mounts to is the source of the flex, as it wants to twist from the weight of the wheel and tire in regards to how the tire carrier mounts to that horizontal tube.
Thats why i'm asking so much. I'm trying to understand how much, if any gusseting will help. Or if its even an issue.

Really like the way your bumper came out though. It looks fantastic. I think on mine i'll either use large diameter tube for the top of the bumper or fab it so that it sticks out more. I have a terrible habit of backing into trees and having some material standing off the bumper would be useful to me.

That tube is .25" thick and the spindle housing is also. A lot of metal to try to flex. My gusset I added is .25 thick also, you could make a longer one to help with that I suppose. The spindle itself is rated @ 4000lbs.
I'll see about running over to my flex loading dock area and see if it shows any height difference for you latter.

If any flex I would see is from bouncing with that weight on principle.

As far as the tubes sticking out, as your going step by step building this bumper, you can pull the sides out farther, and the back pieces are longer for cutting off to fit. Same with the top tube can cut down to fit from both ends.
 
I did just put my weight on the arm and it dropped about 1/8".

1461257748189-123192547.jpg
 

Attachments

  • 1461257748189-123192547.jpg
    1461257748189-123192547.jpg
    111.5 KB · Views: 617
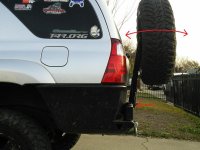
This is the flex i'm worried about. With the bending occurring at the bottom red arrow, and more specifically, twisting the swingout along the length of the bar. Like a torsion bar.
 

Attachments

  • IMG_20160126_164324~2.jpg
    IMG_20160126_164324~2.jpg
    128.1 KB · Views: 609
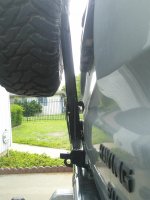
I made my own tire carier. The closes point of contact is 3/8", I used 1/8" tubing for this.
I made mine to be close as possible on the arms and welded straight on to it ( non removable). If you get the DIY kit, you can position the depth of the arm to the spindle.

I haven't seen any flexing issues in that direction period.

1461262679120-1828134839.jpg
 

Attachments

  • 1461262679120-1828134839.jpg
    1461262679120-1828134839.jpg
    135 KB · Views: 616
Dang man, the top of my tire is about 4"-5" of clearance and is stout. Barely moves. Looks like mine is titled in too, tucking it in a bit more.

Mine:

BDDCFFD1-5A11-43E6-BC7D-AAA29976EA42_zpsqrkrjrns.jpg~original


Bobby
 
Last edited:
Correct. Yours came from Luke, so the design doesn't have your lics plate sitting below which allows it to sit lower. In doing so, puts the tire arm sitting at the bend of the back door.

I could have put more of an angle to mine, angled with the back window. When I do my NON removable ladder to the other arm. I will probably move my tire carrier over towards the center more, and probably lower the liscense plate another 1.5". Maybe put the angle of the tire at the window angle also, which would allow me to bring it down a little more in height.

Hey I'm just an old fart experimenting with mine. The hazards of owning multiple cutters and welders.
 
Yeah man no worries. Didn't notice if you have a spoiler or not but mine not having one allowed for my ladder and attachments to hug the rear door a little more too.

Bobby
 
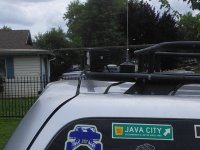
No spoiler. Was the only way I was able to build this rack as my CB antenna was running in the line of the mounting points. So I had to extend the lower bar.
Besides, I wanted to have the top of my ladder to have more of a step design versus Luke's.


1461272675957-1871304086.jpg
 

Attachments

  • 1461272675957-1871304086.jpg
    1461272675957-1871304086.jpg
    127.4 KB · Views: 596
Interesting on the ladder. You should be able to get a good angle on it without the spoiler too. BTW I don't have any problems using my ladder as a step
:pimp:

Hats off to you for putting the kit together :yo:
I'm just glad Luke and I could work this out and set him up with a platform for these to be produced a lot easier with his new jig.


Bobby
 
Thank You there Bobby. Even when I was doing searches for a possible DIY bumper, Lukes never came up for me. I ran across your build with this bumper on sites searches. So I ended up doing a search on him.

Yeah, in my younger yrs, I probably wouldn't have a problem with his ladder, now rather be safe than sorry.

There are some great guys out there to work with, WMW was another as he sold me a pair of his racks feet so I could make mine.

I love your ride, finances will prevent me to get to your degree of build.
 
As far as the rear pinch welds. I snipped about 1.5" at the top then folded them in and pounded them back about 2 inches. Picture was before the rear bumper.


I need to do this. I flexed the rear out almost all the way and cut up my brand new Toyo MTs a little bit.
 

Members online

No members online now.

Forum statistics

Threads
278,309
Messages
3,554,068
Members
248,016
Latest member
Advally Service

Trending content

Back
Top