hawkmanjr
New member
Hey guys and gals! I've been creeping on T4R for years now, and the time has finally come to post my very own build thread!
Background
I've always wanted an off-road-capable vehicle. I have always wanted the assurance that if the weather gets really crazy, a vehicle needs to get unstuck/recovered, or whatever imaginable SHTF scenario, my vehicle would be up that task. 4Runners have always appealed to me--when the wife and I first started thinking about getting one, we were thinking of getting a 5th gen in a few years. Well after a few months of saving and some honest looks at our budget, we realized that a 5th gen would be a LONG way away. I've always liked the rugged look of the 3rd gen, and we agreed that we would start saving for one.
I should mention that my first and only vehicle has been a 2004 Honda Accord V6 6-speed. The thing has been great, it is quick, fairly agile, and a pleasure to drive. I find it interesting how many folks on here also started with a 'sporty' car before coming over to the T4R crowd
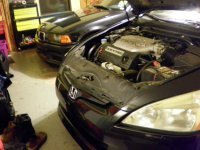
Sorry about the crappy photo. Dad's '98 M3 in the back
The Rig
So my wife and I've been looking for a 4Runner for a little over a month. Searching Craig's List everyday, checking Autotrader, responding to PM here, etc. About 4 weeks in, within the same week, two 'Runners that were listed close to us (less than 2 hours away) for a *great* price both got snagged by someone else in a matter or hours :rockthrow:. Needless to say, we were growing weary of researching, talking to the owner, asking questions, and the dang thing got bought after I decided to drive down the next day and take it for a test drive.
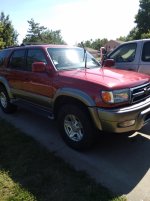
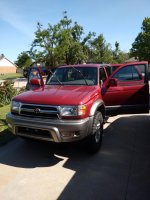
So, we found a nice red '99 on CL (167k miles) listed for $7500 in Austin, TX. Everything looked pretty good, and the mechanic that I had look at it was enamored with the car and told me if I didn't buy it he would. We promptly offered $8k if everything checked out (the owner mentioned that she had two people scheduled to look at the car...the day she listed it...). Long story short we drove down to Austin, bought the dang thing, went to IKEA and bought a desk for my wife, and drove back up all in time for supper (well, not really...).
![IMG_20160330_151556[1].jpg](https://www.toyota-4runner.org/data/attachments/164/164504-0956fe19a2f9e87c50912026ca5b3a2f.jpg?hash=J_CIaJIEDN "IMG_20160330_151556[1].jpg")
![IMG_20160405_074935[1].jpg](https://www.toyota-4runner.org/data/attachments/164/164509-e3f2824f1ac3aabddc85e74c6b54f380.jpg?hash=X6NJiUn6fG "IMG_20160405_074935[1].jpg")
![IMG_20160405_074827[1].jpg](https://www.toyota-4runner.org/data/attachments/164/164521-4c2873a7328f6237ab6d7c27dbb207ce.jpg?hash=eawDOi8bZ0 "IMG_20160405_074827[1].jpg")
I LOVE the Duratracs, they look so much better in person than on the web. Now I can understand why people buy these tires for aesthetic reasons
As you can probably tell, this thing needs some elbow grease to get it in 'really nice for a 17 year-old truck' condition. All the water in Oklahoma contains generous amounts of calcium (among other things...), and thus water spots are common after a hose-down. Thus, I *really* need to detail this car on the outside (wash/clay bar/polish/wax). As there are many paint chips, and the paint currently looks dull, paint correction will be a big part of me getting this 4Runner looking nice. Any tips/pointers in this area would be greatly appreciated.
Philosophy of Use
To borrow a Nutnfancy term (Nutnfancy is a big outdoor/gear/gun/knife channel on Youtube--awesome content), the POU (philosophy of use) for this truck will be above all, my DD. Its secondary role however, will be a weekend trail/camping/get us home alive rig. We intend to drive this car for years and years--I would love to see this thing break 400k miles. As such, the majority of the work on this vehicle will be maintenance and preventative maintenance. The mods that I will do will be fairly light and should be able to stand the test of time. I would like to 'over-build this rig in the sense that, I always want to be a little more prepared than I perhaps 'need' to be just in case. Because of this, I will tend to lean more towards armor, recovery gear, and redundancy in general (2 is 1, 1 is none) when it comes to mods/extras.
Plan of Attack
Phase 1
Initial Phase = Items that are primary, and need to be installed/performed first before anything else.
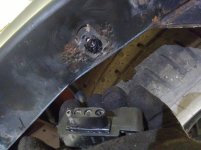
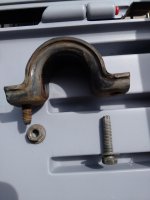
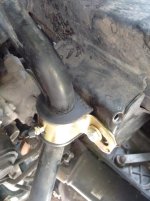
1. Sway Bar Bushings. Funny story--driving the car from Austin to OKC was fairly normal, no weird noises/lights/smells from the 4Runner. A couple days afterward however I noticed a clunking/creaking sound in the front suspension. I researched and found a host of possible causes. This is what I found when I climbed underneath to take a peak.
![IMG_20160405_074721[1].jpg](https://www.toyota-4runner.org/data/attachments/164/164527-c905309842393d2d91f0cfdfe7f5ce4a.jpg?hash=51cCXUZmZx "IMG_20160405_074721[1].jpg")
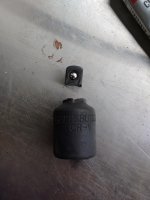
Doh!! No front sway bar bushing!! Interestingly enough, a shop had recently replaced both the front end links (with Moog links -.-) and sway bar bushings. The other front bushing looked new, so I suspect the other must have not been tight enough or just managed to escape somehow. Bought some Energy Suspension bushings that showed up at the house today!
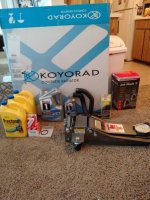
2. Replace radiator. I am taking 0 chances with the pink milkshake, bought a Koyo 1998 radiator and will install this weekend.
3. Vacuum out interior. The previous owner had 2 German Shepherds (God bless 'em) but they shed EVERYWHERE. My wife literally spend 45 minutes at a carwash vacuuming out the hair. Just picked up a little ArmorAll wet/dry vac that is supposed to be great for vacuuming out vehicle interiors, so we'll give that a shot.
3.5 Replace fluids (namely oil, tranny, and diffs)
4. New battery. The old one is not looking good, and startup times are slightly longer than I would like. Going to swap it out for an Optima Yellow Top.
5. The Big 3 electrical upgrades.
6. Replace PCV valve.
7. Clean throttle body and MAF sensor.
8. Lube driveshaft
Phase 2
Secondary Phase = Not crucial, but will definitely want to do these sooner rather than later.
1. Rust eradication (undercarriage). The undercarriage on this thing is VERY clean. only small little bits of rust here and there. Even so, I want to kick its butt and eradicate it before it becomes and issue.
2. Tranny cooler. No chances will be taken with the pink milkshake. 'Nuff said.
3. Sliders. Probably will go with Stubbs HD-SKO sliders. I was somewhat surprised at the lack of views/posts on the thread(s) (sorry author...) about adding grip tape (skateboard deck tape) to sliders to make them much safer and more functional as a step. I always imagined using sliders as steps, and had wondered if they might be slick when painted. P.S. If you can weld and you live less than 4 hours from OKC, I will gladly treat you and your significant other to a nice dinner if you will weld these up for me! I would help as much as I could of course!!
4. Rear diff breather install
4.1 ISR delete
4.2 Deckplate mod
5. Spark plugs + wires
6. Paint wheels graphite grey (these look sick).
7. 5-star as spare tire with a full-size Duratrac?
8. Aftermarket recovery points. I remember there is a guy on here that sells a bolt-on metal piece that acts as a recovery point (forgive my ignorance). Would definitely want to pick these up while I am still running the stock front bumper.
9. The factory A/C control unit is somewhat functional, but needs to be worked on. I don't trust my electronic knowledge enough to open it up and resolder joints, so I will likely ship it to someone and have them fix it up.
10. Window tint. I've heard ceramic window tint is hot sh** (figuratively), and I'd definitely want to tint the windows to eliminate heat in the summer and help keep wayward eyes away from whatever is inside the 'Runner.
Phase 3
Tertiary Phase = Not urgent, but would be nice to have later on
1. Skid plates. Again, more armor = mo betta
2. Satoshi grill mod (probably will pay SRQ-Runner for a Raptor-Style grille like Unner has [that thing looks great!] as I am not great at fabbing even simple-ish stuff).
3. Weathertech floor mats. Seems like a good investment.
4. Aftermarket head unit. Probably a <$100 Pioneer.
5. Tundra brake swap when appropriate (previous owner recently replaced the front pads and turned the rotors).
6. A pair of Rigid Industries Dually or similar rugged-ass bright lights. Probably will get the 'Driving Light' pattern. These will definitely happen.
7. Shrokworks front bumper. This is the best-looking front bumper in my opinion. Expensive, but nice. If/when I get this bumper, a Smittybuilt wench will follow.
8. Suspension. Not a big fan of getting a big lift (>2" would be okay, but I would definitely not want a 3"+ lift right now), the rear shocks were replaced recently, so I am not yet willing to spend $1k on upgraded suspension. One day though I'd like to run the Tundra TRD fronts and OME's in the rear (906's??) with Billy 5100s all around...
Final Thoughts
If you've made it this far, I sincerely thank you for reading this. Please let me know if you have any thoughts, concerns, or just think I am a complete idiot. If you live nearish OKC I'd be totally be down to hang out/help wrench/go 4-wheeling/whatever!
Background
I've always wanted an off-road-capable vehicle. I have always wanted the assurance that if the weather gets really crazy, a vehicle needs to get unstuck/recovered, or whatever imaginable SHTF scenario, my vehicle would be up that task. 4Runners have always appealed to me--when the wife and I first started thinking about getting one, we were thinking of getting a 5th gen in a few years. Well after a few months of saving and some honest looks at our budget, we realized that a 5th gen would be a LONG way away. I've always liked the rugged look of the 3rd gen, and we agreed that we would start saving for one.
I should mention that my first and only vehicle has been a 2004 Honda Accord V6 6-speed. The thing has been great, it is quick, fairly agile, and a pleasure to drive. I find it interesting how many folks on here also started with a 'sporty' car before coming over to the T4R crowd
Sorry about the crappy photo. Dad's '98 M3 in the back
The Rig
So my wife and I've been looking for a 4Runner for a little over a month. Searching Craig's List everyday, checking Autotrader, responding to PM here, etc. About 4 weeks in, within the same week, two 'Runners that were listed close to us (less than 2 hours away) for a *great* price both got snagged by someone else in a matter or hours :rockthrow:. Needless to say, we were growing weary of researching, talking to the owner, asking questions, and the dang thing got bought after I decided to drive down the next day and take it for a test drive.
So, we found a nice red '99 on CL (167k miles) listed for $7500 in Austin, TX. Everything looked pretty good, and the mechanic that I had look at it was enamored with the car and told me if I didn't buy it he would. We promptly offered $8k if everything checked out (the owner mentioned that she had two people scheduled to look at the car...the day she listed it...). Long story short we drove down to Austin, bought the dang thing, went to IKEA and bought a desk for my wife, and drove back up all in time for supper (well, not really...).
I LOVE the Duratracs, they look so much better in person than on the web. Now I can understand why people buy these tires for aesthetic reasons
As you can probably tell, this thing needs some elbow grease to get it in 'really nice for a 17 year-old truck' condition. All the water in Oklahoma contains generous amounts of calcium (among other things...), and thus water spots are common after a hose-down. Thus, I *really* need to detail this car on the outside (wash/clay bar/polish/wax). As there are many paint chips, and the paint currently looks dull, paint correction will be a big part of me getting this 4Runner looking nice. Any tips/pointers in this area would be greatly appreciated.
Philosophy of Use
To borrow a Nutnfancy term (Nutnfancy is a big outdoor/gear/gun/knife channel on Youtube--awesome content), the POU (philosophy of use) for this truck will be above all, my DD. Its secondary role however, will be a weekend trail/camping/get us home alive rig. We intend to drive this car for years and years--I would love to see this thing break 400k miles. As such, the majority of the work on this vehicle will be maintenance and preventative maintenance. The mods that I will do will be fairly light and should be able to stand the test of time. I would like to 'over-build this rig in the sense that, I always want to be a little more prepared than I perhaps 'need' to be just in case. Because of this, I will tend to lean more towards armor, recovery gear, and redundancy in general (2 is 1, 1 is none) when it comes to mods/extras.
Plan of Attack
Phase 1
Initial Phase = Items that are primary, and need to be installed/performed first before anything else.
1. Sway Bar Bushings. Funny story--driving the car from Austin to OKC was fairly normal, no weird noises/lights/smells from the 4Runner. A couple days afterward however I noticed a clunking/creaking sound in the front suspension. I researched and found a host of possible causes. This is what I found when I climbed underneath to take a peak.
Doh!! No front sway bar bushing!! Interestingly enough, a shop had recently replaced both the front end links (with Moog links -.-) and sway bar bushings. The other front bushing looked new, so I suspect the other must have not been tight enough or just managed to escape somehow. Bought some Energy Suspension bushings that showed up at the house today!
2. Replace radiator. I am taking 0 chances with the pink milkshake, bought a Koyo 1998 radiator and will install this weekend.
3. Vacuum out interior. The previous owner had 2 German Shepherds (God bless 'em) but they shed EVERYWHERE. My wife literally spend 45 minutes at a carwash vacuuming out the hair. Just picked up a little ArmorAll wet/dry vac that is supposed to be great for vacuuming out vehicle interiors, so we'll give that a shot.
3.5 Replace fluids (namely oil, tranny, and diffs)
4. New battery. The old one is not looking good, and startup times are slightly longer than I would like. Going to swap it out for an Optima Yellow Top.
5. The Big 3 electrical upgrades.
6. Replace PCV valve.
7. Clean throttle body and MAF sensor.
8. Lube driveshaft
Phase 2
Secondary Phase = Not crucial, but will definitely want to do these sooner rather than later.
1. Rust eradication (undercarriage). The undercarriage on this thing is VERY clean. only small little bits of rust here and there. Even so, I want to kick its butt and eradicate it before it becomes and issue.
2. Tranny cooler. No chances will be taken with the pink milkshake. 'Nuff said.
3. Sliders. Probably will go with Stubbs HD-SKO sliders. I was somewhat surprised at the lack of views/posts on the thread(s) (sorry author...) about adding grip tape (skateboard deck tape) to sliders to make them much safer and more functional as a step. I always imagined using sliders as steps, and had wondered if they might be slick when painted. P.S. If you can weld and you live less than 4 hours from OKC, I will gladly treat you and your significant other to a nice dinner if you will weld these up for me! I would help as much as I could of course!!
4. Rear diff breather install
4.1 ISR delete
4.2 Deckplate mod
5. Spark plugs + wires
6. Paint wheels graphite grey (these look sick).
7. 5-star as spare tire with a full-size Duratrac?
8. Aftermarket recovery points. I remember there is a guy on here that sells a bolt-on metal piece that acts as a recovery point (forgive my ignorance). Would definitely want to pick these up while I am still running the stock front bumper.
9. The factory A/C control unit is somewhat functional, but needs to be worked on. I don't trust my electronic knowledge enough to open it up and resolder joints, so I will likely ship it to someone and have them fix it up.
10. Window tint. I've heard ceramic window tint is hot sh** (figuratively), and I'd definitely want to tint the windows to eliminate heat in the summer and help keep wayward eyes away from whatever is inside the 'Runner.
Phase 3
Tertiary Phase = Not urgent, but would be nice to have later on
1. Skid plates. Again, more armor = mo betta
2. Satoshi grill mod (probably will pay SRQ-Runner for a Raptor-Style grille like Unner has [that thing looks great!] as I am not great at fabbing even simple-ish stuff).
3. Weathertech floor mats. Seems like a good investment.
4. Aftermarket head unit. Probably a <$100 Pioneer.
5. Tundra brake swap when appropriate (previous owner recently replaced the front pads and turned the rotors).
6. A pair of Rigid Industries Dually or similar rugged-ass bright lights. Probably will get the 'Driving Light' pattern. These will definitely happen.
7. Shrokworks front bumper. This is the best-looking front bumper in my opinion. Expensive, but nice. If/when I get this bumper, a Smittybuilt wench will follow.
8. Suspension. Not a big fan of getting a big lift (>2" would be okay, but I would definitely not want a 3"+ lift right now), the rear shocks were replaced recently, so I am not yet willing to spend $1k on upgraded suspension. One day though I'd like to run the Tundra TRD fronts and OME's in the rear (906's??) with Billy 5100s all around...
Final Thoughts
If you've made it this far, I sincerely thank you for reading this. Please let me know if you have any thoughts, concerns, or just think I am a complete idiot. If you live nearish OKC I'd be totally be down to hang out/help wrench/go 4-wheeling/whatever!

![IMG_20160330_151556[1].jpg](/data/attachments/164/164504-0956fe19a2f9e87c50912026ca5b3a2f.jpg?hash=J_CIaJIEDN)
![IMG_20160405_074935[1].jpg](/data/attachments/164/164509-e3f2824f1ac3aabddc85e74c6b54f380.jpg?hash=X6NJiUn6fG)
![IMG_20160405_074827[1].jpg](/data/attachments/164/164521-4c2873a7328f6237ab6d7c27dbb207ce.jpg?hash=eawDOi8bZ0)
![IMG_20160405_074721[1].jpg](/data/attachments/164/164527-c905309842393d2d91f0cfdfe7f5ce4a.jpg?hash=51cCXUZmZx)

 hwell: