
Headlight Condensation

So I got a 3 year old oem headlight getting condensation. No cracks I can see with my eyes. I decided to pull the cover apart and reseal it with butyl from TRS. It worked for 2wks but came back again. So I tried baking it again and pushing it together to get a good contact.(I hope). Again everything is good for a few weeks and it is back. Any tips? I double check all rubber seals. Clueless at this point. Thanks
 
Register to hide this ad
I had the same issue a little while back. Bought some gorilla sealant, worked like a charm. Might be something to check out
 
I would buy new O-ring seals for the lamp sockets on the headlamp assembly from Toyota and install them. If the they are old , dry cracked , shrunk or do not fit snug , it could be your issue.
 
I did an inhumane thing.

I ran silicone around all the edges/gaps on both headlights.

This how I repaired mine as well. Used a hair dryer to drive the moisture out and ran a bead around the seal. Done, and done.
 
Last edited:
This how I repaired mine as well. Used a hair dryer to drive the moisture out and ran a bead around the seal. Done, and done.

Not always... I’ve been chasing this issue with some aftermarket ‘06 projectors that I bought from Amazon for far too long now. I very carefully silicone sealed the driver’s side that started leaking a few months after they were installed. It was good for maybe a month, but once that side was fixed then the passenger side started. I did the same fix to that side, then a few weeks later the driver’s side started again!:mad: During the many times these have been out, I was super careful to use a Teflon based o-ring sealant on all the bulb sockets just to be certain it wasn’t originating there. At this point, I’m perplexed and beginning to think that maybe the vent is somehow defective and letting moisture in since I can honestly find no other way it can be entering at this point. At this point, I’m ready to just shitcan these, or sell them to someone looking to do a real projector retrofit or something and move on to some factory Sport ones. I like that my aftermarket ones are flat black on the reflectors, which looks awesome with my black truck, but I’d settle for the smoked Sport ones just to have clean looking lights for once!
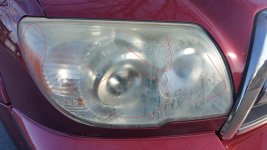
 
you have a weak seal, check the corners, especially the outside edges. and all screw holes.

I'll get it split apart again and try a thicker bead of the rubber butyl but this time I'll use some ratchet straps but carefully. I do notice just right inside the bulb housing I see some brown stain. Not crusty but looks rusted. Don't know if that's normal or what. I remember my old oem housing non projector had the same problem on the same side.(weird) Split it apart and re-seal. No issue. Which is why I still have leftover butyl. So frustrating :sniper:
 
Guys, before even i proceed with "sealing" headlight, does anyone have any idea how to clean-up all that "watery mess"?
pic attached
 

Attachments

  • 20190224_153054.jpg
    20190224_153054.jpg
    134.4 KB · Views: 2,615
Guys, before even i proceed with "sealing" headlight, does anyone have any idea how to clean-up all that "watery mess"?
pic attached

I pulled the low and high bulbs out. Stick a blow dryer to the high beam socket and waited. Eventually, they'll dry up. Heat the plastic from the outside helps too.
 
I pulled the low and high bulbs out. Stick a blow dryer to the high beam socket and waited. Eventually, they'll dry up. Heat the plastic from the outside helps too.

That’s how I’ve usually done it, but in addition to that, I’ve taken along section of paper towel and twisted it into a diameter that can fit through the bulb hole making sort of a wicking rope to dry the puddles first. Usually I bring it in the house, flip it glass side down for a short time so the water pools. That makes it easier to wick up the bulk of it, then I use the hair dryer to evaporate most of the remaining moisture. It still helps to leave it in the house at least overnight to continue drying out. I run a pellet stove for heat this time of year, so I leave it near that, which helps a lot. I just wish I didn’t have to keep doing this! At this point, short of permanently sealing around the bulbs with silicone, and blocking the vent, I’m out of ideas. Who knows, maybe the adjusters need to be sealed too. Wish I could trash the vendor on Amazon, but they won’t allow me to post a review for some reason...hmm... wonder why that is...?
 
from my headlight experience, to dry the lights out, you need to pop it in the over and bake at 250 for 10 mins, at this point, if you decide to seperate the lights and paint, this is good time. now to clean inside lens, use distill water and super fine glass cloth, like the ones that come with glasses.

before you put it in the over, you can drain the water out first.

now for sealing it back up, i stick it back in the oven, for 10 mins at the same temp. then press it together, after that, put it back in for another 5 to 10.
give it a final squeeze and let it cool off, dont forget to put the screws back in while its still warm.

to test if the seal is good, i use a pressure washer, something like 1500 psi at the widest nozzle. spray top to bottom, might as well wash the truck too. now see if it still leak.
 
That’s how I’ve usually done it, but in addition to that, I’ve taken along section of paper towel and twisted it into a diameter that can fit through the bulb hole making sort of a wicking rope to dry the puddles first. Usually I bring it in the house, flip it glass side down for a short time so the water pools. That makes it easier to wick up the bulk of it, then I use the hair dryer to evaporate most of the remaining moisture. It still helps to leave it in the house at least overnight to continue drying out. I run a pellet stove for heat this time of year, so I leave it near that, which helps a lot. I just wish I didn’t have to keep doing this! At this point, short of permanently sealing around the bulbs with silicone, and blocking the vent, I’m out of ideas. Who knows, maybe the adjusters need to be sealed too. Wish I could trash the vendor on Amazon, but they won’t allow me to post a review for some reason...hmm... wonder why that is...?

With Amazon, you'll have to choose your words carefully. LoL i tried bad mouthing some products too and it got rejected. I think he didn't want to remove the headlight. Hardest part is getting that bolt put in from underneath.
 
With Amazon, you'll have to choose your words carefully. LoL i tried bad mouthing some products too and it got rejected. I think he didn't want to remove the headlight. Hardest part is getting that bolt put in from underneath.

I didn’t actually get to even write a review! I think it was because I clicked “helpful” on one of the bad reviews before trying to post mine. The problem was that the set I bought didn’t have any reviews at the time I purchased last year, but the closeup pics made the adjusters, and other components look very high quality. They were also more expensive than a lot of the other aftermarket copies on eBay and such, so I thought I’d roll the dice. They do look very nice quality-wise, but clearly they are defective in the sealing process. My other error was that I bought them in the winter, but decided to run the old ones until spring so they’d be fresh, without sand pits and salt damage for a at least a few months. So, by the time I discovered the problems, it was probably 8 months after I bought them. I still feel like they’d make excellent donors for a HID retro or something, but if I can’t stop the condensation, I’m just going to try to get a better set, likely OEM Sport ones.

With regard to that 4th screw, I’ve had them in and out enough to say that it makes zero difference to just leave it out altogether. Maybe in a front end collision it would retain the pieces better or something, but for everyday use, the other 3 are very sufficient once it’s seated in place.
 
from my headlight experience, to dry the lights out, you need to pop it in the over and bake at 250 for 10 mins, at this point, if you decide to seperate the lights and paint, this is good time. now to clean inside lens, use distill water and super fine glass cloth, like the ones that come with glasses.

before you put it in the over, you can drain the water out first.

now for sealing it back up, i stick it back in the oven, for 10 mins at the same temp. then press it together, after that, put it back in for another 5 to 10.
give it a final squeeze and let it cool off, dont forget to put the screws back in while its still warm.

to test if the seal is good, i use a pressure washer, something like 1500 psi at the widest nozzle. spray top to bottom, might as well wash the truck too. now see if it still leak.

I wish I had just tried that right from the beginning. Now that I’ve beaded them with silicone, it will be much harder and require quite a bit of work to get all that cleaned out prior to baking, which is why I’m just going to replace them instead to save time. If I decide to use them for a retro, then I’d have the time to work on them at my leisure without tying up the truck at least.
 
I wish I had just tried that right from the beginning. Now that I’ve beaded them with silicone, it will be much harder and require quite a bit of work to get all that cleaned out prior to baking, which is why I’m just going to replace them instead to save time. If I decide to use them for a retro, then I’d have the time to work on them at my leisure without tying up the truck at least.

well, if your lights are out the truck, i still suggest you to shake out all the water and use a air compressor and spray it dry, you might be surprise on how much water was trapped in. either way, if you want to do the retro, i use the old lights as practice.
 

Members online

Forum statistics

Threads
278,309
Messages
3,554,068
Members
248,016
Latest member
Advally Service

Trending content

Back
Top