HID retrofit questions....

3rzrunner

Member
Hey guys, I am looking at doing an HID retrofit on my runner.
I have been looking at the BIXENON FX-R projectors.
There is so many options on The retrofit source! I don't even know what to get or which is better.

First what bulbs to get?? Morimoto's are around 50$ but OSRAM's are much more..... how about Phillips? are the osrams so much better or should I just get the morimotos?

Second. The FX-R's come in 2.5" and 3" which should I get? I am guessing 3" (more light?)

3rd. Ballasts.
I don't even know where to start. Any one have any suggestions?

4th. Wiring harness I am going to go with cambus H4. IS that ok or anything better?

5th Shrouds. e46 shrouds? Apollo 3? any suggestions?

6th Halos. what size halo would I need with lets say a 3" FX-R 60mm? 80mm? ?????

any help would be awesome!
Thanks!
3rz

also [MENTION=65101]BrianSD_42[/MENTION]
I saw yours they looked killer!
 
Register to hide this ad
Get the bigger lens "just because"

Go with the morroto bulbs 5000k, I have them in my DD and they are great.

go with 35W not 55W. I've run both go with 35w.

Look at my Retrofit thread on how to properly seal the lights and seal the breathers with cloth so no dust gets in. It's one of the later posts.
 
Get the bigger lens "just because"

Go with the morroto bulbs 5000k, I have them in my DD and they are great.

go with 35W not 55W. I've run both go with 35w.

Look at my Retrofit thread on how to properly seal the lights and seal the breathers with cloth so no dust gets in. It's one of the later posts.

Just did a set myself. Thanks for mentioni g the dust. I didn't think of that.
 
Link ---> http://www.toyota-4runner.org/3rd-g...it-97-4runner-project-toyota-4runner-org.html


Update: 01-06-2014


So it has been 1 year since did this mod and some dust has gotten inside the light housings.

I believe the reason is because the default breathing tubes (2) let in dust.

I have now fixed this so no dust can get in.


Here is the fix:

1. Bake lights (every time), open up and clean inside, wipe out the dust
2. Put the glass back on and re-bake, put on the metal clips etc
3. Add silicone sealant around the outside of the light and on the back around where the bulb is. This may be overkill but I don't want to do this a 3rd time.
4. Pull off the 2 rubber breathing tubes on the back of the light
5. Fill one of the tubes PARTIALY with silicone sealant, , enough to block any air, let it dry.
6. Upgrade the second tube with extended hose and filter
7. Add about 6-8" of Fish Tank Air Hose ($6 Petsmart) and glued it to the small breathing rubber. The idea is not to block the airway at all when doing this.
8. Add an air filter into the fish tank hose. I bought Cheese Cloth from Michaels (Arts & Crafts Store) and cut out a 1" by 2" piece and then twisted it up and shoved it in the tube.
9. Test that you can push (blow) air through the hose with the filter installed, better make sure the silicone had a few hours to dry!
10. Once it is dried, install onto the light as such.


Pictures!


1. Dirty Light (notice the dust in top right corner)


2.


3.


4.


5.


6. Dust Free Lights!


////////////////////////////////


That's a nice comment but BFAD is in a class of his own. I think of this as more of a project report then a write up :)
 
I went with the mini d2s projectors, they are also 3" and easier to install. I had lots of issues with morrimoto ballasts. One died, shortly after another died. TRS sent me replacements but I had to buy an extra pair from a local store since I had no lights.

Just a tip, disable your DRLs before you hook everything up. That might have been my issue with the ballasts. I think DRLs give out less power to the headlights and screwed with the ballasts. I'm not 100% sure they caused my ballasts to fail but better not to take any chances. It pretty easy, just cut one wire. Theres a writeup on that out there.

Good luck!
 
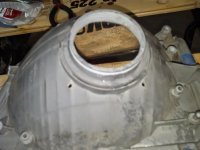
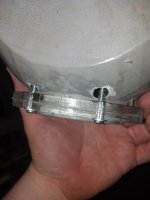
I got around to redoing my projectors a few weeks ago, I was trying to figure out the best way to align the fx-r's to the bore on the back of the lamp. At heatsync labs, a local hackerspace, I used the laser cutter to cut some plastic rings that I could use to get a really good alignment for the screws. The rings worked perfectly, other than one projector was a little twisted, but Its pretty easy to just turn it and fix it. whats nice is I made the rings have the same hole pattern as the projectors mounting holes, which makes it super easy to figure out where to drill the holes. the other thing is as long as you have the dimensions and spacing for the mounting holes this could work for any projector retrofit on the 4runner. also if you look at the glass lens of the headlight there is a little circle that lines up with the axis that the bulb should be going through, your projector lens should be perfectly centered on the mark. if you want the file i have it somewhere on my computer, you could make the rings by printing the pattern out on paper then drilling the holes manually, you could cnc, 3d print , water jet, or laser them as well if you have access to one of those.
 

Attachments

  • lamp bore.jpg
    lamp bore.jpg
    83 KB · Views: 315
  • plastic ring.jpg
    plastic ring.jpg
    64.9 KB · Views: 299

Members online

Forum statistics

Threads
278,312
Messages
3,554,086
Members
248,016
Latest member
Advally Service

Trending content

Back
Top