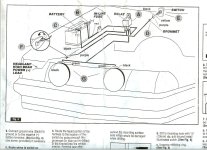
How do I find the high beam power lead?

farmerjon

Senior Member
I'm trying to wire up some aux lights, and I want to tap into the high beams (yes, I know I don't have to do this, but I want to), but I don't know which wire to put the circuit tester on and where exactly do I put the circuit tester? Where does the ground plug go?

I'm so confused... Do I pull the plug out of the headlight with the high beams on and put the circuit tester on the different metal contacts? (already tried this, no light).

I am looking at the FSM for the headlights with no DRLs, but I have no idea what I'm looking at... Or what the terms mean. I've looked all over and I can't find much info.

According to this graphic:
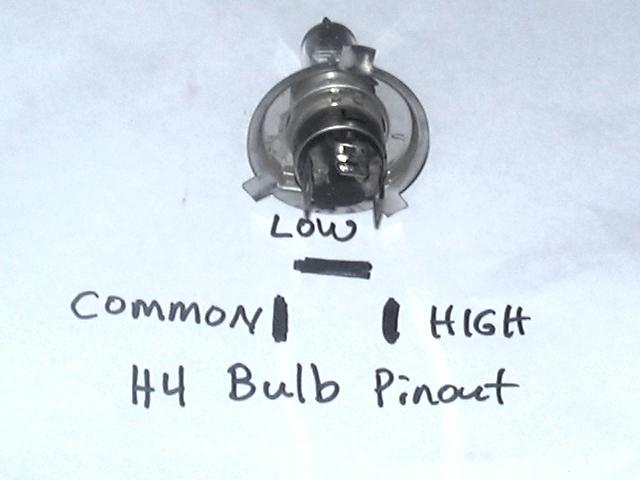
H4_Pinout.jpg


My high beam should be to the right. Should I tap whatever wire is coming in to the left? I'll be using a scotch lock connector to tap in...

I know almost nothing about electrical, this is a learning experience for me. Thanks for any input or help!!
 
Last edited:
Register to hide this ad
What do you want the light to do? Come on only with the highs? the lows? or either one? You succeeded in confusing me....


The non-DRL's are switched grounds--so the ground clip on your circuit tester should be connected to the battery positive. Then check the wire you want to tap for correct behavior. The pic you posted is correct. Common is probably red/blue, high is red/yellow and low is blue/black. 1998 may be different--this is for later trucks for sure. You can just pull the plug and put the probe in there while looking at the other side to confirm behavior of the lights.

When you go to wire your lights, the coil circuit should go 12v+>>>dash switch>>>relay coil>>>tap. The relay coil terminals on a standard Bosch type relay are number 85 and 86. The order is not important as long as one end is 12V+ and the other is the tap. I source my aux lights coil-side 12V+ at a circuit that comes on with ignition; this way the lights go off when the key is turned off and no risk of running down the battery in daylight.

The power side is battery positive>>>fuse>>>relay>>>lights>>>ground. The relay contacts you want here are 87 and 30. Try and maintain this sequence on the power side.

If you have a diagram that matches what I wrote, use it. But a lot of lights don't foresee switched ground circuits so you may have to ignore what came with the kit and do what I said.

For more on relays, go here:

Single Pole Double Throw (SPDT), Single Pole Single Throw (SPST) Automotive Relays

The rest of the site is great for the beginner or as a great reference for even adept wire jocks for things like wire sizing and fusing.
 
Last edited:
you could simply probe the connector with lights on to find out which wire is hot for low/high, then go from there. you do have a multi-meter or test light right?

also, steer clear of the scotch locks, they are super easy and convenient but at the cost of durability or corrosion protection. they always fail and can end up causing more problems than they ever solved.
 
get a $10 voltmeter, measure low beams, measure again with high beams on. You'll note one had 0 on low then 12Vish on high. Use that as our trigger wire.
 
you could simply probe the connector with lights on to find out which wire is hot for low/high, then go from there. you do have a multi-meter or test light right?

also, steer clear of the scotch locks, they are super easy and convenient but at the cost of durability or corrosion protection. they always fail and can end up causing more problems than they ever solved.

I guess you missed the part about switched grounds?

I don't make a habit of Scotch-locks, but a low-current tap in an out-of-the-weather location for a non-critical accessory is just about ideal for them. There is not much room to do anything else on a 4Runner headlight wire. I did my fogs with one on the tap in 1999 and no problems yet after 13 years and 150k. I do wrap them with tape when I use them--and never in an exposed location or high current use--certainly nothing that would be critical to keeping the car running.
 
Last edited:
Basically, I'm trying to understand which wire to tap for the high beams for the auxilary lights... Do I tap into the 'High' or the Common, as seen in the graphic above... I read elsewhere that I should do the "Common" and elswhere, the "Highs".

I have the Hella 1000 Black Magics - and I wanted to tap into the high beam wire as instructed - however, I decided that I would try to install the lights first and see if I could run them independently, I could always attach them to the high beams later.

So I rigged them up following the instructions (really hard to understand, I know nothing about this kind of thing). I started the truck and turned the switch and nothing happened.

I just left the one wire going to the high beams alone, just coiled it up. (is that needed to just run the lights simply on a switch?) The lights came with a relay with all the wires already attached. I ran the two connectors to the battery (who knows, perhaps I didn't attach them properly), and ran the other two wires to the lights, which I then had to attach terminals (first time doing that - I did cut one or two of the tiny copper wires out of all of them in the wire before putting them in the terminal thingy, does that matter??), and then connected them. I also ran the wire to the switch in the cabin and wired that up, flipping the switch either way doesn't work...

So what's going on? Again, thanks for all the input...

I should mention that I'm trying to install this in below zero degrees Farenheit... So many warm up breaks! :D
 
Last edited:
Hey Jon, it's tough to describe without seeing their diagram but I'll make some assumptions.

The relay has a coil and two wires go to it, when one of these wires gets 12v and the other is grounded the relay will activate. The switch is likely tied to one of these two wires.
The relay has a "switched contact", this is what connects power to the lights. You do not have to tap into the high beams, you can tap into any 12v source (I'd use the wire in the fuse box for the headlights).
It you can take a picture of the wiring diagram they show, I can tell you exactly where to connect what.

Edit, found this, is it the same as the diagram that came with your lights?
http://www.hella.com/produktion/Hel...load/Drivers/Lighting/BasicWiringDiagram1.pdf
 
Last edited:
Hey Jon, it's tough to describe without seeing their diagram but I'll make some assumptions.

The relay has a coil and two wires go to it, when one of these wires gets 12v and the other is grounded the relay will activate. The switch is likely tied to one of these two wires.
The relay has a "switched contact", this is what connects power to the lights. You do not have to tap into the high beams, you can tap into any 12v source (I'd use the wire in the fuse box for the headlights).
It you can take a picture of the wiring diagram they show, I can tell you exactly where to connect what.

Edit, found this, is it the same as the diagram that came with your lights?
http://www.hella.com/produktion/Hel...load/Drivers/Lighting/BasicWiringDiagram1.pdf

See below for a scanned copy of what came with the lights - it seems different than what's on the website. I scanned just the wiring diagram, as that's all that fits on my scanner...
 

Attachments

  • scan.jpg
    scan.jpg
    136.5 KB · Views: 5,307
Alright, it's the same wiring just laid out differently.

Red-positive terminal on battery

All blue wires to ground (this can be the negative terminal on the battery, or any bolt on the frame. The entire fame/motor is ground so that can make connections convenient)

Yellow should already be connected to the switch.

Black-to the free wire in the Hellas. I'm not sure if they have a wire here of what. All you need to remember is one wire(or tab/whatever from the light goes to ground, the other is connected to the black wire.)

Green-only reason they say to connect to high beams is because of silly government mandates for new cars. This can be connected to the red terminal of the battery(this will allow you to turn the lighs on any time, even without the key in the ignition).

Edit:there is a slight difference in color coding..... That purple wire is green in the online diagram. The other colors look like they match. Also looks like the blue on the online version may be black with your version......awesome instructions.
 
Last edited:
Alright, it's the same wiring just laid out differently.

Red-positive terminal on battery

All blue wires to ground (this can be the negative terminal on the battery, or any bolt on the frame. The entire fame/motor is ground so that can make connections convenient)

Yellow should already be connected to the switch.

Black-to the free wire in the Hellas. I'm not sure if they have a wire here of what. All you need to remember is one wire(or tab/whatever from the light goes to ground, the other is connected to the black wire.)

Green-only reason they say to connect to high beams is because of silly government mandates for new cars. This can be connected to the red terminal of the battery(this will allow you to turn the lighs on any time, even without the key in the ignition).

I don't have any blue, but I do have purple and black wires. Black seems to be the ground. The Hella's have green and black wires running to them.

Confused about the blacks - "All you need to remember is one wire(or tab/whatever from the light goes to ground, the other is connected to the black wire." what does this mean? In this case, ground is the black, but you're saying the other wire is the ground?

Purple = high beams
Black & Green = lights
Black & Red = battery terminals
Black, Yellow, Purple = Switch

EDIT: I have the red on the positive terminal, the black on the battery - but I might need to change the black ground to some other place and see if that helps. So you're saying to put the purple wire on the battery - even though I don't need it, since I already have a 12V source with the red wire on the battery, right? As far as I know, everything is hooked up correctly, I've been careful through the entire process, but I'm messed up somewhere.
 
Last edited:
They go to the relay. The black goes all over the place.

Ok,so I'll assume you wired everything according to the diagram except the purple one.
Temporarily connect purple to the battery positive,like B in the diagram. This should allow you to turn the new lights on with the switch.
 
Ok,so I'll assume you wired everything according to the diagram except the purple one.
Temporarily connect purple to the battery positive,like B in the diagram. This should allow you to turn the new lights on with the switch.

Yes, just like the diagram... Okay, I'll try and find a connector for the end of the purple wire (one of those loop things) and connect it. I'll get on this first thing in the morning, it's late here and below zero.
 
Yes, just like the diagram... Okay, I'll try and find a connector for the end of the purple wire (one of those loop things) and connect it. I'll get on this first thing in the morning, it's late here and below zero.

If you have a helper,strip some insulation off the purple wire and hold it onto the battery terminal while someone hits the switch.
 
If you have a helper,strip some insulation off the purple wire and hold it onto the battery terminal while someone hits the switch.

WHOO!!! It worked! :D

So what does this mean, since I have both the red and the purple wires on the positive terminal of the battery?
 
WHOO!!! It worked! :D

So what does this mean, since I have both the red and the purple wires on the positive terminal of the battery?

It means that's how you wire the lights so you can run them without highbeams :naughty:

If you can post up the colors of the three wires going to the headlight bulbs or scan the whole diagram I can tell you what factory wire connects to purple if you want highbeam-only operation
 
It means that's how you wire the lights so you can run them without highbeams :naughty:

If you can post up the colors of the three wires going to the headlight bulbs or scan the whole diagram I can tell you what factory wire connects to purple if you want highbeam-only operation

I think I'll do that for now - next is to tighten stuff up in the morning and find a Toyota fog light switch...

I've attached the Toyota FSM for the non-DRL headlight wiring... Hopefully that should help. Thanks a lot EdC for the help, I'm pretty happy to get these lights running!
 

Attachments

so you are tryin to hook up your AUX lights so they come on with your high beams?

thats easy, fuse box under da hood.

ive had mine like that for 5 years. and my aux lights are actually used everyday on dark backroads....so, i would def recommend it.
 
so you are tryin to hook up your AUX lights so they come on with your high beams?

thats easy, fuse box under da hood.

ive had mine like that for 5 years. and my aux lights are actually used everyday on dark backroads....so, i would def recommend it.

How would I take this purple wire (the one that is supposed to run to the high beam leads) to the fuse box? How do I hook that up?

I tested out my lights for the first time tonight and they are awesome! Though it is a pain to keep doing both the high beams and the aux lights whenever someone is oncoming...

Ideally, I would love to have an option to run the high beams separately...
 

Members online

Forum statistics

Threads
278,316
Messages
3,554,105
Members
248,016
Latest member
Advally Service

Trending content

Back
Top