robguitargod1
New member
Here is the remote start and immobilizer bypass that I used in this install:
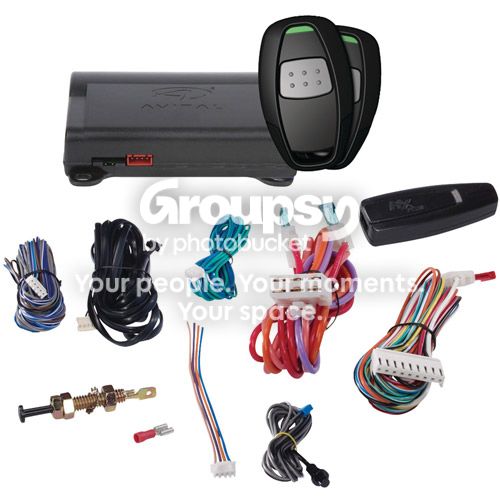
Avital 4113
The remote start is a basic single button remote model. Priced around $50 it's perfect for our 4R's since our OEM key FOB already controls lock/unlock functions, as well as the rear window.
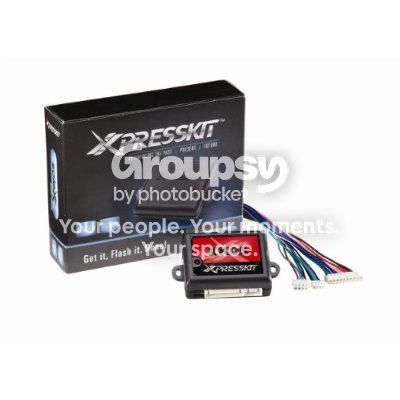
Xpresskit XK05
The immobilizer bypass doesn't require a key, is very small, and can be re-flashed (if you purchase the bootloader) It's priced around $30.
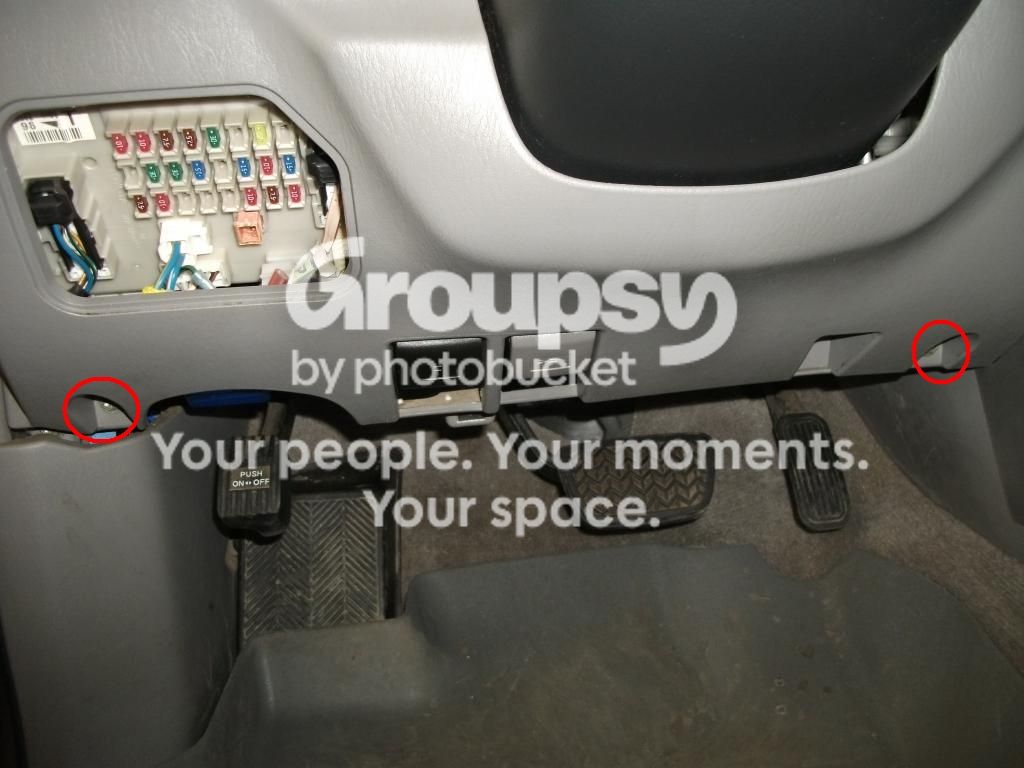
First remove the lower access panel by removing the 2 10mm bolts, then removing the 4 items attached to it (blue circle). Set the piece aside.
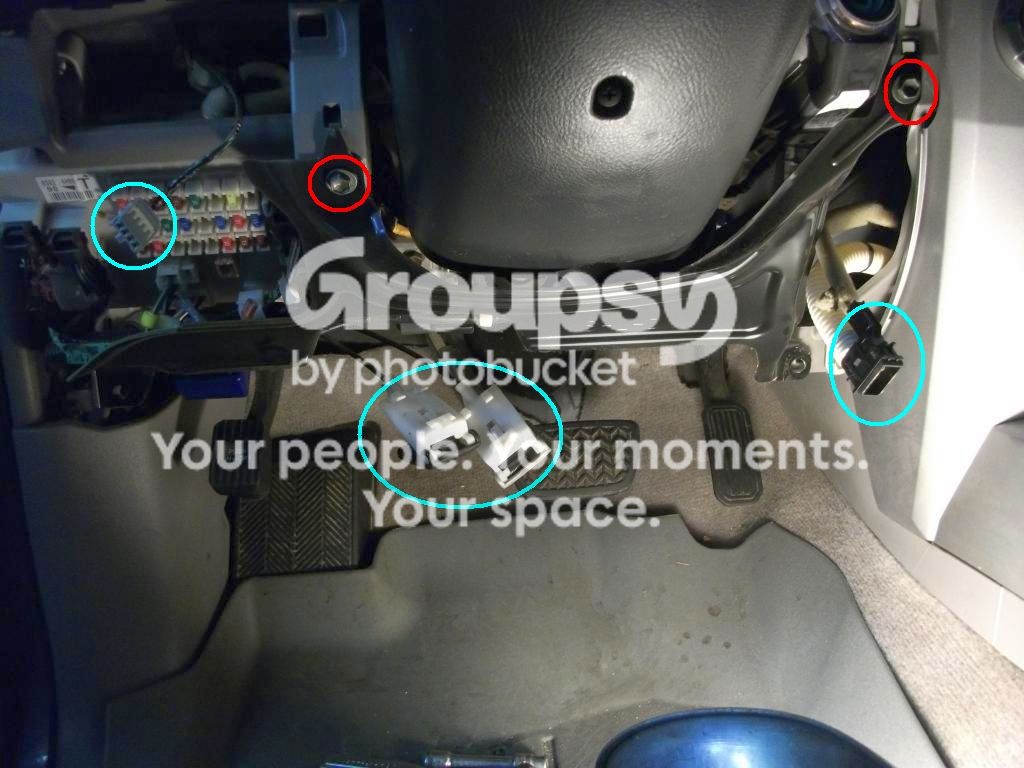
Then remove the metal guard with 2 more 10mm bolts
These are the connections you'll be making to the remote start (red dashes)
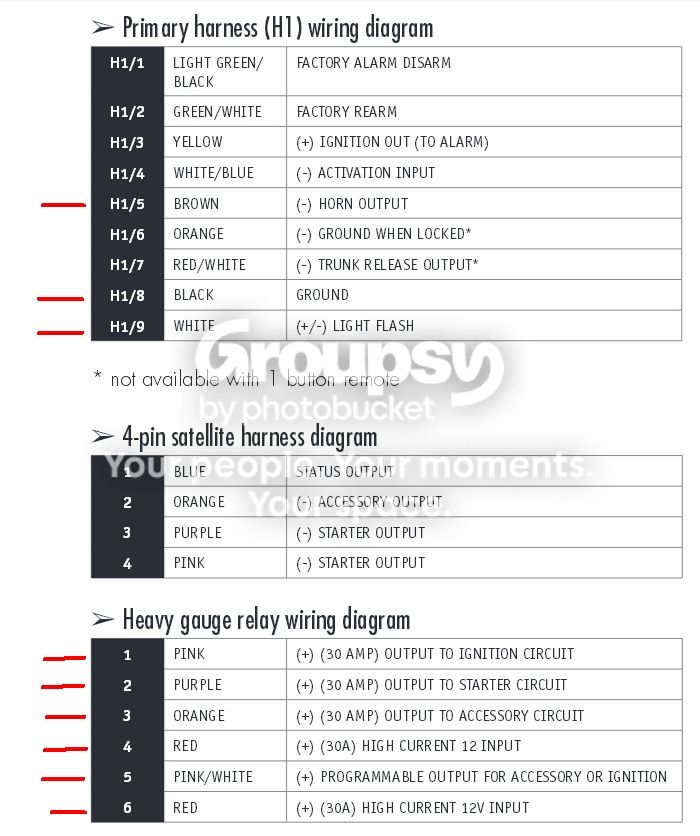
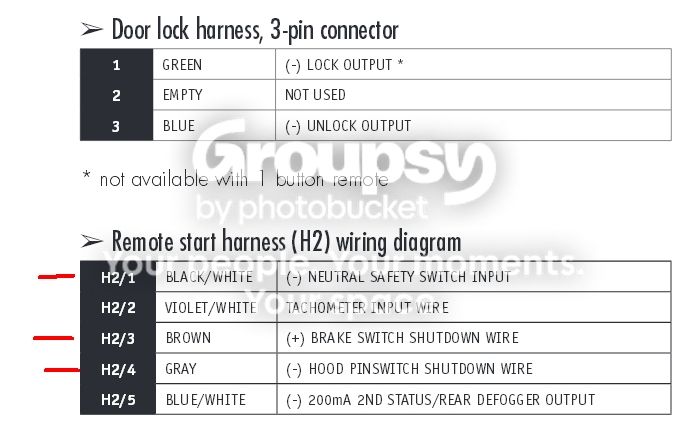
We'll start with the large heavy gauge harness. It needs to be connected to the vehicles main ignition switch harness.
Locate the main ignition switch harness connected to the ignition switch. It will have large gauge wires connected to it. Unplug it and cut away the tape so you will have enough room to separate the wires.

This is the wire color and location of the connections to be made:
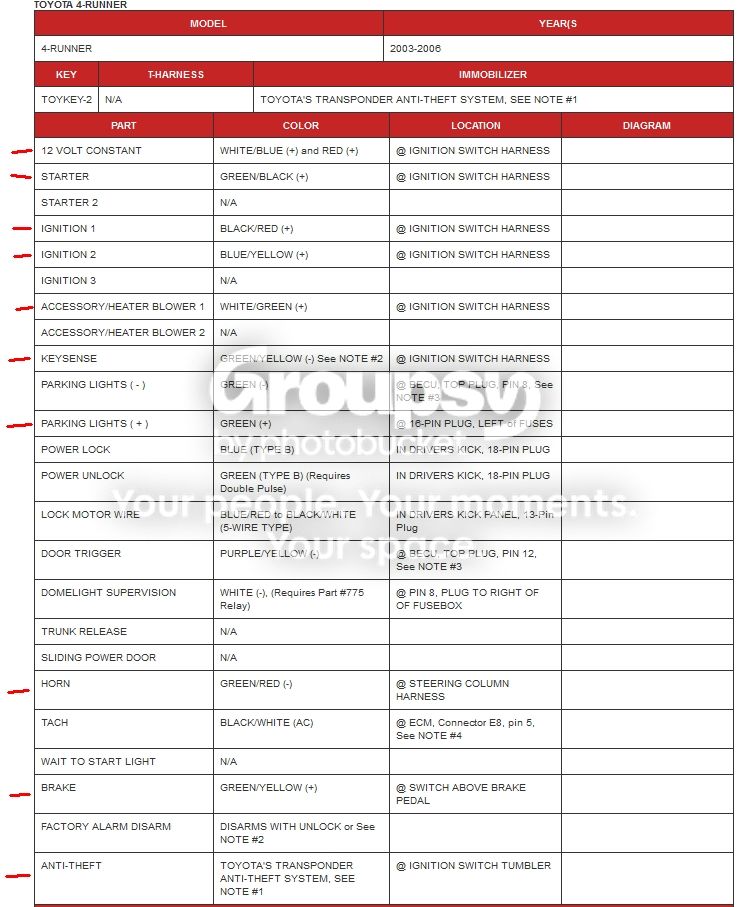
Start by stripping a little insulation away, just enough to be able to test the wire. TEST EVERYTHING! The info here is solid (I know because...well....I just did the install!) but you can never be to sure.
Once you know you have the correct wire, you need to isolate it from the rest so you can connect to it. I first make two cuts about 1/2" - 3/4" apart (red lines) then a cut straight down the middle. Be sure not to cut the actual copper wire, you only want to be cutting insulation.
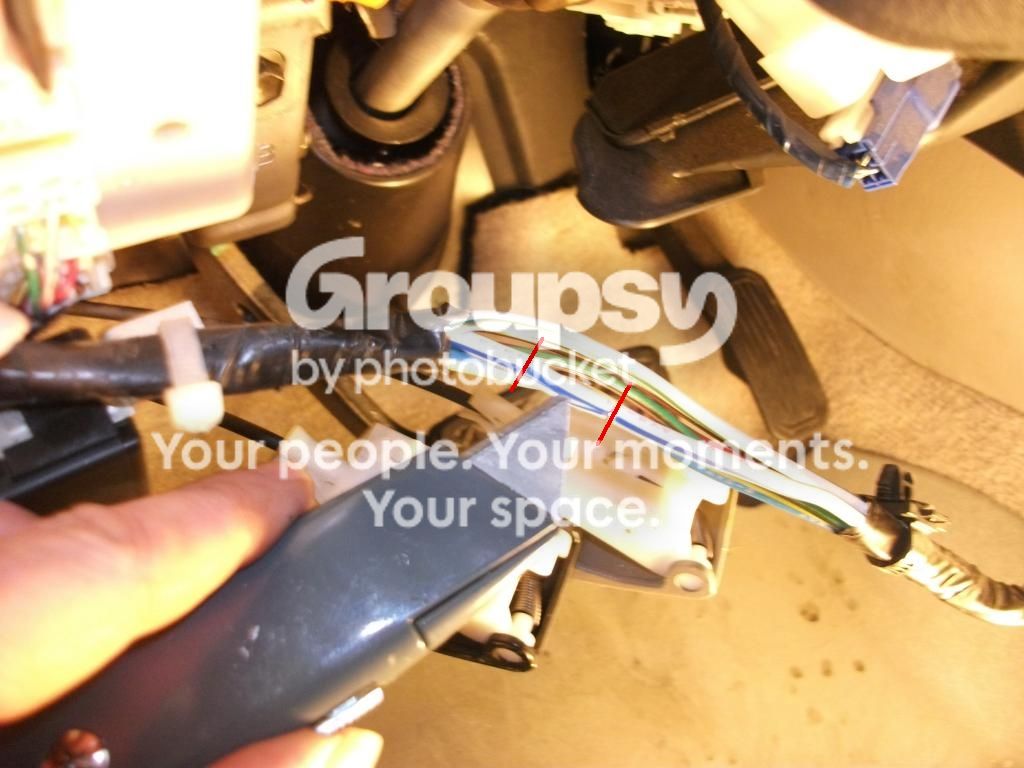
Once the wire is exposed, be sure not to short it to any other wire or metal part on the vehicle. You could disconnect the battery, but then of course you wouldn't be able to test the wires you're connecting to. As long as you connect one wire at a time, you'll be fine.
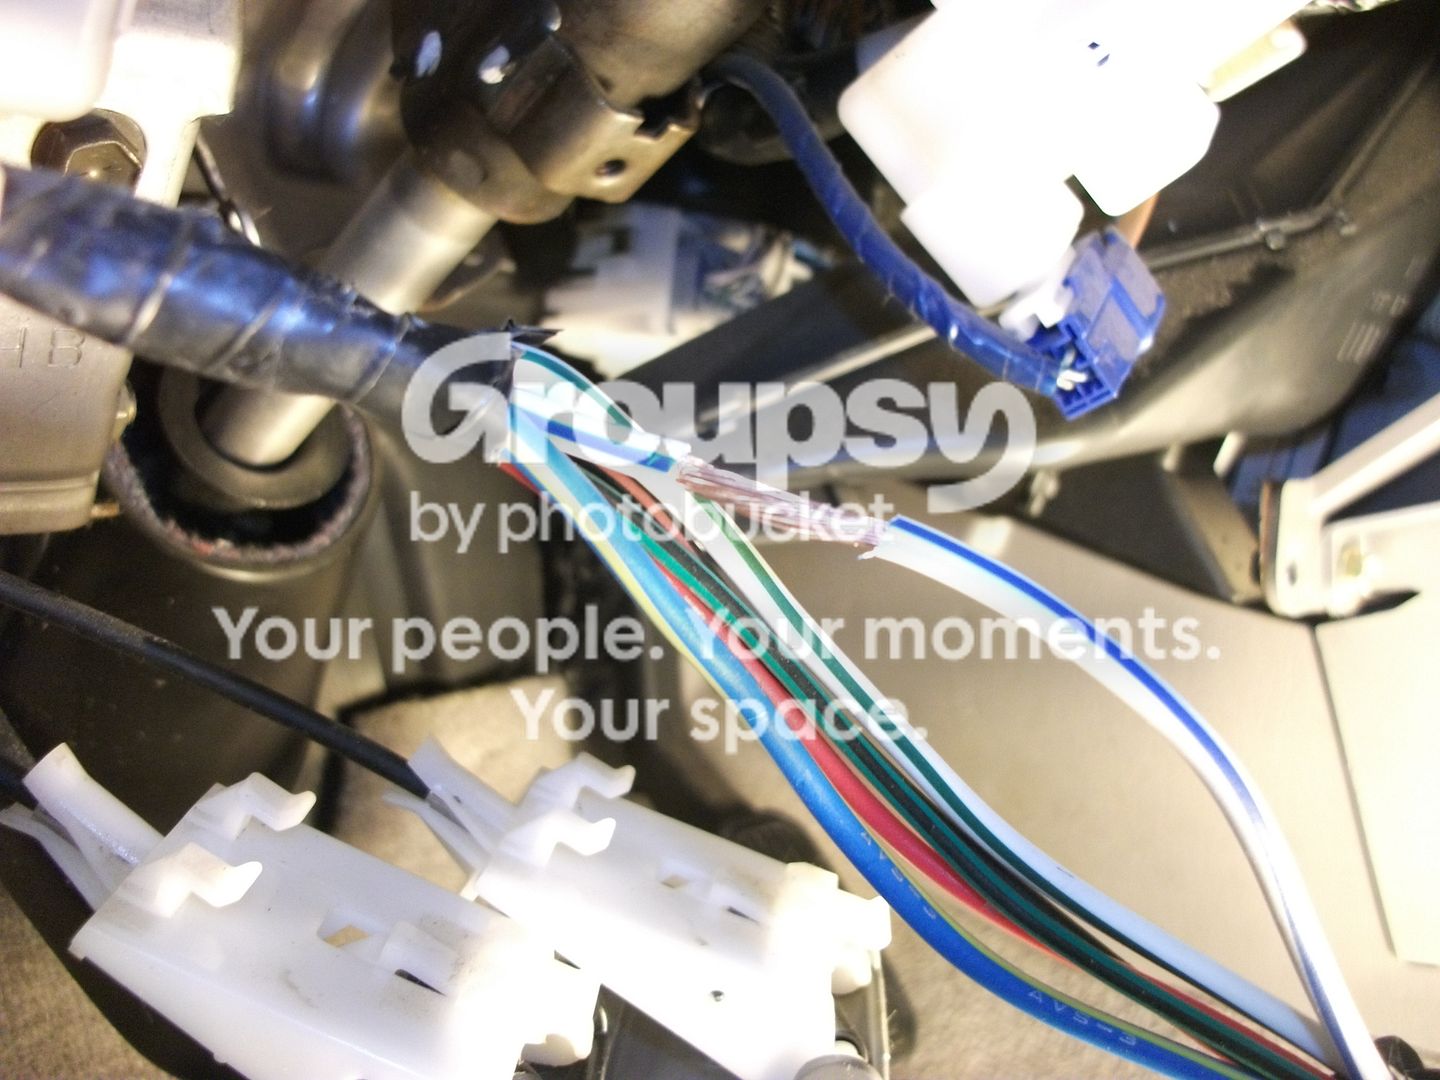
Next grab the harness from the remote start that you'll be working with (the heavy gauge harness in this case) and shorten the appropriate wire to the desired length. This will keep your install cleaner by reducing the amount of wire you'll have to tuck away later.
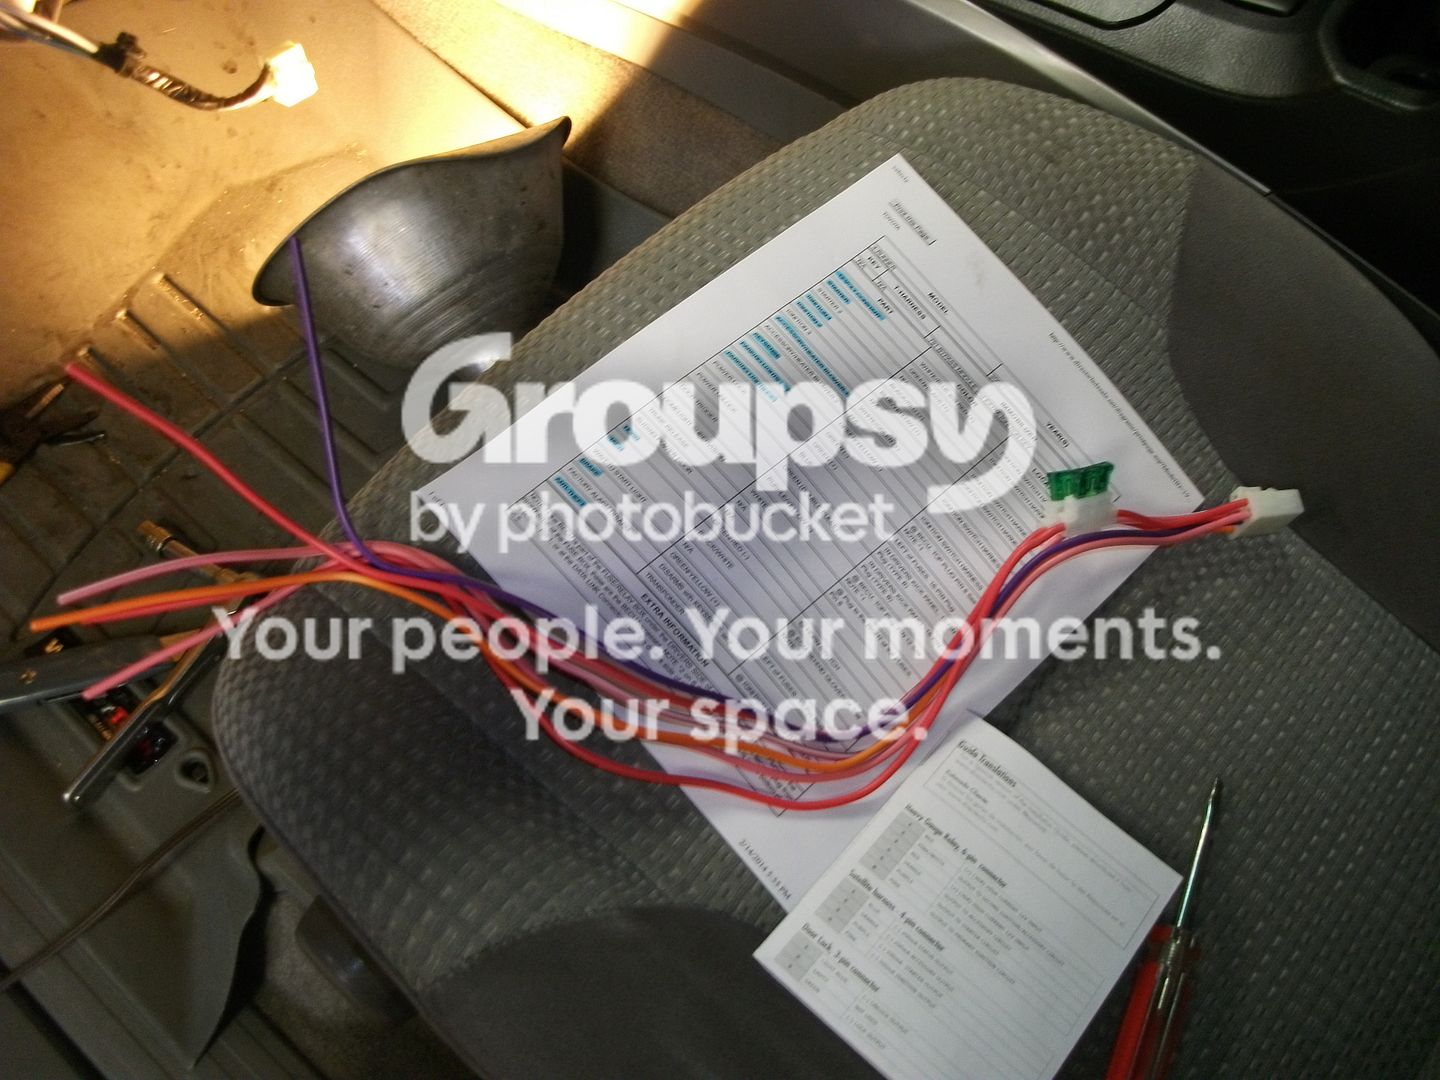
Now lay the wires (the remote start wire, and the vehicle wire you're connecting to) parallel to each other. Wrap the wires around each other and solder with a fairly large soldering iron. Don't get crazy with the solder. There shouldn't be a big blob, just enough to penetrate both wires.
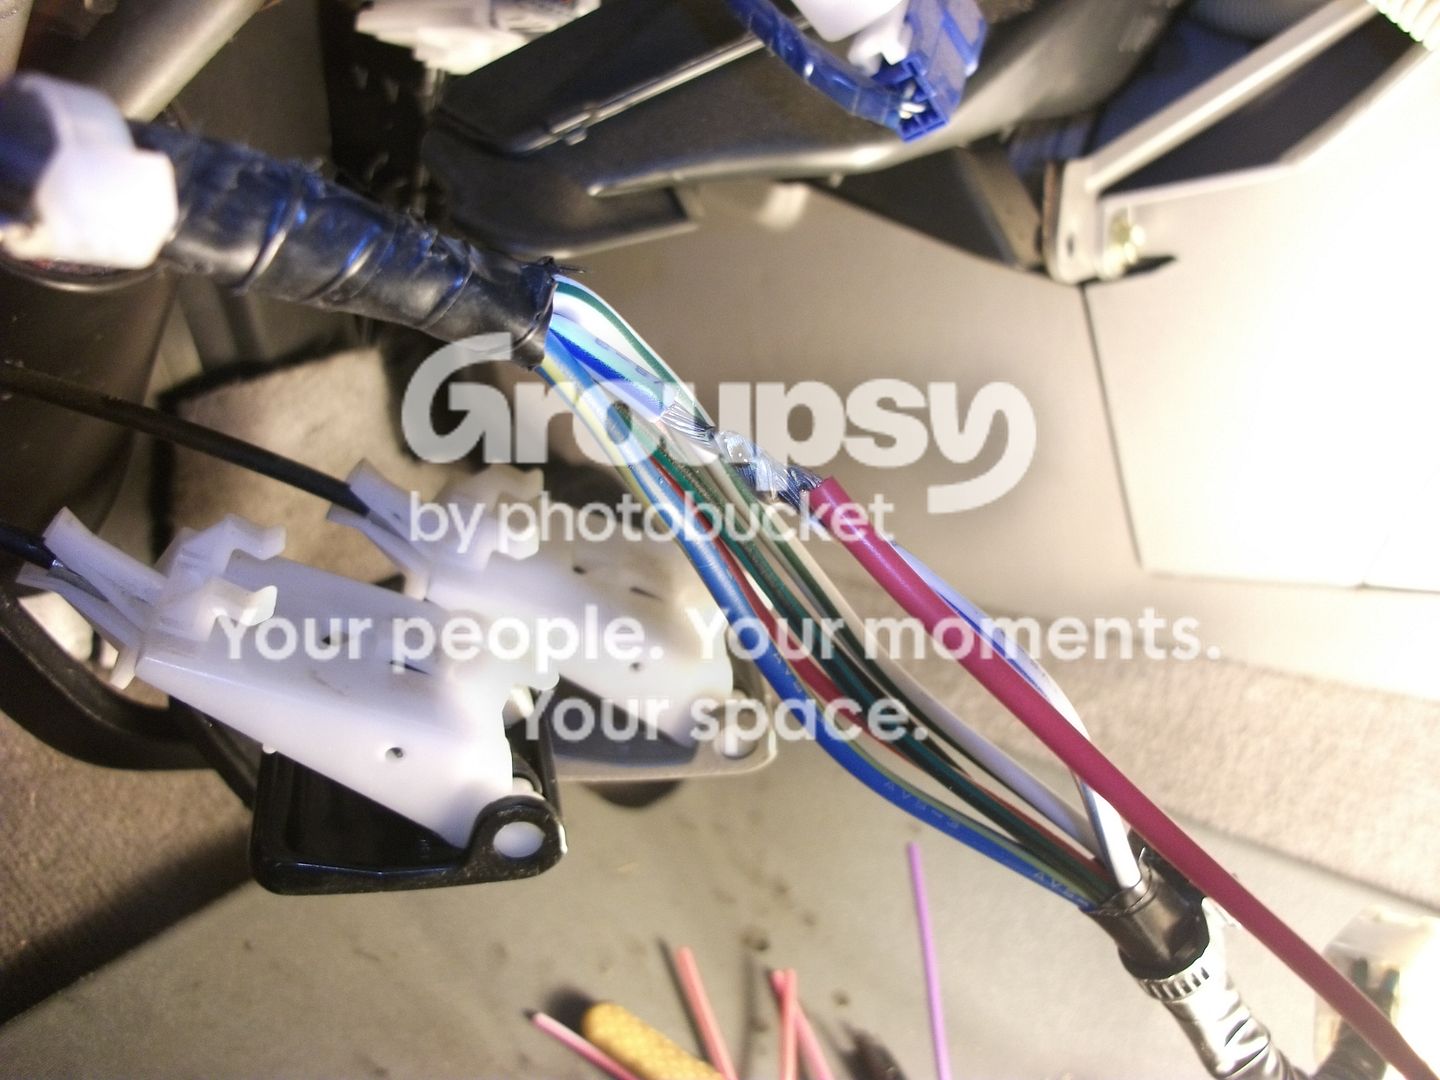
While the joint is still warm (not super hot) wrap the exposed connection with electrical tape. Be sure to wrap the tape tight, and cover a good 1/2" on both sides of the solder joint. Take your time and keep your fingers off the tape as much as possible. It should look something like this:
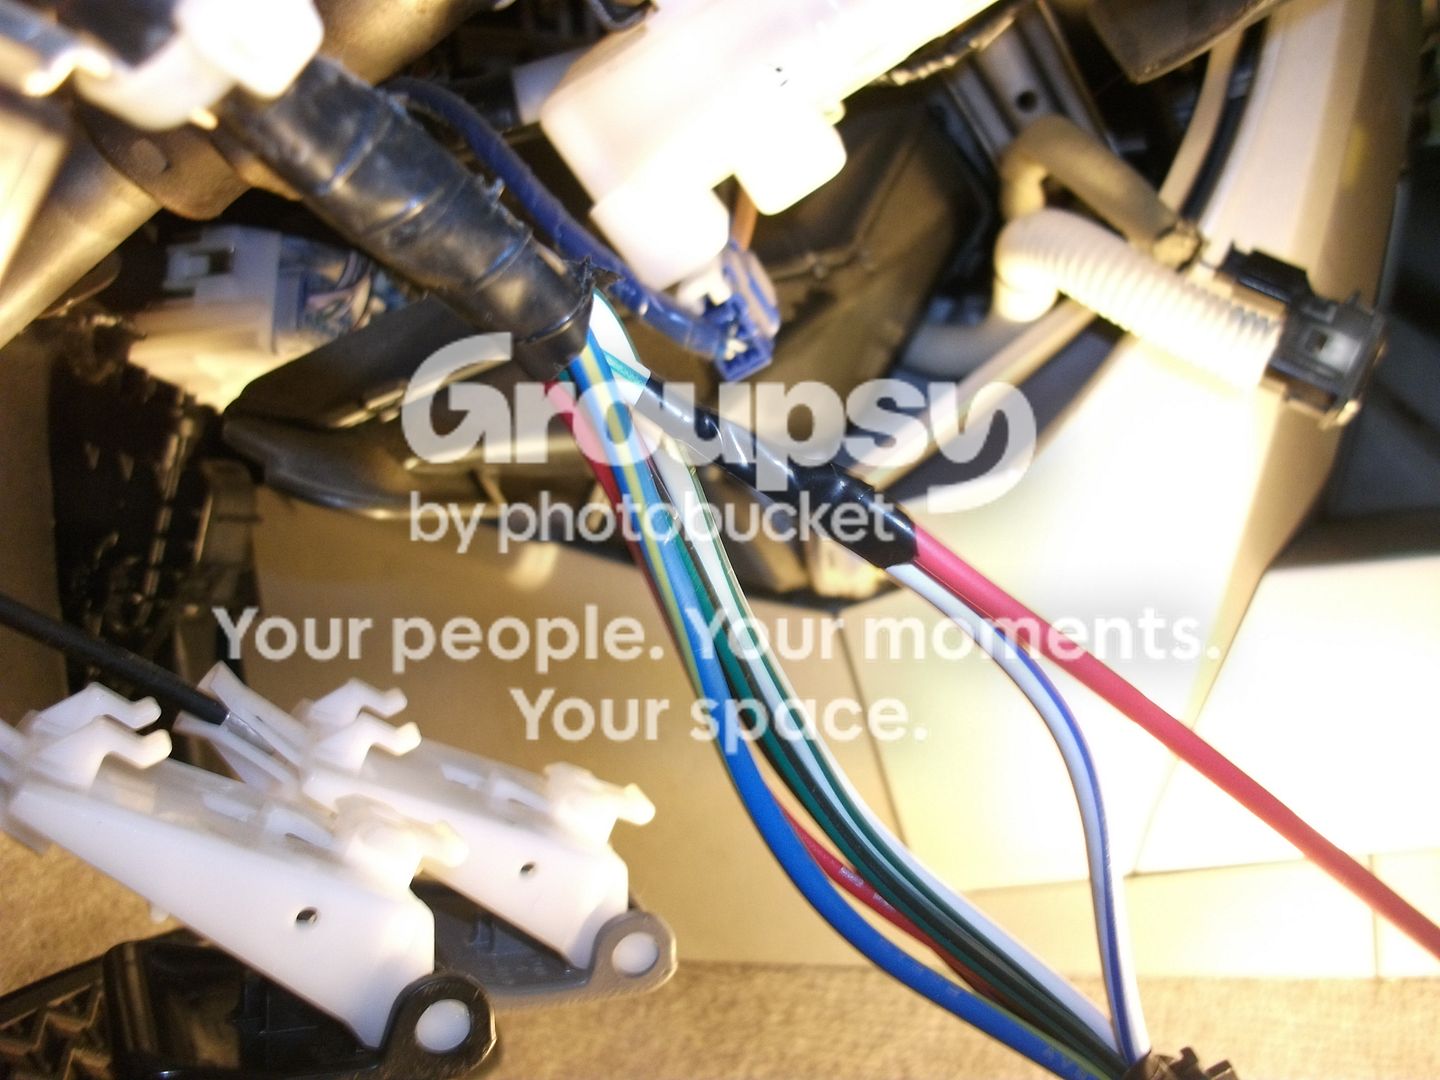
So from now on whenever I mention something like 'Connect to this wire,' The above procedure is what I mean.
So go ahead and connect each wire of the remote starts heavy gauge harness to the vehicles ignition switch harness. They are:
- 12V battery
- 2nd ignition
- 12v battery
- accessory
- starter
- primary ignition
After that you only have 5 more connection to make from the remote start to the vehicle. 3 are in the 9-pin H1 harness, 2 are in the 5-pin H3 harness. The order in which you connect wires is irrelevant.
Next is the Horn. It's the lower left connector just above the gas pedal. There's 2 green/red wires, your horn is the one on the left (red circle). Connect the Horn wire to it.

Next are your grounds. There are only 2 ground connections. They are
- Ground in H1 harness
- Neutral safety switch in H3 harness
Both connection must be at ground in order for the remote start to activate. Because our vehicles already incorporate a neutral safety kill circuit (which means the vehicle cannot turn over in any gear other than neutral and park) simply ground this connection. So even if you attempt to remote start the vehicle while it's in gear, it simply won't turn over.
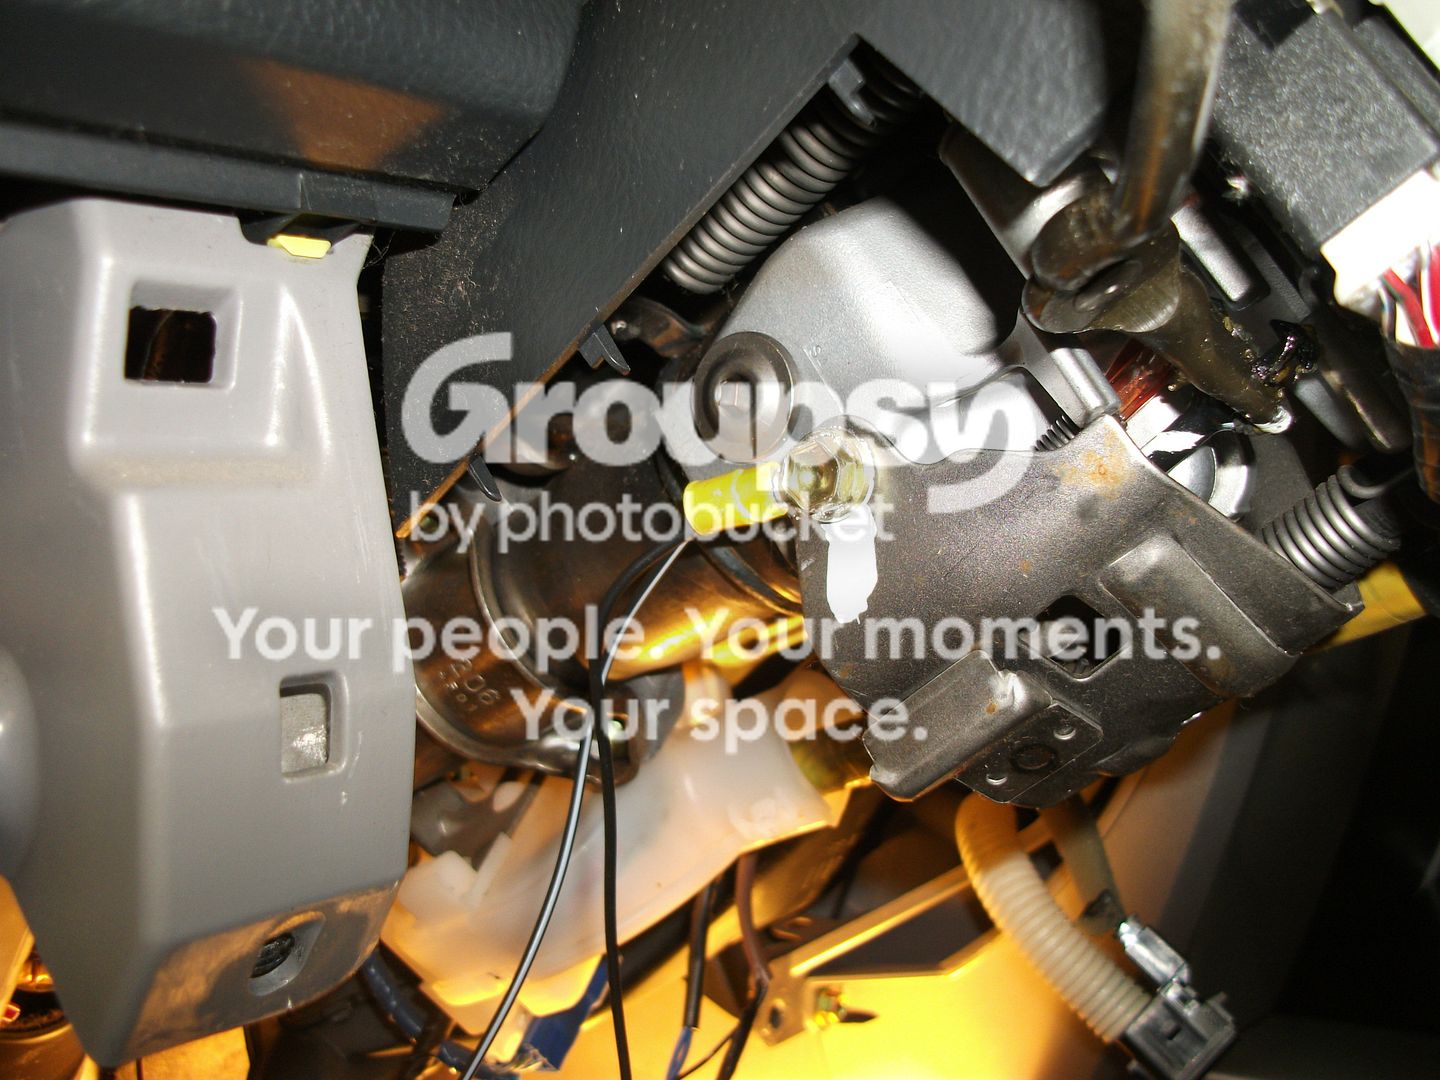
I removed the lower plastic steering column cover to access a bolt to use as my ground. You have to turn the steering while in both direction in order to remove the screws that will allow you to remove it.
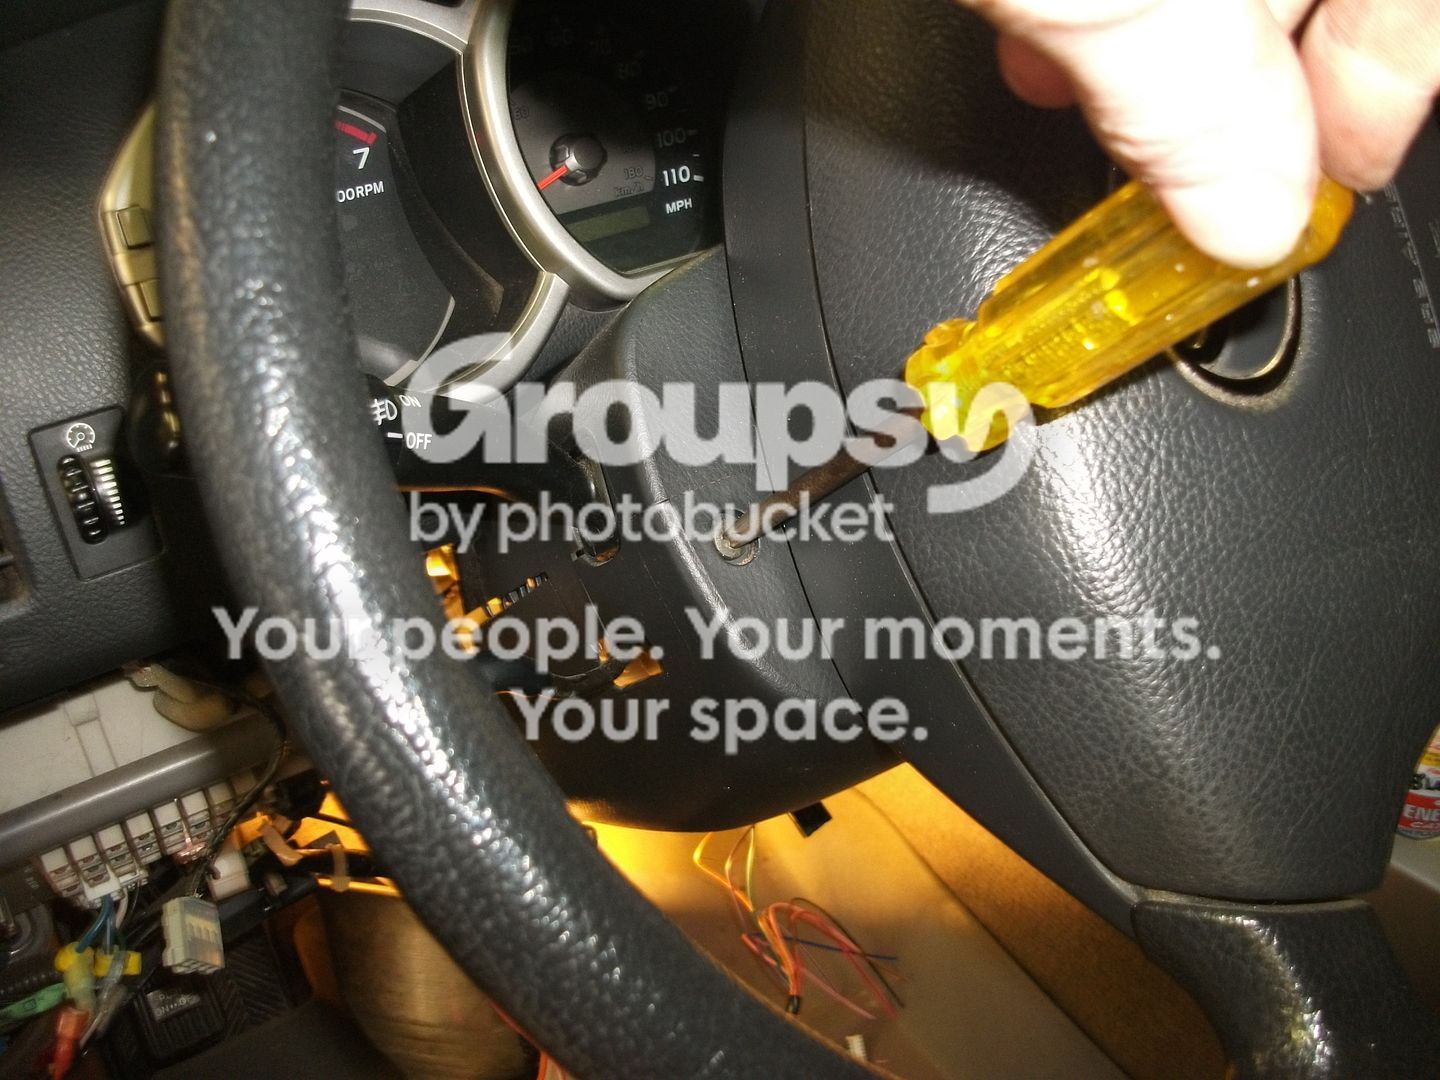
Then I made my ground connections to a 10 mm bolt. Test your connection to make sure it's a solid ground of course.
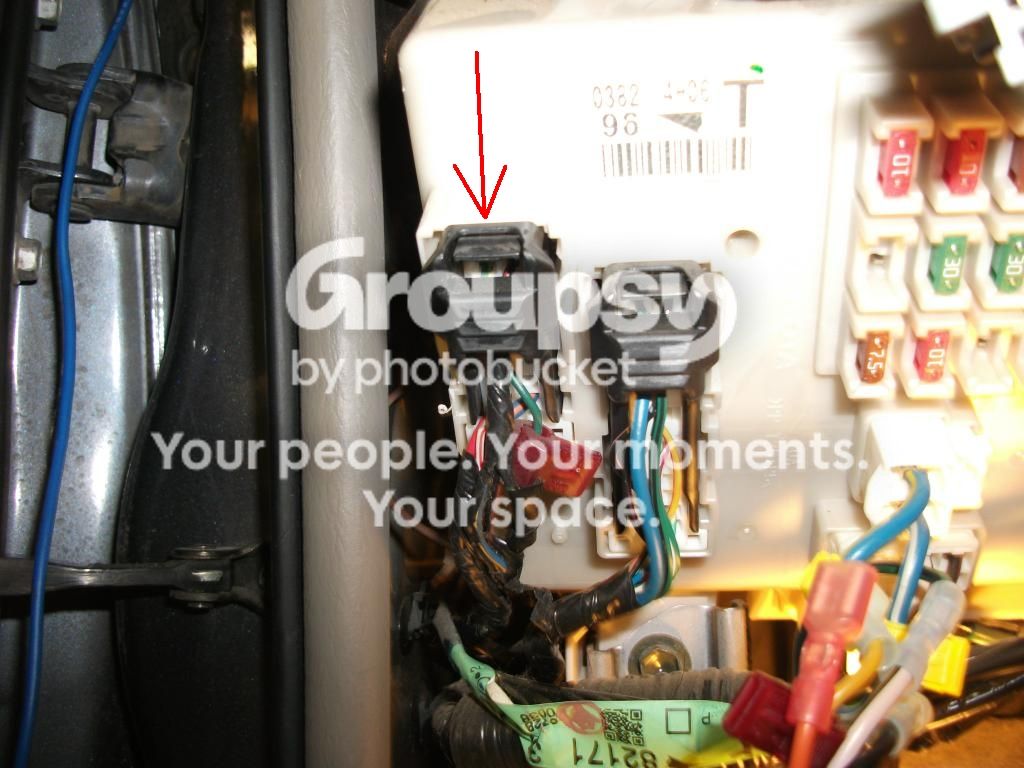
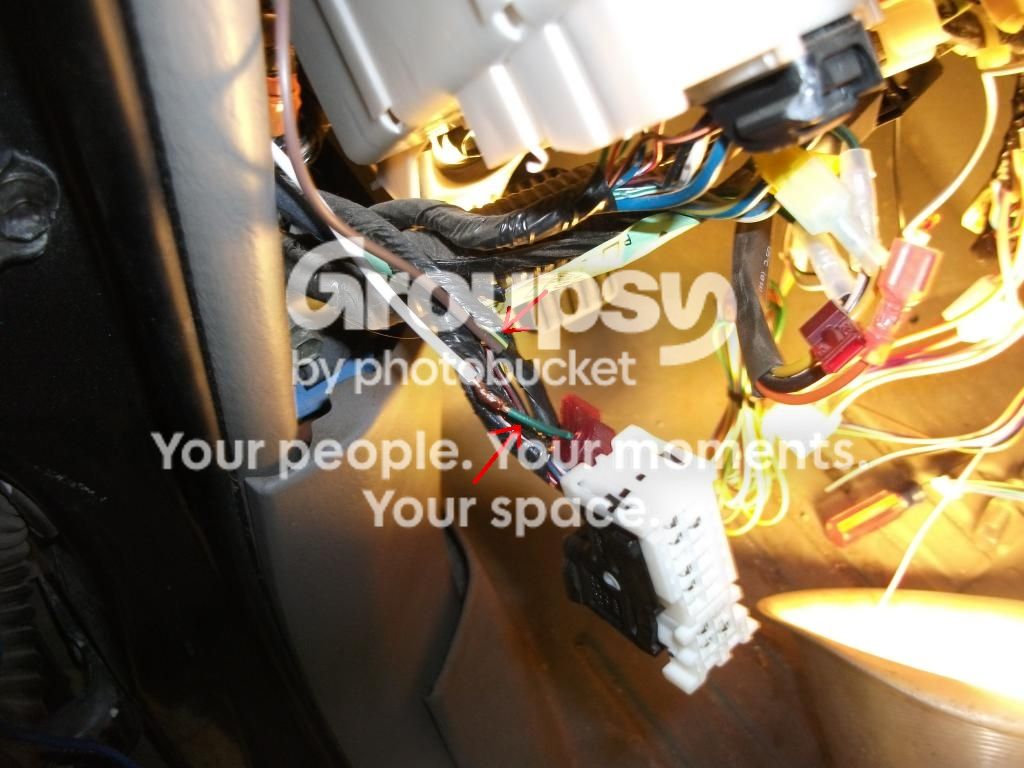
Parking lights and brake. The parking lights are the visual indicator that tells you if your vehicle detected the remote start signal. You can also connect to your headlights or hazards if you wanted. REMEMBER TO SET THE PARKING LIGHT JUMPER TO POSITIVE, NOT NEGATIVE! The brake tells the remote start to kill it's power to the vehicle. Once you're in your car and ready to drive, it allows the vehicle to run under it's own power. It also prevents someone from stealing it. If the brake is depressed without the key in the ignition (someone is trying to steal your vehicle) power is killed and the vehicle shuts off immediately.
Both of these connection are made at the fuse panel in the far left connector.
And that's it for the remote start! Leave it unplugged for now of course.
Onto the XK05 immobilizer bypass. Only 3 connection here. From the XK05 they are:
- Keysense
- RX output
- TX output
It's wired like this:
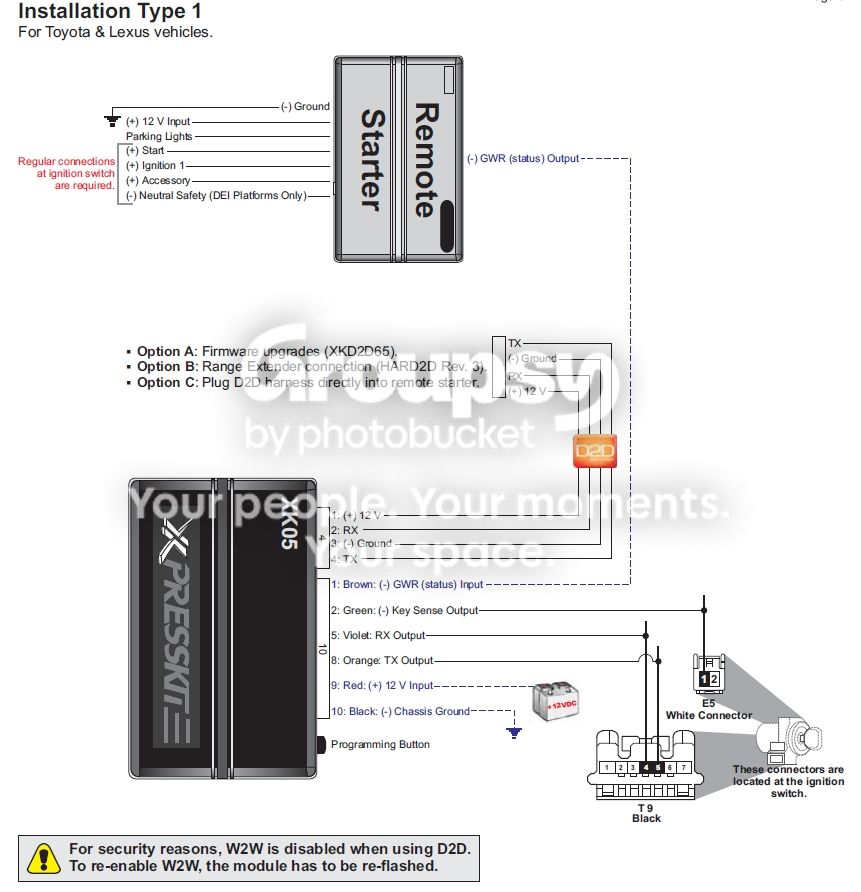
Unplug the small 7-pin connector from the vehicles ignition switch. This is where you'll connect the violet RX wire and the orange TX wires. As you see in the picture above they connect like this:
Violet --> pin 4 (it doesn't tell you but the wire color is pink/green)
Orange --> pin 5 (wire color is green/red)
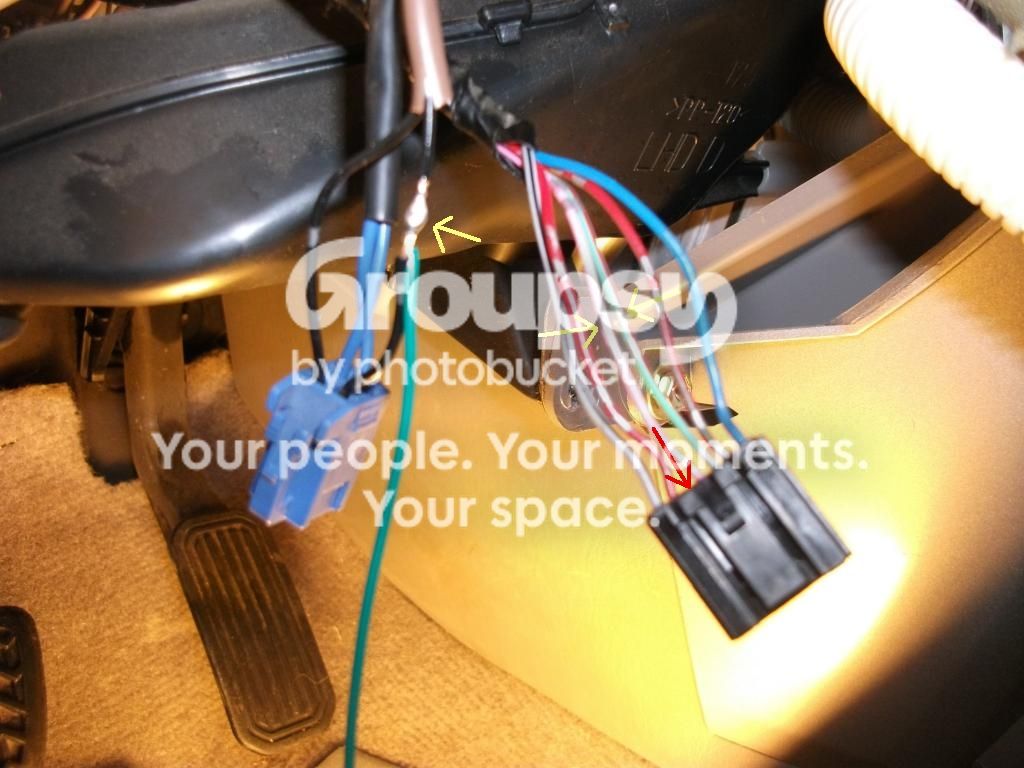
WARNING!! We're connecting to PINS 4 and 5, NOT the 4th and 5th wires!! If you face the connector straight at you you'll notice that PIN 3 DOES NOT HAVE A WIRE ATTACHED TO IT. IT'S EMPTY. Remember to factor that in when connecting to these wires. Make these connections.
Avital 4113
The remote start is a basic single button remote model. Priced around $50 it's perfect for our 4R's since our OEM key FOB already controls lock/unlock functions, as well as the rear window.

Xpresskit XK05
The immobilizer bypass doesn't require a key, is very small, and can be re-flashed (if you purchase the bootloader) It's priced around $30.

First remove the lower access panel by removing the 2 10mm bolts, then removing the 4 items attached to it (blue circle). Set the piece aside.

Then remove the metal guard with 2 more 10mm bolts

These are the connections you'll be making to the remote start (red dashes)


We'll start with the large heavy gauge harness. It needs to be connected to the vehicles main ignition switch harness.
Locate the main ignition switch harness connected to the ignition switch. It will have large gauge wires connected to it. Unplug it and cut away the tape so you will have enough room to separate the wires.

This is the wire color and location of the connections to be made:

Start by stripping a little insulation away, just enough to be able to test the wire. TEST EVERYTHING! The info here is solid (I know because...well....I just did the install!) but you can never be to sure.
Once you know you have the correct wire, you need to isolate it from the rest so you can connect to it. I first make two cuts about 1/2" - 3/4" apart (red lines) then a cut straight down the middle. Be sure not to cut the actual copper wire, you only want to be cutting insulation.

Once the wire is exposed, be sure not to short it to any other wire or metal part on the vehicle. You could disconnect the battery, but then of course you wouldn't be able to test the wires you're connecting to. As long as you connect one wire at a time, you'll be fine.

Next grab the harness from the remote start that you'll be working with (the heavy gauge harness in this case) and shorten the appropriate wire to the desired length. This will keep your install cleaner by reducing the amount of wire you'll have to tuck away later.

Now lay the wires (the remote start wire, and the vehicle wire you're connecting to) parallel to each other. Wrap the wires around each other and solder with a fairly large soldering iron. Don't get crazy with the solder. There shouldn't be a big blob, just enough to penetrate both wires.

While the joint is still warm (not super hot) wrap the exposed connection with electrical tape. Be sure to wrap the tape tight, and cover a good 1/2" on both sides of the solder joint. Take your time and keep your fingers off the tape as much as possible. It should look something like this:

So from now on whenever I mention something like 'Connect to this wire,' The above procedure is what I mean.
So go ahead and connect each wire of the remote starts heavy gauge harness to the vehicles ignition switch harness. They are:
- 12V battery
- 2nd ignition
- 12v battery
- accessory
- starter
- primary ignition
After that you only have 5 more connection to make from the remote start to the vehicle. 3 are in the 9-pin H1 harness, 2 are in the 5-pin H3 harness. The order in which you connect wires is irrelevant.
Next is the Horn. It's the lower left connector just above the gas pedal. There's 2 green/red wires, your horn is the one on the left (red circle). Connect the Horn wire to it.

Next are your grounds. There are only 2 ground connections. They are
- Ground in H1 harness
- Neutral safety switch in H3 harness
Both connection must be at ground in order for the remote start to activate. Because our vehicles already incorporate a neutral safety kill circuit (which means the vehicle cannot turn over in any gear other than neutral and park) simply ground this connection. So even if you attempt to remote start the vehicle while it's in gear, it simply won't turn over.
I removed the lower plastic steering column cover to access a bolt to use as my ground. You have to turn the steering while in both direction in order to remove the screws that will allow you to remove it.

Then I made my ground connections to a 10 mm bolt. Test your connection to make sure it's a solid ground of course.

Parking lights and brake. The parking lights are the visual indicator that tells you if your vehicle detected the remote start signal. You can also connect to your headlights or hazards if you wanted. REMEMBER TO SET THE PARKING LIGHT JUMPER TO POSITIVE, NOT NEGATIVE! The brake tells the remote start to kill it's power to the vehicle. Once you're in your car and ready to drive, it allows the vehicle to run under it's own power. It also prevents someone from stealing it. If the brake is depressed without the key in the ignition (someone is trying to steal your vehicle) power is killed and the vehicle shuts off immediately.
Both of these connection are made at the fuse panel in the far left connector.


And that's it for the remote start! Leave it unplugged for now of course.
Onto the XK05 immobilizer bypass. Only 3 connection here. From the XK05 they are:
- Keysense
- RX output
- TX output
It's wired like this:

Unplug the small 7-pin connector from the vehicles ignition switch. This is where you'll connect the violet RX wire and the orange TX wires. As you see in the picture above they connect like this:
Violet --> pin 4 (it doesn't tell you but the wire color is pink/green)
Orange --> pin 5 (wire color is green/red)
WARNING!! We're connecting to PINS 4 and 5, NOT the 4th and 5th wires!! If you face the connector straight at you you'll notice that PIN 3 DOES NOT HAVE A WIRE ATTACHED TO IT. IT'S EMPTY. Remember to factor that in when connecting to these wires. Make these connections.

Last edited: