How To: Lift Installation (on KDSS equipped vehicles)

Let me add a few things I've noticed, after researching all over the internet vs testing things out in real life. I might be wrong, but it seems like most people recommend that you install a small trim spacer (~5mm thick) on the driver side springs if you are lifting your KDSS equipped vehicles to compensate for driver side lean. I of course went against the grain :)

When I pulled off my OE front springs, I compared the color paint markings on them to see if there was possibly a difference; it turns out they are both painted with the same exact color markings (from what I understand the markings are usually used to indicate one being stiffer than the other). Also comparing them side by side, they are pretty much identical in height and the number of coil windings as well. So, I concluded that they are most likely the exact same spring rate and height.

After installing my new front OME 883 springs and getting the truck back down on the ground, there was ~3/4-1" difference in height between the left and right. However, right after I hooked up the front KDSS sway bar, the side to side difference was immediately reduced to less than ~1/2" (driver side being the taller side). This is when I concluded that it was a good thing I didn't bother to install the trim packer as suggested, lol.

The above was all observed with the rear end at stock height and less than a 1/4 tank of gas.

Now onto the rear suspension, I noticed the same observations with the rear coil spring markings and what not. I will take yet another educated guess and say that they are probably the same exact spring left and right as well.

Once I got the rear end back on the ground with the new SAW coils, I measured and found that the driver side is actually ~3/4" taller as compared to the passenger side (with the 1/4 tank of gas). However to settle my curiosity, I went ahead and filled up the tank all the way and remeasured; and found that the side to side difference was almost completely even now. This is when I concluded that the driver side trim packer in the rear is not required either.

Also, I noticed that the full tank of gas didn't really affect the front side to side height difference too much at all (less than ~1/4" if that).

I know that your mileage may vary and each truck is different, but I think I can safely say that it's probably better to not install trim packers on the driver side right off the bat, even though it is recommended for our KDSS equipped models.

If you think about it, right now as is my driver side is already the taller side, so if you went ahead and added trim packers, you'd be making it even taller, throwing things way off!

I am not really sure how ARB/OME concluded that the trim packers are required w/ KDSS, and I am not going to comment about that because I am sure they had their reasons. But me personally, I would never recommend installing them as a precaution on KDSS equipped models.

One thought came to mind is, perhaps when they say "driver's side", they actually mean the passenger side in the US market? (I think the aussies drive on the other side of the road?) But even then, it does not really seem to make sense because the factory springs seem to be identical left and right.

Anyway, take this all with grain of salt because these opinions are just based on my observations of ONE lift installation and nothing scientific at all.

I just installed an Old Man Emu (OME) lift in my 2016 Trail w/ KDSS. From the OME International Application Guide (#31), page 103, I found the following instructions -

Vehicles with KDSS, must have 1 x
OME95PF5 packer installed on the
front right hand side to maintain
correct trim.


I'm glad I installed the trim packer per instructions because the vehicle sits perfectly level. I assumed that that the Australians refer to the right hand side as the passenger side.
 
I did a Sonoran Steel lift on my 11 TE with KDSS. No spacers involved, and my driver side is around 1/2 to 3/4" high. I'm not sure it really matters, but I'm told the left and right coils are different springs and reversing them would fix the offset.
If you think about the design of the KDSS, the right side is a fixed link and the left side is the cylinder that allows it to move.
When you lift it, the right side fixed link probably constrains the lift, while the left side allows the spring(coil) to lift the truck a little more.
I've read about re calibrating the KDSS cylinder to reset where neutral position is supposed to be, but Toyota wasn't interested in touching that when I asked them about it.
I left mine as is, and haven't had any problems.
 
I did a Sonoran Steel lift on my 11 TE with KDSS. No spacers involved, and my driver side is around 1/2 to 3/4" high. I'm not sure it really matters, but I'm told the left and right coils are different springs and reversing them would fix the offset.
If you think about the design of the KDSS, the right side is a fixed link and the left side is the cylinder that allows it to move.
When you lift it, the right side fixed link probably constrains the lift, while the left side allows the spring(coil) to lift the truck a little more.
I've read about re calibrating the KDSS cylinder to reset where neutral position is supposed to be, but Toyota wasn't interested in touching that when I asked them about it.
I left mine as is, and haven't had any problems.

My truck is also 1/2-3/4" higher on the front driver's side. Both L/R heights in the back are the same though.
 
Thanks to eddiebx and all those other tips here. I don't have a KDSS suspension but this thread helped me out a ton installing my Toytec 3" lift and UCAs. Great job writing this up. The tips and hints saved me ALL of the guess work and made this an easy job at all four corners.

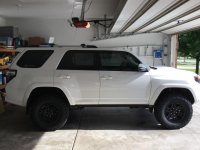
197799d1459275775-post-your-lifted-pix-here-img_20160329_120011050_hdr.jpg
 
Last edited:
Just wanted to throw in this choice bit of info.
I'm running the Sonoran Steel lift, and it was too springy for me. I actually wanted to get something else but figured I should own my decision.
After 20k on the lift and still not happy, I finally loaded it up for a weekend expedition with camping gear, a dirtbike, hitch haulers, water cans, gas cans, probably 1000# or more, and it rode like a dream.
!!!
So I was figuring it needed extra weight if I ever want it to feel plush or forgiving - not so! It seems to have relaxed after that trip, and feels a little better all the time now. Am I imagining this? Does suspension "settle"?

Fun Wheel Drive
 
Now for the obligatory shot of the rear suspension in all its glory:


I think this should be a pretty accurate representation of all the steps I did, but if I left out any steps please let me know and I will be glad to update this post.

:cheers:

My turn to tackle this job, and I have a question!!?? Due to having limited time and not the best work space, I started with the rear section.

The shaft on the Bilsteins is a good 1/2" shorter than OEM. Seems that you must use the 2 metal washers and 2 bushing that come with the Bilstein kit. Is this correct (no OEM bushings or washers) ?

Secondly the instructions say to tighten the top nut to 18ft lbs. When inserting the shock there are barely enough threads to get the nut on. The bushings have to be compress to get the nut started, then I am not sure how much to tighten it down. The picture above shows the bushing smushed some and the staft protruding through the nut, like OEM. However I am concerned that it will be too much torque to get the thread through the top of the nut like in the OP's install.

Here is what mine looks like with no OEM washers or bushing, all from the bilstein kit.

IMG_9537.JPG
 

Attachments

  • IMG_9537.JPG
    IMG_9537.JPG
    79.1 KB · Views: 4,914
My turn to tackle this job, and I have a question!!?? Due to having limited time and not the best work space, I started with the rear section.


The shaft on the Bilsteins is a good 1/2" shorter than OEM. Seems that you must use the 2 metal washers and 2 bushing that come with the Bilstein kit. Is this correct (no OEM bushings or washers) ?


Secondly the instructions say to tighten the top nut to 18ft lbs. When inserting the shock there are barely enough threads to get the nut on. The bushings have to be compress to get the nut started, then I am not sure how much to tighten it down. The picture above shows the bushing smushed some and the staft protruding through the nut, like OEM. However I am concerned that it will be too much torque to get the thread through the top of the nut like in the OP's install.


Here is what mine looks like with no OEM washers or bushing, all from the bilstein kit.


View attachment 203959


I just ordered mine but have yet to install. While doing research I spoke to Bilstein and they informed me supplemental parts were needed for a 2016. I'm assuming this is what your referring to. Bilstein had a package to me within 3 days.
 
I just ordered mine but have yet to install. While doing research I spoke to Bilstein and they informed me supplemental parts were needed for a 2016. I'm assuming this is what your referring to. Bilstein had a package to me within 3 days.

Interesting. It would be a big help if you could provide me the part numbers , and pictures of the additional parts you received.

Thanks!
 
My turn to tackle this job, and I have a question!!?? Due to having limited time and not the best work space, I started with the rear section.

The shaft on the Bilsteins is a good 1/2" shorter than OEM. Seems that you must use the 2 metal washers and 2 bushing that come with the Bilstein kit. Is this correct (no OEM bushings or washers) ?

Secondly the instructions say to tighten the top nut to 18ft lbs. When inserting the shock there are barely enough threads to get the nut on. The bushings have to be compress to get the nut started, then I am not sure how much to tighten it down. The picture above shows the bushing smushed some and the staft protruding through the nut, like OEM. However I am concerned that it will be too much torque to get the thread through the top of the nut like in the OP's install.

Here is what mine looks like with no OEM washers or bushing, all from the bilstein kit.

View attachment 203959

The bushings and washers are about the same size, but it is good practice to replace these when you replace shocks. 18 ft lbs isn't much. The more you jack up the axel, the more the shock bolt sticks through. I just redid my rear this morning. You just need enough threads to get the nut started, and as you tighten, the bushings will compress. I had about 3 threads showing above the nut for about 35k miles, as long as it's tight down, it's good.
Interesting. It would be a big help if you could provide me the part numbers , and pictures of the additional parts you received.

Thanks!

You don't need any additional parts outside of the bushings and washers.
 
Last edited:
My turn to tackle this job, and I have a question!!?? Due to having limited time and not the best work space, I started with the rear section.

The shaft on the Bilsteins is a good 1/2" shorter than OEM. Seems that you must use the 2 metal washers and 2 bushing that come with the Bilstein kit. Is this correct (no OEM bushings or washers) ?

Secondly the instructions say to tighten the top nut to 18ft lbs. When inserting the shock there are barely enough threads to get the nut on. The bushings have to be compress to get the nut started, then I am not sure how much to tighten it down. The picture above shows the bushing smushed some and the staft protruding through the nut, like OEM. However I am concerned that it will be too much torque to get the thread through the top of the nut like in the OP's install.

Here is what mine looks like with no OEM washers or bushing, all from the bilstein kit.

203959-how-lift-installation-kdss-equipped-vehicles-img_9537.jpg

I see something in your photo.....
Initially I had my washers facing the same way yours are.
I looked at the instructions and then called Bilstein to inquire if the illustration was correct on the parts packet, showing the washers inverted.
I was instructed the proper way for Bilstein's install is to have them the way they are on the parts packet, otherwise if there is a failure, it would not be covered.

Call them if in doubt.
 
I see something in your photo.....
Initially I had my washers facing the same way yours are.
I looked at the instructions and then called Bilstein to inquire if the illustration was correct on the parts packet, showing the washers inverted.
I was instructed the proper way for Bilstein's install is to have them the way they are on the parts packet, otherwise if there is a failure, it would not be covered.

Call them if in doubt.

Thanks [MENTION=103267]Saker[/MENTION], My parts pack only came with a list of parts, no diagram at all.:confused: I'll give them a call tomorrow to confirm. Every pic on the web shows the washers curved out the way mine are, but it would give more room on the shaft if bilstein says to invert them.
 
Thanks [MENTION=103267]Saker[/MENTION], My parts pack only came with a list of parts, no diagram at all.:confused: I'll give them a call tomorrow to confirm. Every pic on the web shows the washers curved out the way mine are, but it would give more room on the shaft if bilstein says to invert them.

I found it strange, but that was how the packaging showed....
 
I can confirm what Saker said. The washers need to be flipped around. Just put 5160s on and the diagram has them this way.
 
Thanks again guys, and thank to all who contributed to this awesome thread.

My rear's didn't come with any diagram, just the bushing kit bag, and stickers .

I finished the front 5100's today and it when better than expected, only a few skinned knuckles lol . Got hung on the very last bolt for KDSS - really have to watch out for cross threading !

-Jim
 
I too would like not to fuss with the KDSS as much as possible. I have installed using the UCA (swap out) and the LCA (drop down) methods before on my Tacoma.

Because I will be changing springs and shocks (have access to a garage spring compressor) is the only steps needed and not have to disconnect the front KDSS components:

1. Rachet strap the front KDSS
2. Undo the UCA
3. Drop out the assembly
4. Reinstall reverse..

I will be swapping out the rear springs as well, so I know I will need to disconnect the KDSS for that...

did this end up working for you?

and do i have to undo the uca?

i was og goin to do the shock swap out wo removing the whole spring/shock assembly, but if i can bypass messing w the kdss, ill just take the whole assembly to a wall mounted spring compressor and just swap out the shocks that way. and just bolt back on with the 3 upper nuts and the lower bolt.
 
A million thanks

I cannot thank you enough for this post. I was extremely frustrated dealing with KDSS and ICON didn't provide any help. You made my installation very easy. I would never have figured out the front end.
 

Attachments

  • image.jpg
    image.jpg
    129.2 KB · Views: 1,840

Members online

No members online now.

Forum statistics

Threads
278,316
Messages
3,554,121
Members
248,016
Latest member
Advally Service

Trending content

Back
Top