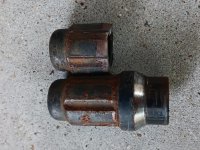
I broke a lug nut stud :mad:

I broke one before on my rear wheel… I was pretty pissed at first but I learned some stuff in the process. Dealer wanted too much to do it, and doing it myself really wasn’t that bad at all.

Dealer would not cover it. So I bought a couple of studs from the dealer and will do it myself.

How hard was the back? Did you have to pull the axel for clearance?
 
Dealer would not cover it. So I bought a couple of studs from the dealer and will do it myself.

How hard was the back? Did you have to pull the axel for clearance?

I didn't have to pull the axel.

The rear was kinda annoying being new to the process, but it wasn’t that bad. I took the rotor off, but did not dissemble the parking brake... it gives you just enough clearance to do it, but it’s pretty tight.

I had to use things like 2 pairs long needle nose pliers to help position the thing in the right place, one at a time.

The part that got me stuck and annoyed was actually the adjustment star for the parking brake. I didn’t know how to back it off and without it my rotor didn’t come off easily. I started forcing it and ended up hearing some springs shoot out which were parking brake related.

If it wasn’t for my lack of experience, it would have went a LOT faster because most of it was just my own noob-ness.
 
https://www.zoro.com/sk-professional-tools-socket-set-14-in-drive-762/i/G4061127/#specifications

The universal locking lug nut key. Attach until it bites, tighten until you feel a sudden snap. In fairness, a wheel thief who uses this can remove your wheels faster because he A) doesn't have to carry a compressor and an air gun or B) doesn't have to take the time to unthread your lugs. He just bites the lug and steps on the driver and "snap" each one brakes off in a fraction of the time it takes to spin one on or off.
 
Good to know...

The extra 7ft/lb isn't going to break anything... ur probably good running 83 and calling it good.

The OPs studs have been abused, probably seen installation with an impact one too many times.
 
I didn't have to pull the axel.

The rear was kinda annoying being new to the process, but it wasn’t that bad. I took the rotor off, but did not dissemble the parking brake... it gives you just enough clearance to do it, but it’s pretty tight.

I had to use things like 2 pairs long needle nose pliers to help position the thing in the right place, one at a time.

The part that got me stuck and annoyed was actually the adjustment star for the parking brake. I didn’t know how to back it off and without it my rotor didn’t come off easily. I started forcing it and ended up hearing some springs shoot out which were parking brake related.

If it wasn’t for my lack of experience, it would have went a LOT faster because most of it was just my own noob-ness.

Good to know it's not too much trouble to replace if my rear studs break:hail:
 
My 2016 manual says 76 ft lbs aluminum wheel and 83 ft lbs steel.

Good to know...

The extra 7ft/lb isn't going to break anything... ur probably good running 83 and calling it good.

The OPs studs have been abused, probably seen installation with an impact one too many times.

I torque them to 83ft-lbs like I have been doing with my 2006 Tacoma for 12 years. The wheels have been on and off like more than 30 times throughout the years and the studs never broke. Numerous shops over torqued them and they never broke.

The part number for the studs are the same for 2006 Tacoma & 2018 4Runner. I just wonder if my 4runner got a bad batch of studs.

The spec sheet from America's tire says 85ft lbs for a 2018 4Runner.
 
I just finished the job. It was ridiculously easy. It took more time to gather my tools than doing the actual job. Besides the broken stud, I also had to to replace another one that look stretched out.

Fortunately I already have a Harbor Freight C-frame press so I was able to press the studs out easily. Then I used a spacer and lug nut to draw the studs back in.

I used Toyota studs instead of Dorman studs because I heard Dorman studs are oversized on the knurl so they are hard to install.
 
I use the ET nuts on my spacers and torque all the lugs to 80lbs....I marked the spacer nuts and visually none have moved and using the torque wrench shows none will move at 80 each time I have the wheels off and check. If 83 snapped one it was from being ''Abused'' by a shops airgun most likely.....and the Dorman studs do have a grippy, knurled base but it isn't really a problem to seat when I used them on other trucks before.
 
10/2/2023 Again this is an old thread and about studs breaking, that would be simple. Here's what just happened to me and I need suggestions.
Was trying to remove the front right wheel to replace control arm bushings, pretty routine stuff. I did the left side yesterday. I noticed all the lugs were over torqued but I have a breaker bar so that's OK.
The 4r has the splined type lugs and one of them broke off - right where the bottom shoulder is.

Tried drilling it out and have gone through some pretty good bits. Going to try a grinding stone tomorrow.

Posted here because I don't have enough post to start a thread.
 

Attachments

  • sheered lug.jpg
    sheered lug.jpg
    138.8 KB · Views: 117
Last edited:
I use the ET nuts on my spacers and torque all the lugs to 80lbs....I marked the spacer nuts and visually none have moved and using the torque wrench shows none will move at 80 each time I have the wheels off and check. If 83 snapped one it was from being ''Abused'' by a shops airgun most likely.....and the Dorman studs do have a grippy, knurled base but it isn't really a problem to seat when I used them on other trucks before.

Right these shop workers have to be watched. Discount tire had to buy me a whole new set of wheel spacers after cross threading a lug and having to break off the stud to put my tire back on. Only because I was watching them impact them on without hand threading them a few threads initially. They probably would have screwed me if I wasn't observing their improper work. Never had one break besides the shop.
 
Nothing to grab. I ended up drilling and grinding the stud and remaining nut bottom, until I was able to remove the wheel. Wheel is slight ly damaged but that was the only way I could get into the recess below the face of the wheel.
Wheel off and new stud installed, I'll buff and brush all the studs before the wheel goes back on, with new nuts.
Have to replace the control arm bushings first.
Thanks
 

Members online

Forum statistics

Threads
278,312
Messages
3,554,085
Members
248,016
Latest member
Advally Service

Trending content

Back
Top