I found "The One", 2001 Sport Ed. TRD SC'd

NICE!!! If you need a hand with anything, let me know. Not the best wrencher, but I hold a flashlight a boss. Lol.

BTW I would throw it up on TTORA before I put it on tacoma world. Bigger market for that stuff over there.

With all this new stuff recently, its like you are preparing for an adventure or something.. Maybe Moab?.. :naughty:

For sure. I'm definitely going to need a hand w/the CBI. I don't think I'll be able to manhandle/install that thing on my own. As far as the new axle/locker goes, I'm going to start cleaning/painting the old housing on Thurs/Fri, then I'll be disassembling the Tacoma axle and installing the 3rd into the 4Runner housing the following Mon-Weds. The week after that I plan to install the whole thing. Might be nice to have some help putting the axle under the truck, but we'll have to see how your schedule works out.

And that Moab trip is definitely still on my radar.

4.10's huh? Hey I've still got my old 4.30's if you're interested in them. Might not be that much of an upgrade over 4.10's but just kinda throwing out the idea while the housings on the ground. Had about 135,000kms on them:shrug:

If you're willing to swap your gear sets...they're yours if ya want!

4.10's is right. That's what's in the truck now, so this presented me the quickest/cheapest way to get an e-locker up and running in the truck. No need to regear the front, just bolt it in and go. That's why I was after a Taco axle/diff.

I'm not sure if I'll ever need to regear. I've considered it, but the truck has plenty of power as it is. I appreciate the generous offer on the 4.30's, but if I ever pull that front diff out for a re-gear it will be to 4.56's minimum... probably 4.88's.
 
NICE!!! If you need a hand with anything, let me know. Not the best wrencher, but I hold a flashlight a boss. Lol.

BTW I would throw it up on TTORA before I put it on tacoma world. Bigger market for that stuff over there.

With all this new stuff recently, its like you are preparing for an adventure or something.. Maybe Moab?.. :naughty:


Nice Find!!!!
Give me a hollar I'm good for another jack and stands and a cool LCD flashlight...LOL!!!...:flamethrwoer2:
 
4.10's is right. That's what's in the truck now, so this presented me the quickest/cheapest way to get an e-locker up and running in the truck. No need to regear the front, just bolt it in and go. That's why I was after a Taco axle/diff.

I'm not sure if I'll ever need to regear. I've considered it, but the truck has plenty of power as it is. I appreciate the generous offer on the 4.30's, but if I ever pull that front diff out for a re-gear it will be to 4.56's minimum... probably 4.88's.

Sure thing bud....Yeah I kinda figured it might not be worth the trouble dismantling an already complete & unmolested diffs if you're just re-gearing up one notch. I'd do the same.:thumb3:
 
Connector like this one? If needed, just say so.


IMG_0352.jpg~original
 
Nice Find!!!!
Give me a hollar I'm good for another jack and stands and a cool LCD flashlight...LOL!!!...:flamethrwoer2:

Will do. I'll take as many flashlight holders as I can get!! You two don't give yourselves enough credit.

Sure thing bud....Yeah I kinda figured it might not be worth the trouble dismantling an already complete & unmolested diffs if you're just re-gearing up one notch. I'd do the same.:thumb3:

Great minds think alike. I've got you on my list of "need to contact RE 4.88's" so if/when the time comes I'll be picking your brain.

Connector like this one? If needed, just say so.

IMG_0352.jpg~original

That's the one LC. I'll send you a PM.
 
Will do. I'll take as many flashlight holders as I can get!! You two don't give yourselves enough credit.


\

Cool to see so many of you working together on your rigs.... I wish I had more friends like my buddy Lee around to do the same! It would be fun to have wrenching parties!

That being said, Lee is always game to come over and wrench, so I'm usually not without a shop buddy! :)

Back on topic, I can't wait to see/read about how this new setup works for you buddy! Congrats on the sweet deal!
 
I got my hands on the last major peice of the puzzle. The E-Locker ECU. I pulled it from the same truck I got the housing out of, and when I went to the counter to pay for everything, I showed them the ECU, and they didn't charge me for it!! :happy bda ME! There's no price like FREE.

d57b861a.jpg~original


Little Ceasar was kind enough to set me up with the plug/pigtail for the back of the "RR Diff Lock" switch. Once I recieve that in the mail, I'll have everything I need to get things running with what basically amounts to an OEM setup. :thanks: AGAIN L.C.!

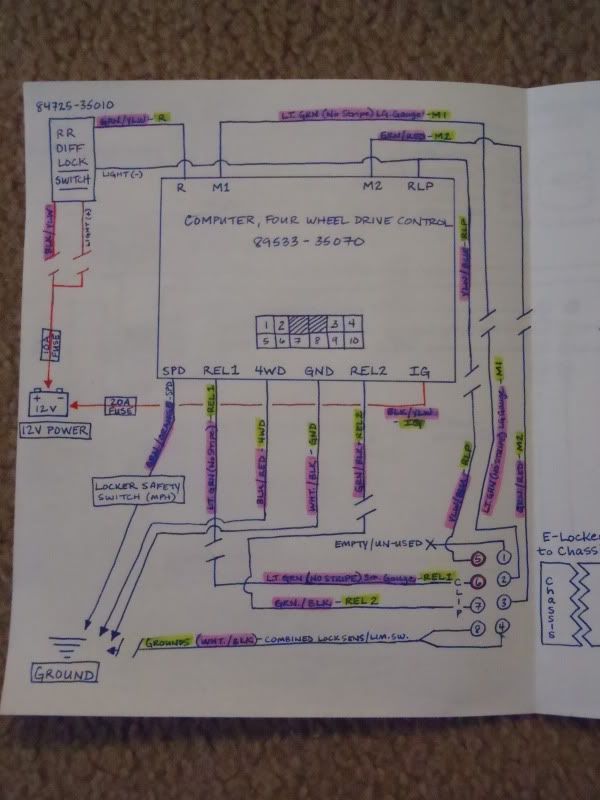
I made some major progress (IMO) last night on the research end of things. I got the e-locker/ECU/switch wiring all figured out and sketched a wiring diagram. The only thing left to figure out is the wiring colors going into the "RR Diff Lock" switch, which shouldn't be too hard. I have my wife's '00 for reference, and it's got a full factory E-locker harness.

Here's a couple shots of my wiring diagram. The six areas where you see "/ /" are the sections where I will have to extend the harness from the locker forward to the dash/ECU using some 6 conductor wiring. I'll write the colors for the intermediate wiring between the "/ /" marks.

Left Side:

793f5afa.jpg~original


Right Side:

17fff230.jpg~original


While I was pulling the E-Locker ECU, I went ahead and pulled both CV axles off the parts rig. They are both in good shape, with no tears in the boots and no slop.

For $25 each, I couldn't pass them up for trail spares, not to mention it was a great lesson in how to change a CV. Now if I ever have to do it on the trail, I'll be able to do it very quickly. (NOTE: I had read that the axle nut was 36mm, but the ones on this truck were 35mm. The 36mm was just big enough that it was starting to strip the nut, so I had to buy a 35mm socket. Oh well, now I've got both sizes.)

I'm going to pass one of these on to Ripcord for his Moab trip.

6410fe54.jpg~original


Last but not least, I found a friend for my XDM .40. The adoption fee was only $225, and included a holster, 2 mags, some expensive self defense ammo, and the case.

1bbfc83e.jpg~original


bc94e244.jpg~original


f516bea0.jpg~original
 
Cool to see so many of you working together on your rigs.... I wish I had more friends like my buddy Lee around to do the same! It would be fun to have wrenching parties!

Back on topic, I can't wait to see/read about how this new setup works for you buddy! Congrats on the sweet deal!

Nice deals on the Yota parts man! You definitely can't beat free!

I haven't had a chance to wrench with ALBPM yet, but he's always willing. Ripcord and I have been wrenching buddies since we met through the forum, and it's definitely good to have an extra pair of eyes/arms/hands when you need them.

RE the deals I've found on this stuff, I feel pretty lucky. Those ECU's are usually $60+ and the switches aren't cheap either.

Hey the truck is looking great and I have been following this thread but keeping my comments to a min lately.

I saw this just now and your thread came to mind.

Nice. I think I would actually wear that shirt.
 
It should be there tomorrow for you, as long as the USPS is in a somewhat lucid working order this week.

Nothing beats the SW USA for clean, rust free used parts, as evidence by those CVs.
 
Lovin' the detailed updates on the locker. This rig just keeps getting nicer and nicer. Oh, how I love those rust-free axle housings....
 
It should be there tomorrow for you, as long as the USPS is in a somewhat lucid working order this week.

Nothing beats the SW USA for clean, rust free used parts, as evidence by those CVs.

Awesome! Thanks again man. The USPS has been doing really well for me lately, on both sending and recieving items. Their delivery times have been impressive for Priority and 1st class stuff, and they don't seem to deliberately try to damage my stuff like UPS.

Lovin' the detailed updates on the locker. This rig just keeps getting nicer and nicer. Oh, how I love those rust-free axle housings....

Thanks man. I like rust free housings too. The '97 was from Nebraska originally, and it's got a good amount of rust on it. The '01 is a lifelong NM resident and it's 99% rust free. Like LC said, thanks go to the good old SW climate.

PS >>>>

The Hi-Lift & the Handle Keeper arrived late last week, and I picked them up today. Now I can cross that off the "to get" list.

I had my dog check it out... she says Hi-Lift jacks are "Pitbull Approved" :thumb3:

2ec67190.jpg~original
 
More E-Locker updates....

Yesterday I started the retrofit process. My first task was to make sure that the 3rd member and E-Locker motor that I bought function properly and are in good condition.

I started by draining the gear oil from the Tacoma axle. The drain plug came out fine, with no chunks on the magnet. It had the normal grey metallic paste that tends to accumulate on the drain plug magnet. While I poured the used fluid into containers, I did it slowly so that any metal fragments would settle to the bottom of the drain pan. When all was said and done I found one very small (2mm x <0.5mm) metal shaving, and that's it.

Next I bench tested the E-Locker motor, sending the power through the limit switches to ensure that they were in good working order. It works flawlessly. If anyone needs help with bench testing an E-Locker, I'm pretty familiar with it now, just let me know.

After that I started cleaning up the housing. First I gave it a good scrub down... first with Dawn dish soap and a stiff nylon brush, then with a 3M abrasive pad and more soap. After getting it clean, I hit the spots that had rust/loose paint with a wire brush to knock everything down prior to re-finishing.

I ended up with this:

7ba2789f.jpg~original


2208a81c.jpg~original


There were a few problem areas, but they had only mild surface rust. I took the majority of the rust off, but I wasn't aiming for perfection.

226db42e.jpg~original


2722a447.jpg~original


When the 3rd member was pulled the brake lines were cut, allowing brake fluid to leak/settle on the brackets for the E-Brake. The brake fluid softened the paint on those brackets, so they ended up bare metal.

c97bd5ed.jpg~original


The upper link towers had some rust on the inside surfaces.

5cd4d9cf.jpg~original


To keep future rust at bay, I started with Self Etching Primer...

99559afc.jpg~original


56ff4f5c.jpg~original


Then moved on to a coat of Rustoleum Flat Black Engine Enamel... The paint is resistant to damage from heat & oils, so I figure it will work fine. I plan to top coat the axle with a rubberized undercoating after a final coat of paint.

d25a365c.jpg~original


b846e5ab.jpg~original


Today I spent most of the morning and early afternoon tracking down odds and ends for the wiring and parts for the axle.

Toyota Parts

90301-88077 - O-Ring X 2 (these are for the ends of the axle tube)
90404-51319 - Union Plug (to connect the rear diff breather, axle side)
42181-60050 - E-Locker Differential Gasket
12157-10010 - Gaskets for Rear Diff Drain/Fill Plugs X 6 (I got some extras for future drain/fills)
90310-50006 - Type S Oil Seal X 3 (rear axle seals, these are a MUST do)

Wiring

6 strand 14AWG Phillips Duraflex Trailer Cable x 15 feet (E-Locker to ECU)
4 strand 18AWG CL3R Security Cable x 6 feet (E-Locker switch to ECU)
Heat Shring Tubing
Electrical Tape
Rosin Core Solder

Fluids

Brake Cleaner x 3 (for final cleaning of the inside of the housing)
1 QT Valvoline 75w90 gear oil x 3 (I plan to run this for 1,000 miles after install, drain, then switch back to Redline synthetic)

8d7667dd.jpg~original


c2672dd3.jpg~original


:zoom:
 
Last edited:
Then I got to work on the wiring. First I built the section of the harness from the "RR Diff Lock" Switch to the ECU.

bd19d4bd.jpg~original


THANKS LittleCeasar, for the Switch and the Plug! As you can see, they worked out GREAT!

2a1b3812.jpg~original


Next up was the section from the E-Locker > Chassis Plug, forward to the ECU (Chassis Side)

cb9f8cbd.jpg~original


The plug in the picture above gets connected to the E-Locker side of the E-Locker > Chassis Plug. The problem I faced was that I have a Tacoma E-Locker, which has a Tacoma style plug. My next task was to cut the Tacoma plug off and solder in the 4Runner style plug.

Tacoma (round) VS. 4Runner (rectangular) style plugs...

bac01c0f.jpg~original


The wires are the same color on both of the plugs, so it was an exercise in matching straight across...

70eff047.jpg~original


Swapped...

dec9927b.jpg~original


Add some electrical tape...

a7882e64.jpg~original


And some loom... Done and done. I bench tested the locker again w/the new harness and it works as it should.

a70fe109.jpg~original


Finally I started running the rear section of the harness. I used the access plate under the rear, driver side, seat to get the wire from the interior to the exterior of the truck. (The new wiring the bundle in the center... kinda hard to tell it apart from the factory wiring huh?? ;): )

6ee7273a.jpg~original


24ab59a3.jpg~original


On the outside, I went down along the top of the gas tank...

fb348dee.jpg~original


Along the main wiring harness to the rear evap system

bf77ac4d.jpg~original


Then rearward toward the frame side brake line bracket. I wanted to set the wiring up OEM style in the rear, but the place where the wiring brace is supposed to bolt up is occupied by a brake line bracket only found on '01-02 models, so I could not use it.

I intend to run the harness either connected to the brake line, or the rear diff breather tube, leaving the same amount of slack as the respective peice that I attach to. This should keep it out of the way and allow plenty of room for flexing of the rear axle.

BTW, the E-Locker plug has a ziploc baggie over it to protect it from the elements until I can get it all put together.

1b7ebe49.jpg~original


Inside, I ran along the driver side door sill forward to the driver side kick panel. The last bit of wiring will take place here, and will involve connecting both harnesses to the ECU pigtail, and making some ground connections, then I'm done.

a00f8b2c.jpg~original


These two are going to make an odd, but highly effective and versatile, couple. :thumb3:

54a9a6cf.jpg~original


Last but not least, I picked up a 5th ProComp 8069 for my spare. There's no way I'm going to let that little dirty spare sit on my new CBI for even a second.

(NOTE: I was told by 4WheelParts that ProComp is planning on discontinuing the 8069's!!! WTF? I figured I'd better get my spare now, while I still can.)

2037833b.jpg~original


Last, LAST, and least, I picked up a cheap back-up shovel to take along when I don't want to take a full size shovel.

b979842f.jpg~original
 
Last edited:
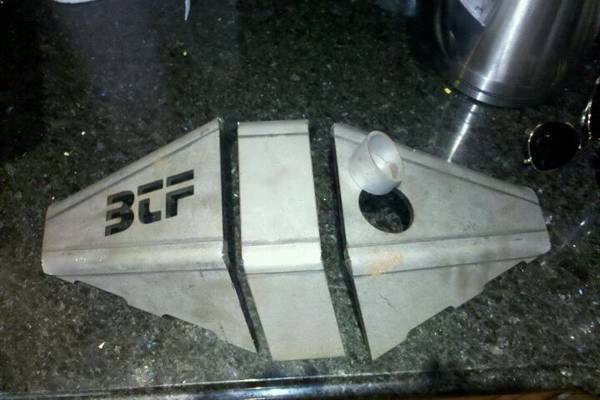
i think you should weld on some armor for the axle while its still off the truck. i suggest Blue Torch Fab axle cover. since the weakest spot on toyota axles are the back plate of the pumpkin this will pretty much make the housing bullet proof. great price too 59 dollars, this is the one on my boss's taco. plus it makes your axle looks like a dimond axle, how BA is that!

livek6zgQ4.jpg
 
i think you should weld on some armor for the axle while its still off the truck. i suggest Blue Torch Fab axle cover. since the weakest spot on toyota axles are the back plate of the pumpkin this will pretty much make the housing bullet proof. great price too 59 dollars, this is the one on my boss's taco. plus it makes your axle looks like a dimond axle, how BA is that!

livek6zgQ4.jpg

Where can you buy this?
 

Members online

No members online now.

Forum statistics

Threads
278,316
Messages
3,554,121
Members
248,016
Latest member
Advally Service

Trending content

Back
Top