
You are using an out of date browser. It may not display this or other websites correctly.
You should upgrade or use an alternative browser.
You should upgrade or use an alternative browser.
I found "The One", 2001 Sport Ed. TRD SC'd
- Thread starter BigFishAllDay
- Start date


4ever4running
New member
Thanks Jimmy, and I'm glad to hear the emblem reached you in one piece. I'll look forward to seeing it installed.
As far a the emblem goes, how did you go about painting the black area between the letters?
I was thinking about using spray paint. I would use blue painters tape to cover the whole emblem, then use a razor blade to trace out the letters and remove the tape keeping the letters covered.
Bryan3GT4R
New member

I would remove that, or use some sort of cavity wax and reapply. That is just asking for rust to start by giving water somewhere to collect and not drain.
Apart from that, sweet build.

BigFishAllDay
New member
Yeah. There you go, Dad. DirtyDiapersAllDay, I like it.
I also need to apologize for making my first post in you're awesome build thread **** talk.
No worries man. Thanks for the compliment on the build.
As far a the emblem goes, how did you go about painting the black area between the letters?
I was thinking about using spray paint. I would use blue painters tape to cover the whole emblem, then use a razor blade to trace out the letters and remove the tape keeping the letters covered.
You read my mind, sir. That's exactly how I did it.
I would remove that, or use some sort of cavity wax and reapply. That is just asking for rust to start by giving water somewhere to collect and not drain.
Apart from that, sweet build.
Bryan, I appreciate the input on that man. I'm not sure if you missed it, but there is two coats of primer, and two of paint on the metal underneath that edge trim. The edge trim also has a glue inside that mates up to the surface that was cut (and painted). Between the primer, paint, and glue there's a pretty good seal on the cut edge. Also, I'm in NM and there's not alot of moisture to worry about here, so rust is a non-issue. Last but not least, the water would easily drain out of the edge trim, considering the bottom is shaped like a "U" laid on it's side.
All that being said, I will be removing the edge trim and applying a layer of hi-temp black silicone gasket maker, followed by rubberized undercoating. This is mainly because I took that route on the passenger side. I cut the other side a little too close and had to weld it back together, so some additional sealing was called for.
Thanks for checking out the build.
4ever4running
New member
You read my mind, sir. That's exactly how I did it.
Great minds think alike I guess. What kind of spray paint did you use?
Also, did you have to repaint the chrome letters at all? My emblem has some dings and dents and it would be nice to be able to sand them out and repaint it, but I don't know what paint to use or if it would hold up.

So Many Roads
New member
I picked up a Superflow MV-50... If you've done any research on compressors, I'm sure you've heard of it. I plan to go through it, address all the weak points, and modify it, which should give me a solid little compressor. More on that once I've got it in hand.
BFAD - the LCA skids look great. I am patiently awaiting the MV-50 writeup. New relay, gauge & cables? Anything else planned?
I didn't do the endcap mod on my ARB because I just did not see the point of all that work. Instead, I bolted it on how you would anyways and then I just laid 1" welds on the bottom and both sides on each frame rail. It took about 5 minutes. I laid the welds in spots where they could be easily ground with an angle grinder if I ever need to take the bumper back off. I have pushed, pulled, and strapped several vehicles with mine, and it's as solid as it was the day I put it on. I honestly feel that 3" of weld on each rail is just as strong or stronger than one more bolt anyways. You shouldn't be at the welder for more than 2 hours for everything if you do it this way, maybe 3-4 if you do the actual endcap mod. BTW, J-money$$$ attached his ARB the same way I did, and he has winched lots of things with it without any issus. Cheaper, easier, just as effective.
has this method of installing the ARB front bumper continued to still hold up well with all that winching?
BigFishAllDay
New member
Well damn... that was a busy month, wasn't it?
First things first, I finally got to go fishing! No fish pics this time around, but we did catch a few. It was colder than a polar bear's toenails, and I think the fish were hunkered down, but it felt great to get out and stretch the legs.


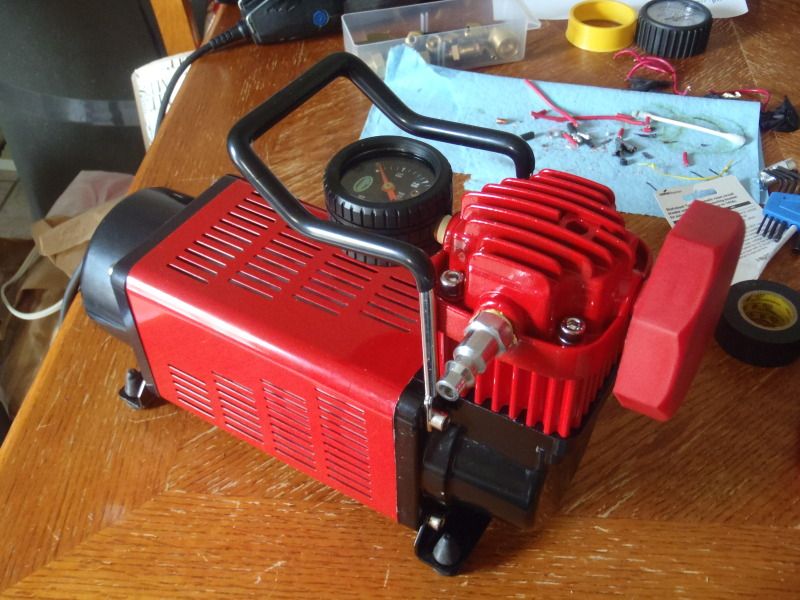
After Christmas, I finally knocked out my air compressor build. I took a Superflow MV-50 and modded it for a 25% performance increase as measured by before/after testing.
You can see the full thread on the MV-50 build here:
http://www.toyota-4runner.org/3rd-gen-t4rs/131953-bfads-superflow-mv-50-air-compressor-build.html
Just before New Years, I ordered an E-Locker Motor Guard from Inchworm Gear. These things used to cost close to $80, but when I looked, they had them marked down to $50... with a 10% off Coupon Code I paid $45... and today it looks like they're even cheaper on the site @ $40... (guess I should have waited).
Product Link > Electric Locker Motor Guard | Inchworm Gear
They come powdercoated in a light blue color, but I'm going to paint all the armor under the truck silver, so the E-Locker guard got a coat of Rustoleum silver enamel, followed by clear.


Coverage of the E-Locker motor is excellent, and install took less than 10 minutes. The guard attaches using two of the studs/nuts that secure the 3rd member, and a bolt that secures the E-Locker motor to the diff. One bolt at the top has to be removed in order to install the guard, but it is not a critical fastener and holds only a corner of the OEM cover for the E-locker motor wiring.
For $45, I figure it's cheap insurance against the pricey E-Locker motor taking a hit from a rock. I considered making my own, but saving $45 didn't justify the time I'd have spent in the garage.


As you can see in this picture, gas tank clearance is a non-issue.

A bunch of other small stuff also got handled:
- The Sub/Amp quit working, turned out the fuse was a little loose in the fuse holder and was not making a secure connection.. got that fixed.
- One of the IPF's got a fresh 100W H3 bulb, the old one was burnt out.
- I re-wired the IPF's so that the relay is powered by the corner lights, rather than the high beams, and moved the switch from the engine bay to the interior and mounted it on the steering column, behind the tilt lever and out of the way. Before they came on automatically with the brights, but I decided I wanted full control. Now they can be switched on anytime the parking lights are on... by themselves, with Low beams, or with Highs.
- The IPF light covers were removed. I like the look better without covers, I think.
- Got some more bungees, just in case.
- Added a 24mm socket, and a 10mm hex key socket to the on-board tool kit. No sense carrying a quart of gear oil if I cant pull the fill plugs to put it into the diffs in an emergency.
- The license plate light on the CBI was filled with mud/dirt so I pulled it off and cleaned it. I don't want any problems with 5-0.
I picked up another set of OEM "TRD" "Supercharged" emblems from Brilliant (Thanks, man!) for next to nothing. I had a place in mind for them, so I went ahead and put them on.

Last but not least I pulled my passenger side CV and re-booted it. It was the last of four that needed to be done, and I wanted to re-boot it as preventative maintenance rather than waiting for the boot to tear and having to clean up a crap ton of grease.

Things look kosher at the diff...

After that I topped off the front diff with Redline 75w90, finally put the front skid back on, checked all the fluids and tire pressures, and packed up for skiing trip to Wolf Creek, CO.
First things first, I finally got to go fishing! No fish pics this time around, but we did catch a few. It was colder than a polar bear's toenails, and I think the fish were hunkered down, but it felt great to get out and stretch the legs.
After Christmas, I finally knocked out my air compressor build. I took a Superflow MV-50 and modded it for a 25% performance increase as measured by before/after testing.
You can see the full thread on the MV-50 build here:
http://www.toyota-4runner.org/3rd-gen-t4rs/131953-bfads-superflow-mv-50-air-compressor-build.html
Just before New Years, I ordered an E-Locker Motor Guard from Inchworm Gear. These things used to cost close to $80, but when I looked, they had them marked down to $50... with a 10% off Coupon Code I paid $45... and today it looks like they're even cheaper on the site @ $40... (guess I should have waited).
Product Link > Electric Locker Motor Guard | Inchworm Gear
They come powdercoated in a light blue color, but I'm going to paint all the armor under the truck silver, so the E-Locker guard got a coat of Rustoleum silver enamel, followed by clear.
Coverage of the E-Locker motor is excellent, and install took less than 10 minutes. The guard attaches using two of the studs/nuts that secure the 3rd member, and a bolt that secures the E-Locker motor to the diff. One bolt at the top has to be removed in order to install the guard, but it is not a critical fastener and holds only a corner of the OEM cover for the E-locker motor wiring.
For $45, I figure it's cheap insurance against the pricey E-Locker motor taking a hit from a rock. I considered making my own, but saving $45 didn't justify the time I'd have spent in the garage.
As you can see in this picture, gas tank clearance is a non-issue.
A bunch of other small stuff also got handled:
- The Sub/Amp quit working, turned out the fuse was a little loose in the fuse holder and was not making a secure connection.. got that fixed.
- One of the IPF's got a fresh 100W H3 bulb, the old one was burnt out.
- I re-wired the IPF's so that the relay is powered by the corner lights, rather than the high beams, and moved the switch from the engine bay to the interior and mounted it on the steering column, behind the tilt lever and out of the way. Before they came on automatically with the brights, but I decided I wanted full control. Now they can be switched on anytime the parking lights are on... by themselves, with Low beams, or with Highs.
- The IPF light covers were removed. I like the look better without covers, I think.
- Got some more bungees, just in case.
- Added a 24mm socket, and a 10mm hex key socket to the on-board tool kit. No sense carrying a quart of gear oil if I cant pull the fill plugs to put it into the diffs in an emergency.
- The license plate light on the CBI was filled with mud/dirt so I pulled it off and cleaned it. I don't want any problems with 5-0.
I picked up another set of OEM "TRD" "Supercharged" emblems from Brilliant (Thanks, man!) for next to nothing. I had a place in mind for them, so I went ahead and put them on.
Last but not least I pulled my passenger side CV and re-booted it. It was the last of four that needed to be done, and I wanted to re-boot it as preventative maintenance rather than waiting for the boot to tear and having to clean up a crap ton of grease.
Things look kosher at the diff...
After that I topped off the front diff with Redline 75w90, finally put the front skid back on, checked all the fluids and tire pressures, and packed up for skiing trip to Wolf Creek, CO.
Last edited:
BigFishAllDay
New member
The Ski trip was awesome. We left on Friday night at 6:30pm, hit icy snow packed roads about halfway up and after that it just never cleared up. With the t-case in 4wd, center diff unlocked, the Duratracs ate up the road like it was dry pavement. I had to TRY to get it to slip at all.
The low on Saturday morning was -15F... that's 15 BELOW zero.. in Pagosa Springs. The DieHard Platinum was hating life, but it turned the engine over and started her right up while many other vehicles in the parking lot at the lodge struggled.
After skiing on Saturday, we were headed down the mountain when we passed an elderly couple standing on the side of the road at a turn off. We glanced down the side road and saw that they had spun their car out into a snow bank, so we decided to turn back and help.
Turns out they were in a Subaru Legacy with AWD, but crappy tires. It was going to be dark soon and with the temps plumetting, they didn't have time to wait for a tow truck. I hooked a recovery strap to the CBI w/a shackle and the other end to a tie down under their front bumper using another shackle. I gave it a test pull and their bumper flexed upward a little. I warned that they may end up with some damage, and offered them a ride into town instead where they could get cell service and call for help. They wanted to get moving though, and said go for it.
With the 4Runner in 4-Hi and the center diff locked, I pulled that Subie up an 8-9% grade on packed snow/ice without even spinning a tire. Freakin love my Duratracs...
It's all good, you can say it.... "Cool Story Bro!"
We didn't get any pics of the recovery, but I got a few good ones on the trip home. We went over Cumbres/La Manga pass in white-out conditions on packed snow/ice to go check on the family Cabin.
Heading up the pass, about to get into the chit...

Safely over the pass, we checked out the Cabin. It was all good, and we got to ride through some snow 8-10" deep and have a little fun.


Views on the way home...


The low on Saturday morning was -15F... that's 15 BELOW zero.. in Pagosa Springs. The DieHard Platinum was hating life, but it turned the engine over and started her right up while many other vehicles in the parking lot at the lodge struggled.
After skiing on Saturday, we were headed down the mountain when we passed an elderly couple standing on the side of the road at a turn off. We glanced down the side road and saw that they had spun their car out into a snow bank, so we decided to turn back and help.
Turns out they were in a Subaru Legacy with AWD, but crappy tires. It was going to be dark soon and with the temps plumetting, they didn't have time to wait for a tow truck. I hooked a recovery strap to the CBI w/a shackle and the other end to a tie down under their front bumper using another shackle. I gave it a test pull and their bumper flexed upward a little. I warned that they may end up with some damage, and offered them a ride into town instead where they could get cell service and call for help. They wanted to get moving though, and said go for it.
With the 4Runner in 4-Hi and the center diff locked, I pulled that Subie up an 8-9% grade on packed snow/ice without even spinning a tire. Freakin love my Duratracs...
It's all good, you can say it.... "Cool Story Bro!"
We didn't get any pics of the recovery, but I got a few good ones on the trip home. We went over Cumbres/La Manga pass in white-out conditions on packed snow/ice to go check on the family Cabin.
Heading up the pass, about to get into the chit...
Safely over the pass, we checked out the Cabin. It was all good, and we got to ride through some snow 8-10" deep and have a little fun.
Views on the way home...
Last edited:

SCRunner12
New member
Might have to look into those e-locker guards, although shipping $15 and I'm in CA. Nice update and we still haven't left our daughter alone for the night and she is 2 years old. Glad everything is going well in the New Year and I can't wait to see what's in store.

Stockwell45
New member
Nice cabin! And I'm with ya on the fishing thing, can't catch anything because it's so cold now. But nice to get out!

JWaldz
Moderator
That's a good shot.. I like the silver theme you're going with. Great updates and thanks for the heads up on the motor guard. That's a good price I might order one now. Where'd the coupon code come from?? Those square links look beastly! Paint them silver too

Last edited:

blcktpgsr
New member
The little things that makes a difference..that motor guard might be on that short list of mine, never really looked into adding protection on it, I guess.
While you were recovering the Subie, why didn't you opt for the winch instead of tugging with the strap? Jas asking.....But it sure was kind-hearted of you both to turn back and lend a helping hand to those elderlies.
COOl story bro!:thumb:
While you were recovering the Subie, why didn't you opt for the winch instead of tugging with the strap? Jas asking.....But it sure was kind-hearted of you both to turn back and lend a helping hand to those elderlies.
COOl story bro!:thumb:
BigFishAllDay
New member
Great minds think alike I guess. What kind of spray paint did you use?
Also, did you have to repaint the chrome letters at all? My emblem has some dings and dents and it would be nice to be able to sand them out and repaint it, but I don't know what paint to use or if it would hold up.
I used plain old rust-o-leum semi-gloss black on the emblem. As far as the chrome letters, I just cleaned them with soap and a sponge. Mine has the same little dings and dents but you can't see them from more than a foot away. AFAIK, there's no such thing as a (durable) chrome paint, but you could go with white to match your rig, I guess.
BFAD - the LCA skids look great. I am patiently awaiting the MV-50 writeup. New relay, gauge & cables? Anything else planned?
Thanks for the motivation S.M.R. It was this comment that got me started on the compressor build. I know you've seen the thread, but here's the link just for good measure:
http://www.toyota-4runner.org/3rd-gen-t4rs/131953-bfads-superflow-mv-50-air-compressor-build.html
What a GREAT thread. :nicethread: Thank you for taking the time to do all the documentation.
You're welcome! Thanks for reading!
has this method of installing the ARB front bumper continued to still hold up well with all that winching?
hrt4me, you'd probably want to send a PM to brian2sun about this, or inquire in his build thread, rather than hoping he sees your question in my thread.
I love checking in on this thread from time to time - just when I think I am going to take a breather on my truck, I find some small project to do - which turns into a huge project.
Great pics and great truck!
Thanks again, Nate! I'm curious what's next for your rig.
Nice cabin! And I'm with ya on the fishing thing, can't catch anything because it's so cold now. But nice to get out!
Thanks Matt! It's my home away from home... Whatever happened to you anyway? Are you gonna make it to NM on this voyage?
That's a good shot.. I like the silver theme you're going with. Great updates and thanks for the heads up on the motor guard. That's a good price I might order one now. Where'd the coupon code come from?? Those square links look beastly! Paint them silver too
Thanks man, I was trying to capture the overall state of the growing amount of armor on my 4Runner's rear axle. I'm going to end up with alot of Silver, but it's OK, I like silver. The coupon code was a Christmas thing, I think it was Santa25 or something, it's probably expired now but it was listed on the home page for Inchworm.
The little things that makes a difference..that motor guard might be on that short list of mine, never really looked into adding protection on it, I guess.
While you were recovering the Subie, why didn't you opt for the winch instead of tugging with the strap? Jas asking.....But it sure was kind-hearted of you both to turn back and lend a helping hand to those elderlies.
COOl story bro!:thumb:
RE the E-Locker motor, I figure it's cheap insurance considering how expensive they are to replace and how rarely they come up for sale on the various forum classifieds / at junkyards / etc. I know you've got $40 in your pocket, considering all the $$$ that goes into your rig.
As far as the recovery, the road that they were stuck on was a turnoff from a major state highway (Hwy. 160 over Wolf Creek Pass, east of Pagosa Springs, CO if you're curious). That highway was iced over and packed with snow, and the afternoon ski traffic was all coming downhill into Pagosa. They were stuck 70-80 feet from where the side road connected to the highway, on a steep grade where the side road had to climb to meet the highway.
I had to get them up the hill without putting myself into the flow of traffic on the highway, since we had no way to stop traffic, and the lanes of traffic on the highway were obscured by snow/ice, making it dangerous to place my vehicle in the right of way.
Had I chosen to winch them I would have had put my 4Runner in traffic in order to pull them far enough up the hill that they could start moving under their own power once unhooked. I was also worried that the winch might pull me downhill toward them rather than pulling them uphill toward me, since I was on the same icy/snowy road surface, and would have been facing downhill.
With the tow strap I just waited for a break in traffic, pulled them up the hill quickly and turned right as I entered the highway right of way to put myself on the shoulder and out of traffic while still moving them forward the final couple of feet. After that I unhooked the strap, got behind their car and pushed them out with my Chevro-legs the last couple feet onto the highway.
Stockwell45
New member
Thanks Matt! It's my home away from home... Whatever happened to you anyway? Are you gonna make it to NM on this voyage?
That was the plan, but stupid life got in the way lol. The plan right now is to go to the Overland Expo on May 17 in Flagstaff. After that I think I'll head east and explore the southern US. I'll be spending a ton of time in New Mexico so hopefully I can see you then!
hrt4me, you'd probably want to send a PM to brian2sun about this, or inquire in his build thread, rather than hoping he sees your question in my thread.
will do
BigFishAllDay
New member
Until this weekend, this is how my switch panel (left of the steering wheel) has been set up.

The GREEN LED is a status light for the E-Locker that indicates when the locker is engaging/disengaging (blinks) and when it's engaged/disengaged (lit/off). The RED LED is a status light for my Innovate Wideband, and the RED button is a calibration button for the Wideband. Not pictured is a RED LED that I added for the Alarm that indicates armed/disarmed status, zone trip indicators, etc.
I've always thought the array of LED's looks kind of tacky and low budget, not to mention that their functions are not defined in any way. To the uninitiated they might be construed as decorative.
I also wanted to add an in-cab winch control using an OEM power mirror switch, but the LED panel occupied the knock-out where I wanted to add the extra power mirror switch.
I started by replacing the RED indicator LED (visible in this pic) for the alarm with an OEM "Toyota Security" dash insert. I used only the LED and left the glass breakage sensor disconnected (my alarm has its own). This not only cleans up the switch panel with a more OEM look, but it will also serve to confuse would be thieves as to what type of system they're dealing with.
RESPECT THE TOYOTA SECURITY!!!!!!!!


The GREEN e-locker status LED was moved to a new location above the RR DIFF LOCK switch. I think it looks better there, and now it can be visually associated with the RR DIFF LOCK switch, which clarifies exactly what is being indicated when the LED is lit.
The calibration button and RED LED for the wideband were moved down, below the bank of switches. There is a narrow rib of plastic at that location that worked out perfectly.
Finally, I test fit the new winch control switch (power mirror switch) in its new home to see how it looked. I think it's going to work out perfectly. I've already tested the switch with a multi-meter to check for continuity on the wires through all of the various switching positions. I've found two that are discrete channels which can be disabled using the button that selects the L or R mirror. This will give me an "IN", an "OUT", and a safety function.

UNFORTUNATELY.... while I was working on the LED for the e-locker, I short circuited the two wires for the illumination of the LED/switch. One is a fused 12V+ feed, and the other is a switched ground controlled by the e-locker detection switch and the ECU. When I shorted the wires I smelled smoke. I followed my nose and it led me to the E-locker ECU.
Pulled that sucker apart for inspection.....
Backside of the board looks ok...

Can you spot the problem?

Looks like I cooked a 680 ohm resistor on the upper RH side of the board on the "RLP" circuit. Oops.

The locker still locks/unlocks as it should, in fact everything still seems to work, EXCEPT when I engage the locker only the LED gets power... the light bulb inside the switch does not. I'm thinking I can have a new resistor soldered onto the board pretty easily. It could have been a lot worse.
Lesson for the day: The E-Locker ECU is electrically sensitive. BE CAREFUL when you're working w/the wiring connected to the ECU. :frusty:
....
.............
..........................
.........................................
On a final note... I've got some long awaited transmission upgrades in the works. First, I picked up a B&M 70264 which I'm going to put in-line with the TRD trans cooler and run a dual external cooler setup. This should help settle down the 200-220 degree peak temps that I was seeing last summer.

ALSO... I'm excited!!!! I'm finally going to ship this little guy off to IPT Transmissions and have them perform their Valve Body Upgrade service. I just got off the phone with John (owner of IPT), who was kind enough to let me pick his brain for 20 minutes about my options.
(Link > Toyota A340 Series Modified Valve Body)
For the first time since I've owned this rig, I'll actually be able to floor the throttle through a 1-2 up shift and not have to worry about tearing up my clutches. It's going to be nice to actually be able to use the power that my 4Runner puts out without the worry of transmission failure.

The GREEN LED is a status light for the E-Locker that indicates when the locker is engaging/disengaging (blinks) and when it's engaged/disengaged (lit/off). The RED LED is a status light for my Innovate Wideband, and the RED button is a calibration button for the Wideband. Not pictured is a RED LED that I added for the Alarm that indicates armed/disarmed status, zone trip indicators, etc.
I've always thought the array of LED's looks kind of tacky and low budget, not to mention that their functions are not defined in any way. To the uninitiated they might be construed as decorative.
I also wanted to add an in-cab winch control using an OEM power mirror switch, but the LED panel occupied the knock-out where I wanted to add the extra power mirror switch.
I started by replacing the RED indicator LED (visible in this pic) for the alarm with an OEM "Toyota Security" dash insert. I used only the LED and left the glass breakage sensor disconnected (my alarm has its own). This not only cleans up the switch panel with a more OEM look, but it will also serve to confuse would be thieves as to what type of system they're dealing with.
RESPECT THE TOYOTA SECURITY!!!!!!!!
The GREEN e-locker status LED was moved to a new location above the RR DIFF LOCK switch. I think it looks better there, and now it can be visually associated with the RR DIFF LOCK switch, which clarifies exactly what is being indicated when the LED is lit.
The calibration button and RED LED for the wideband were moved down, below the bank of switches. There is a narrow rib of plastic at that location that worked out perfectly.
Finally, I test fit the new winch control switch (power mirror switch) in its new home to see how it looked. I think it's going to work out perfectly. I've already tested the switch with a multi-meter to check for continuity on the wires through all of the various switching positions. I've found two that are discrete channels which can be disabled using the button that selects the L or R mirror. This will give me an "IN", an "OUT", and a safety function.
UNFORTUNATELY.... while I was working on the LED for the e-locker, I short circuited the two wires for the illumination of the LED/switch. One is a fused 12V+ feed, and the other is a switched ground controlled by the e-locker detection switch and the ECU. When I shorted the wires I smelled smoke. I followed my nose and it led me to the E-locker ECU.
Pulled that sucker apart for inspection.....
Backside of the board looks ok...
Can you spot the problem?
Looks like I cooked a 680 ohm resistor on the upper RH side of the board on the "RLP" circuit. Oops.
The locker still locks/unlocks as it should, in fact everything still seems to work, EXCEPT when I engage the locker only the LED gets power... the light bulb inside the switch does not. I'm thinking I can have a new resistor soldered onto the board pretty easily. It could have been a lot worse.
Lesson for the day: The E-Locker ECU is electrically sensitive. BE CAREFUL when you're working w/the wiring connected to the ECU. :frusty:
....
.............
..........................
.........................................
On a final note... I've got some long awaited transmission upgrades in the works. First, I picked up a B&M 70264 which I'm going to put in-line with the TRD trans cooler and run a dual external cooler setup. This should help settle down the 200-220 degree peak temps that I was seeing last summer.
ALSO... I'm excited!!!! I'm finally going to ship this little guy off to IPT Transmissions and have them perform their Valve Body Upgrade service. I just got off the phone with John (owner of IPT), who was kind enough to let me pick his brain for 20 minutes about my options.
(Link > Toyota A340 Series Modified Valve Body)
For the first time since I've owned this rig, I'll actually be able to floor the throttle through a 1-2 up shift and not have to worry about tearing up my clutches. It's going to be nice to actually be able to use the power that my 4Runner puts out without the worry of transmission failure.
Last edited:

4-Ripcord
New member
Nice update! Interesting use of the mirror switch for the winch control, how will that work exactly?
Thats awesome that you are finally getting the valve body worked on, I cant wait to read what you have to say about that. What made you go with the 70264 instead of a new radiator? I havnt seen a temp above 180 ever since I put my trans cooler in series with the radiator.
Thats awesome that you are finally getting the valve body worked on, I cant wait to read what you have to say about that. What made you go with the 70264 instead of a new radiator? I havnt seen a temp above 180 ever since I put my trans cooler in series with the radiator.
Similar threads

- Replies
- 2
- Views
- 3K

- Replies
- 0
- Views
- 293
- Replies
- 8
- Views
- 6K

- Replies
- 0
- Views
- 3K
- Replies
- 4
- Views
- 8K


