
You are using an out of date browser. It may not display this or other websites correctly.
You should upgrade or use an alternative browser.
You should upgrade or use an alternative browser.
I found "The One", 2001 Sport Ed. TRD SC'd
- Thread starter BigFishAllDay
- Start date


BrianSD_42
New member
now I want to do the away bar bushings mod, it looks pretty cheap.
I am currently running without bar but would like to put one back on. I snapped my links shortly after installing SS 1.2.
How does it drive now that you added anothernotch?
I set mine to the notch steve recommended but the front us still slightly lower than rear.
i also added skids and arb but I dont think it has sagged yet. I did not add a winch.
I am currently running without bar but would like to put one back on. I snapped my links shortly after installing SS 1.2.
How does it drive now that you added anothernotch?
I set mine to the notch steve recommended but the front us still slightly lower than rear.
i also added skids and arb but I dont think it has sagged yet. I did not add a winch.

BigFishAllDay
New member
Yeah I live a 5 minute walk from the ocean. My coworker went out last weekend and caught a 30 in salmon and 10 lbs. I haven't been in the last few years because I was at college, but I will this year.
Dang! That's a beast salmon. I'd love to catch one like that. My wife and I are going to Alaska in June, so maybe I can get into something close up there.
Woah, you have so much freaking patience to mask off the entire side of the truck just for painting where the slider meets the frame... I'm now on the prowl for a supercharger of my own. I found a second gen with about 60k on it for a little over a grand, deciding whether or not to bite the bullet on a higher mileage SC... Thanks for helping me empty my wallet out even more!!
Another side note/ fun fact, my dad holds the world record for the 3rd largest tuna fish... I'll have to dig up a picture of the thing... it must have been 11 or 12 feet long, and it's total weight was 985 lbs. Hence why his license plate is 985TUNA, haha.
Those superchargers always pull in some cash. The main thing I would be looking for is one that is COMPLETE with all the little odds and ends you need to install it. Chasing down all those small parts would be both frustrating and costly. The superchargers can be completely rebuilt by Magnusson for about $600 from what I understand. If you find a COMPLETE s/c with high mileage for say $750, and rebuild it for $600, you've basically got the equivalent of a brand new one, but for $1350... so just keep the rebuild option in mind.
And those big tuna are impressive. You'd never think they got that big when you're opening up a can of tuna to make a sandwich. I've heard they're insanely powerful fighters too.
You definitely seem to live up to the name! Nice looking fish. Catch and release or are you munching on those things? Not sure Pike is a good eating fish...
Catch and release on the pike. I tried to eat one a long time ago and it was horrible. The taste was just like pond water. Some people love them though... When it comes to eating fish, I prefer these....
PERCH!!!! :hungry:

Great looking truck, and I agree with the other guys saying you are completely meticulous in every step in transforming your Runner - great pics and description too, looking forward to hearing how the new bushings are working out, that is something I would like to do as well.
now I want to do the away bar bushings mod, it looks pretty cheap.
I am currently running without bar but would like to put one back on. I snapped my links shortly after installing SS 1.2.
How does it drive now that you added anothernotch?
I set mine to the notch steve recommended but the front us still slightly lower than rear.
i also added skids and arb but I dont think it has sagged yet. I did not add a winch.
MAD 69, Brianemc2,
I'll update the thread later this weekend with some info on how the bushings perform, so keep an eye out. Brian, regarding the lift, I thought it was going to get a lot stiffer up front once I bumped it up a notch, but it ended up being a perfect match for the extra weight. It feels the same or better than it did on the lower setting w/the stock front end.
Thanks to both of you for the input on the thread and reading all these long a$$ posts. BTW, Brianemc2, why haven't you posted any pictures of your truck, or did I miss them somewhere?
Last edited:
BrianSD_42
New member
BTW, Brianemc2, why haven't you posted any pictures of your truck, or did I miss them somewhere?
You didn't miss it. In fact I am hoping to start a build thread in next two weeks.
Since my last post with pics "satoshi grill mod" I have done following:
* painted fenders black to match the body (paint shop did it for $250 ~ about $600 less than full price)
* installed new headlight and corner light assembly
* install ARB
* swap out my Tokiko struts for the SS 1.2 Bilstiens
* install BUD Built Skid
* OEM fog light switch
* installed new radio cause Alpine died
* getting my broken window fixed this monday 4/11
* painting my rear bumper black this Saturday 4/9
where did my tax return go????
I have pics and will start a thread hopefully in next week or so.
Love this thread btw. You provide great info.
Last edited:
BigFishAllDay
New member
I said I'd update the thread regarding the sway bar bushings....
Overall impressions:
1. It's still a lifted 4Runner, so it's never going to handle like a lowered Supra (my other, other, car). I couldn't really distinguish any difference in the handling going from the old rubber bushings to the poly's.
2. The sway bar/endlinks are definitely where my "clunking" noise is coming from. Adding the poly bushings made a big difference in the tone/loudness of the noise I'm getting. This leads me to believe it is definitley the sway bar that is causing the noise, but that the poly bushings don't offer a fix, merely a reduction in the overall level of "clunk".
3. I need to drive the '01 more often. The supercharger is FUN!
The only thing I can think of to cure the noise is to find some extended length front sway bar endlinks. Time to start looking into that.
Overall impressions:
1. It's still a lifted 4Runner, so it's never going to handle like a lowered Supra (my other, other, car). I couldn't really distinguish any difference in the handling going from the old rubber bushings to the poly's.
2. The sway bar/endlinks are definitely where my "clunking" noise is coming from. Adding the poly bushings made a big difference in the tone/loudness of the noise I'm getting. This leads me to believe it is definitley the sway bar that is causing the noise, but that the poly bushings don't offer a fix, merely a reduction in the overall level of "clunk".
3. I need to drive the '01 more often. The supercharger is FUN!
The only thing I can think of to cure the noise is to find some extended length front sway bar endlinks. Time to start looking into that.
BrianSD_42
New member
hey
have you talked with Steve @ SS about it?
I called him a few months back and explained that the lift broke my end links so I removed it. His recommendation was to put the sway bar back on but this time use links from "2WD Tundra end links (not 4WD)". I don't know if this will actually help with the clunking sound though. We didn't talk about that.
have you talked with Steve @ SS about it?
I called him a few months back and explained that the lift broke my end links so I removed it. His recommendation was to put the sway bar back on but this time use links from "2WD Tundra end links (not 4WD)". I don't know if this will actually help with the clunking sound though. We didn't talk about that.
BigFishAllDay
New member
Yeah, I called him. He suggested I check out the assembly of the shock/coil/top hat, which I did. His thoughts were that I missed a bushing somewhere or assembled it incorrectly. He also mentioned ball joints, but said that considering the mileage on the vehicle, that was not likely to be the cause.
Neither suggestion is the cause of the issue. Checked and double checked.
Thanks for the tip on the 2wd Tundra endlinks, I remember you mentioning that in the other thread. Abnormal noises bug me, so I'll figure it out one way or another. When I find the solution, I'll definitely share it with the forum.
Neither suggestion is the cause of the issue. Checked and double checked.
Thanks for the tip on the 2wd Tundra endlinks, I remember you mentioning that in the other thread. Abnormal noises bug me, so I'll figure it out one way or another. When I find the solution, I'll definitely share it with the forum.
BrianSD_42
New member
re: links
yep, I plan on trying them out with the bushings you suggested once I find a set of links at local junk yard.
btw do you know what year tundra 2wd links to use? I never wrote that down.
yep, I plan on trying them out with the bushings you suggested once I find a set of links at local junk yard.
btw do you know what year tundra 2wd links to use? I never wrote that down.
BigFishAllDay
New member
I wish I did... You were the first person to bring them up to me.
BrianSD_42
New member
I'll find out and let you know.
BrianSD_42
New member
BigFishAllDay where to begin …
it has been too long since I have checked on this thread. Your attention to detail always makes for a really great read.
I really like your rig. I think it looks good without a roof rack + saves you mpgs.
I wonder how much that JAOS skid weighs; the Bud Built I just added weighs at least 80 lbs. That plus the ARB has definitely added to my front end. I am considering adding another notch to my new Bilstiens but I am worried about the effect on the drive.
RE trimming: I have also trimmed in the wheel well but not the pinch welds. I am pretty sure you can remove that bolt without any consequences. I noticed that on my rig that bolt was rubbing against my BFGs causing a terrible sound and burning smell when at full flex. My tires are smaller than yours; I am running 275x70xR16.
RE Tundra sway bar links: I believe the links Steve suggests are 2004, 2005 or 2006 basically any set that is "cast" steel.
I haven't added the sway bar yet but I will soon. I am running without one right now.
1. When are you going HID with projectors? I am planning this for the summer after I add a new stereo deck.
2. Have you considered adding 1.25 or 1.5" spacers?
.
.
it has been too long since I have checked on this thread. Your attention to detail always makes for a really great read.
I really like your rig. I think it looks good without a roof rack + saves you mpgs.
I wonder how much that JAOS skid weighs; the Bud Built I just added weighs at least 80 lbs. That plus the ARB has definitely added to my front end. I am considering adding another notch to my new Bilstiens but I am worried about the effect on the drive.
RE trimming: I have also trimmed in the wheel well but not the pinch welds. I am pretty sure you can remove that bolt without any consequences. I noticed that on my rig that bolt was rubbing against my BFGs causing a terrible sound and burning smell when at full flex. My tires are smaller than yours; I am running 275x70xR16.
RE Tundra sway bar links: I believe the links Steve suggests are 2004, 2005 or 2006 basically any set that is "cast" steel.
I haven't added the sway bar yet but I will soon. I am running without one right now.
1. When are you going HID with projectors? I am planning this for the summer after I add a new stereo deck.
2. Have you considered adding 1.25 or 1.5" spacers?
.
.
BigFishAllDay
New member
brianemc2_42,
The JAOS skid doesn't weight much, it's stainless steel, and only 2.5 millimeters thick, so 1/10 of an inch. I'd guess it weights 15-20 lbs at the very most. It's more a cosmetic peice than anything, but it came with the truck, so :shrug:
Regarding the rubbing, where exactly you rub is going to depend on the final position of the outside corner of your tire, where the ouside sidewall meets the tread. That all depends on the width and backspacing of your wheels, use of spacers, etc. Mine was all on the pinch weld, I don't even get close to that bolt, so I just left it alone.
Thanks for the info on the Tundra links, I'll look into those and give Steve a call to verify part #'s.
RE Projectors, I've never had any intention of converting to projectors. I really like the look of them, but it's a time consuming process and I've already got a lot of things I need to finish as it is. Also, with the 100W IPF's and the brights on, I've got more than enough light.
RE spacers, there are several reasons that I don't like them, and I decided I didn't want to run them. With that in mind I picked my wheels specifically to avoid having to use wheel spacers. I'm running 16x8's with 4" backspacing. They give me more than ample clearance on the upper A arm, some extra width for the 285's to sit on the rim, and move the tires outboard 1.5" on each corner for a wider stance.
The JAOS skid doesn't weight much, it's stainless steel, and only 2.5 millimeters thick, so 1/10 of an inch. I'd guess it weights 15-20 lbs at the very most. It's more a cosmetic peice than anything, but it came with the truck, so :shrug:
Regarding the rubbing, where exactly you rub is going to depend on the final position of the outside corner of your tire, where the ouside sidewall meets the tread. That all depends on the width and backspacing of your wheels, use of spacers, etc. Mine was all on the pinch weld, I don't even get close to that bolt, so I just left it alone.
Thanks for the info on the Tundra links, I'll look into those and give Steve a call to verify part #'s.
RE Projectors, I've never had any intention of converting to projectors. I really like the look of them, but it's a time consuming process and I've already got a lot of things I need to finish as it is. Also, with the 100W IPF's and the brights on, I've got more than enough light.
RE spacers, there are several reasons that I don't like them, and I decided I didn't want to run them. With that in mind I picked my wheels specifically to avoid having to use wheel spacers. I'm running 16x8's with 4" backspacing. They give me more than ample clearance on the upper A arm, some extra width for the 285's to sit on the rim, and move the tires outboard 1.5" on each corner for a wider stance.
BrianSD_42
New member
I see what you mean about the rubbing. I haven't actually gone offroad since added the ARB 4 weeks ago. I going on a trip to Joshua Tree National Park this weekend so I'll know soon enough.
I only experience rubbing with that bolt when I had my front end at full flex going up a path. I also had the front sway disconnected. I heard this terrible sound and smell of rubber and I could see that I was making contact with the bolt. The tires were straight at the time. Just FYI if you run into the issue.
--
so what is your verdict on the sway bar? you mentioned the clunking sound is now diminished.
--
I only experience rubbing with that bolt when I had my front end at full flex going up a path. I also had the front sway disconnected. I heard this terrible sound and smell of rubber and I could see that I was making contact with the bolt. The tires were straight at the time. Just FYI if you run into the issue.
--
so what is your verdict on the sway bar? you mentioned the clunking sound is now diminished.
--
BrianSD_42
New member
Bishfish,
I recently increased the "level" on my front adjustable Bilsteins. Did your become noticeably stiffer? I only went up one notch and i did help level it out but man it is a lot stiffer. Not bad to drive just noticeably different than before.
I have the same ARB in front plus 75 lbs Bud Built. I have no winch or supercharger. I figure our rigs still weigh pretty close though and should perform very similar.
.
I recently increased the "level" on my front adjustable Bilsteins. Did your become noticeably stiffer? I only went up one notch and i did help level it out but man it is a lot stiffer. Not bad to drive just noticeably different than before.
I have the same ARB in front plus 75 lbs Bud Built. I have no winch or supercharger. I figure our rigs still weigh pretty close though and should perform very similar.
.
BigFishAllDay
New member
So what is your verdict on the sway bar? you mentioned the clunking sound is now diminished.
The new bushings made a drastic difference in the sound that I'm getting, but it's still there. The fact that they made a difference at all leads me to believe that the sway bar is the source of the noise. At this point I'm deciding whether I want to learn to live with it, or try out some longer endlinks.
I recently increased the "level" on my front adjustable Bilsteins. Did your become noticeably stiffer? I only went up one notch and i did help level it out but man it is a lot stiffer. Not bad to drive just noticeably different than before.
I didn't notice a big difference in mine when I took them up a notch. They ride was a little bit more firm, but the difference was not drastic.
BigFishAllDay
New member
Electrical upgrades coming soon!
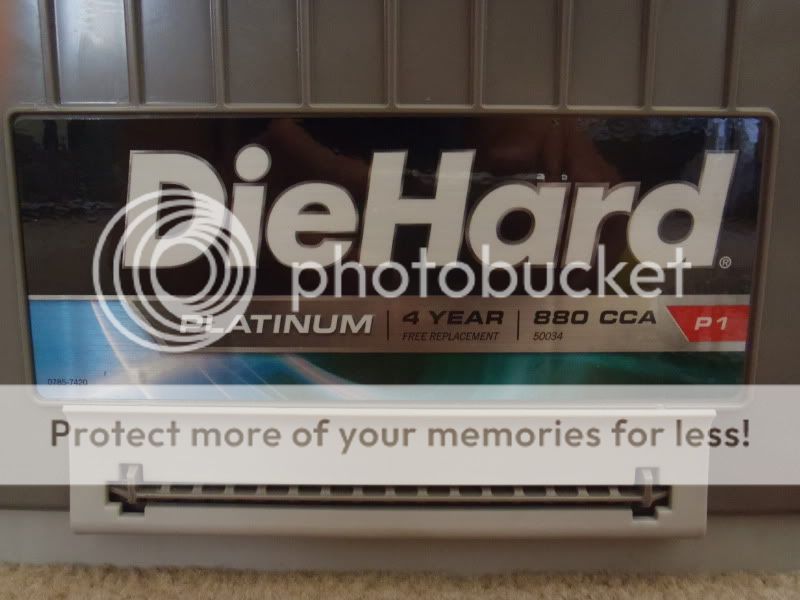
Not much of an update, I'm just super stoked. I just picked up one bad mother of battery for $200. Sears Die Hard Platinum. Basically a re-badged Odyssey at a $100 savings. Group 34. Winch food.
I've been doing some small cosmetic things, putting together a system for In-Cab winch control, doing the "Big 3" upgrade to the primary grounds and alternator to battery wiring. Once I hooked up the winch and tested it, I realized my electrical system was not up to the task. Should have everything knocked out soon and will post up with some write-up type stuff and pics. :bigok:
Not much of an update, I'm just super stoked. I just picked up one bad mother of battery for $200. Sears Die Hard Platinum. Basically a re-badged Odyssey at a $100 savings. Group 34. Winch food.
I've been doing some small cosmetic things, putting together a system for In-Cab winch control, doing the "Big 3" upgrade to the primary grounds and alternator to battery wiring. Once I hooked up the winch and tested it, I realized my electrical system was not up to the task. Should have everything knocked out soon and will post up with some write-up type stuff and pics. :bigok:

BigFishAllDay
New member
Ripcord, I think the new setup will be more than sufficient.
Researching all of this has been a chore, so I'm going to share, in summary form, all of the info that I discovered in picking what I believe to be the best battery for the money.
The following are the Models and Specs that I considered when I was choosing a new battery to support my current electrical drains... (Stock stuff + IPF's, Winch, Gauges, soon URD gear, and possibly more down the road)
Battery Comparison:
Existing Battery: Toyota True-2, Group 24F, Reverse Terminals, Manufacture Date: 12/06
665CA
530CCA
90 Minute Reserve Capacity
7 7/8” H
11” L
6 13/16” W
Optima Red Top, Group 35, Reverse Terminals, $172.99 + tax
Cold Crank Amps 720
Crank Amps 910
Reserve Capacity 90
Ampere Hour 44
L-9 5/16 in.
W-6 13/16 in.
H-7 5/8 in.
Premium Starting Power,For Use With SUVs/Trucks/Cars,Non-Spillable And Maintenance Free,Vibration Resistant,36 Months Free Replacement Warranty
Optima Part 8020-164 - RedTop; Battery
Optima Yellow Top, Group 35, Standard Terminals, $187.19 + tax
Deep Cycle Battery
Cold Crank Amps 650
Crank Amps 810
Reserve Capacity 98
Amp Hour 48
L-9 5/16 in.
W-6 13/16 in.
H-7 5/8 in.
Premium Starting And Deep Cycle Power,For Off-Road/Competition/Performance/Car Audio,Non-Spillable And Maintenance Free,Vibration Resistant,12 Months Free Replacement Warranty
Optima Part 8040-218 - YellowTop; Deep Cycle Battery
Odyssey 34R-PC1500, Group 34, Reverse Terminals $278.18 (including shipping/tax)
CCA: 880A at 0°F (-18°C)
Reserve capacity: 135 minutes
Deep cycling capability: 400 cycles at 80% Depth of Discharge
Typical service life: 6 to 8 years
Absorbed glass mat (AGM) technology
12V pure lead VRLA
SAE Group 34 footprint
Rugged construction
Top tin plated brass SAE terminals
Can be mounted in any orientation
Lifting handle
US DOT and IATA certified non-spillable
Shipped fully charged
Container and cover made from oil resistant plastic
4 Year Free Replacement Warranty
7.13” H, 7.82” including terminals
10.85” L
6.76” W
34R-PC1500 - Odyssey battery
Sears Die Hard Platinum P-1, Group 34, Standard Terminals $199 + Tax
The P-1 Platinum Automotive Battery from DieHard features 135 minutes of reserve capacity and 880 cold cranking amps. Its corrosion-resistant high quality tin-coated brass terminals provide reliable starting power in all weather conditions. Its rugged, military-grade construction features robust casing for increased compression and offers superior vibration resistance, making it ideal for off-road applications.
Longer off-season storage time - show cars & classic cars
Ideal for luxury vehicles with multiple electronic accessories
Plates made of 99.99% pure virgin lead
High purity grade acid held safely in place by glass mats; non-spillable design
Absorbed Glass Mat construction provides mounting flexibility & guarantees longer service life
4-Year Free Replacement; 100-Month Prorated Limited Warranty
7-4/5 in. H (including terminals)
10-9/10 in. L
6-4/5 in. W
Amp Hours at 20 Hour Rate: 68
Cold Cranking Amps (CCA at 0 deg.F): 880
Reserve Capacity (RC): 135
Sears Die-Hard Platinum P1 Group 34
After all the comparison shopping, I decided on the Sears Die Hard Platinum. It is a clone of the Odyssey for $75 less. Everything, from the specs, to the case, to the terminals, to the handle, size, warranty... EVERYTHING... is the same. I found a few threads on various forums citing conversations with Odyssey reps and Sears reps confirming that EnerSys (makers of Odyssey) manufactures this battery on Sears' behalf.
The Sears/Odyssey offers all the features of both of the Optimas in one package. Massive instantaneous power, deep cycle capability, better specs all around, and a better warranty to boot. It fits perfectly in the same spot as the group 24 stock battery, provided you make sure to get the spacer that fits on the bottom, raising it an inch and bringing it within 1/8" in all dimensions of a group 24 battery.
The only disadvantage of the Sears battery is that it is not offered in a reverse terminal configuration, so the positive and negative terminals will be reversed and be in the "wrong" spots. To make it fit, you have to extend the positive connections. More on that soon.
For me it was a no brainer... World class battery, $75 savings. And I've dealt with the terminal issue twice before, so I've got it down. Done deal. :naughty:
Researching all of this has been a chore, so I'm going to share, in summary form, all of the info that I discovered in picking what I believe to be the best battery for the money.
The following are the Models and Specs that I considered when I was choosing a new battery to support my current electrical drains... (Stock stuff + IPF's, Winch, Gauges, soon URD gear, and possibly more down the road)
Battery Comparison:
Existing Battery: Toyota True-2, Group 24F, Reverse Terminals, Manufacture Date: 12/06
665CA
530CCA
90 Minute Reserve Capacity
7 7/8” H
11” L
6 13/16” W
Optima Red Top, Group 35, Reverse Terminals, $172.99 + tax
Cold Crank Amps 720
Crank Amps 910
Reserve Capacity 90
Ampere Hour 44
L-9 5/16 in.
W-6 13/16 in.
H-7 5/8 in.
Premium Starting Power,For Use With SUVs/Trucks/Cars,Non-Spillable And Maintenance Free,Vibration Resistant,36 Months Free Replacement Warranty
Optima Part 8020-164 - RedTop; Battery
Optima Yellow Top, Group 35, Standard Terminals, $187.19 + tax
Deep Cycle Battery
Cold Crank Amps 650
Crank Amps 810
Reserve Capacity 98
Amp Hour 48
L-9 5/16 in.
W-6 13/16 in.
H-7 5/8 in.
Premium Starting And Deep Cycle Power,For Off-Road/Competition/Performance/Car Audio,Non-Spillable And Maintenance Free,Vibration Resistant,12 Months Free Replacement Warranty
Optima Part 8040-218 - YellowTop; Deep Cycle Battery
Odyssey 34R-PC1500, Group 34, Reverse Terminals $278.18 (including shipping/tax)
CCA: 880A at 0°F (-18°C)
Reserve capacity: 135 minutes
Deep cycling capability: 400 cycles at 80% Depth of Discharge
Typical service life: 6 to 8 years
Absorbed glass mat (AGM) technology
12V pure lead VRLA
SAE Group 34 footprint
Rugged construction
Top tin plated brass SAE terminals
Can be mounted in any orientation
Lifting handle
US DOT and IATA certified non-spillable
Shipped fully charged
Container and cover made from oil resistant plastic
4 Year Free Replacement Warranty
7.13” H, 7.82” including terminals
10.85” L
6.76” W
34R-PC1500 - Odyssey battery
Sears Die Hard Platinum P-1, Group 34, Standard Terminals $199 + Tax
The P-1 Platinum Automotive Battery from DieHard features 135 minutes of reserve capacity and 880 cold cranking amps. Its corrosion-resistant high quality tin-coated brass terminals provide reliable starting power in all weather conditions. Its rugged, military-grade construction features robust casing for increased compression and offers superior vibration resistance, making it ideal for off-road applications.
Longer off-season storage time - show cars & classic cars
Ideal for luxury vehicles with multiple electronic accessories
Plates made of 99.99% pure virgin lead
High purity grade acid held safely in place by glass mats; non-spillable design
Absorbed Glass Mat construction provides mounting flexibility & guarantees longer service life
4-Year Free Replacement; 100-Month Prorated Limited Warranty
7-4/5 in. H (including terminals)
10-9/10 in. L
6-4/5 in. W
Amp Hours at 20 Hour Rate: 68
Cold Cranking Amps (CCA at 0 deg.F): 880
Reserve Capacity (RC): 135
Sears Die-Hard Platinum P1 Group 34
After all the comparison shopping, I decided on the Sears Die Hard Platinum. It is a clone of the Odyssey for $75 less. Everything, from the specs, to the case, to the terminals, to the handle, size, warranty... EVERYTHING... is the same. I found a few threads on various forums citing conversations with Odyssey reps and Sears reps confirming that EnerSys (makers of Odyssey) manufactures this battery on Sears' behalf.
The Sears/Odyssey offers all the features of both of the Optimas in one package. Massive instantaneous power, deep cycle capability, better specs all around, and a better warranty to boot. It fits perfectly in the same spot as the group 24 stock battery, provided you make sure to get the spacer that fits on the bottom, raising it an inch and bringing it within 1/8" in all dimensions of a group 24 battery.
The only disadvantage of the Sears battery is that it is not offered in a reverse terminal configuration, so the positive and negative terminals will be reversed and be in the "wrong" spots. To make it fit, you have to extend the positive connections. More on that soon.
For me it was a no brainer... World class battery, $75 savings. And I've dealt with the terminal issue twice before, so I've got it down. Done deal. :naughty:
BigFishAllDay
New member
“BIG 3” Modification
In the process of getting my winch all wired up and testing it, I found that my battery was getting weak. Once I decided on the Die Hard I started looking into other improvements to the electrical system. The only other modification that I found that yielded big results, aside from upgrading the alternator, is to upgrade the “Big 3”.
I’m not going to type up an explanation… it’s been done a thousand times. The best explanation of the theory and process is at the link below, courtesy of the The12Volt.com:
How to upgrade the Big Three
In order to install the new battery and complete the “Big 3”, and considering the fact that I had to extend the positive connections to install it, I needed the following:
1. 8 feet of 4 gauge cable… I had some decent quality amp wiring in the garage already.
2. Some heavy gauge flux core Solder.
3. 1/2” Heat Shrink Tubing
4. Some Zip Ties… 8” size is good.
5. Some new battery terminals. The jury is still out on this one, but I got some new marine terminals. I’ll post more on what I end up doing with the terminals when this is all done.
6. Two 4 Gauge Battery Cables (19 inch length). I’ll probably only need one, but these are for extending the positive side of things.
7. Some 1/4-20 3/4” bolts and lock nuts…
8. 120 Amp Circuit Breaker (Littelfuse and Bussman both make a good offering for around $30)
9. Felt Terminal Protectors
10. Electrical Tape.
11. 8 Copper ring terminals, 4 AWG size, 3/8” hole.
All of this additional stuff cost about $75.00.
The Goods:
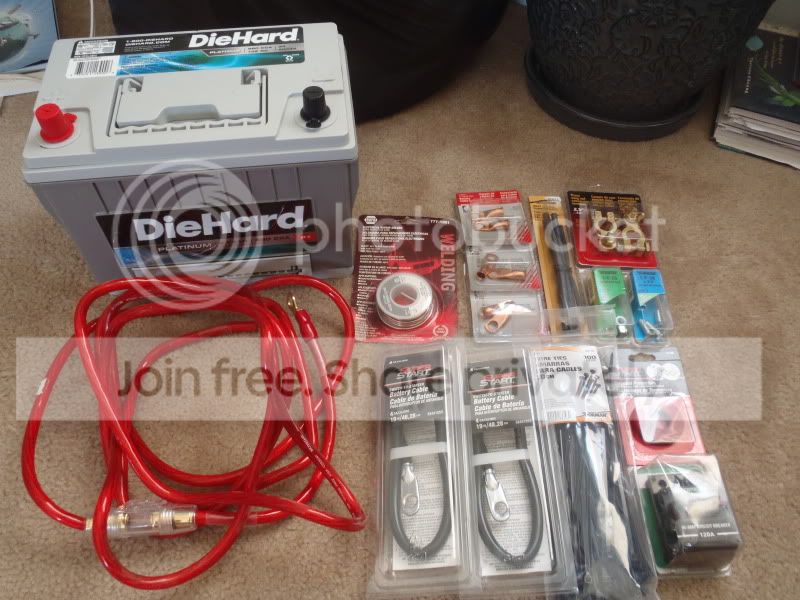
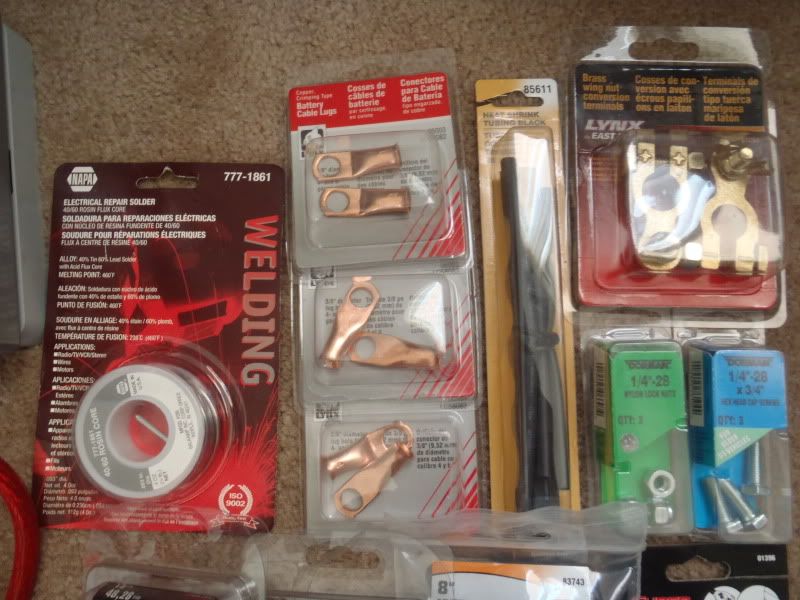
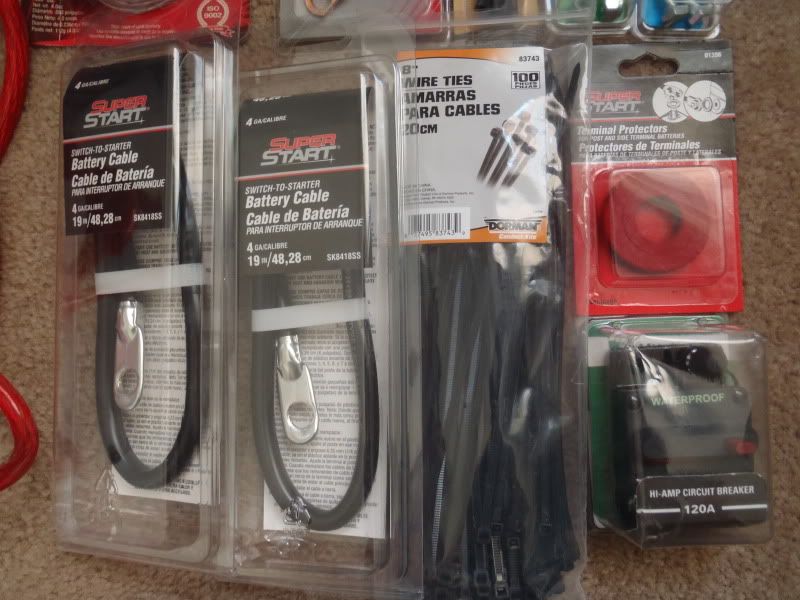
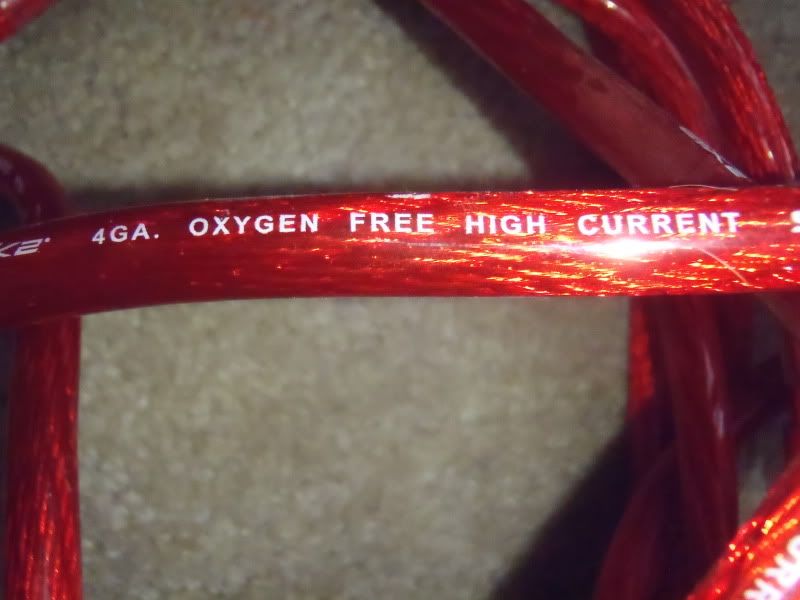
I didn’t get too far tonight, but I got the wires built for the “Big 3” upgrade:
Step 1: Strip the shielding…
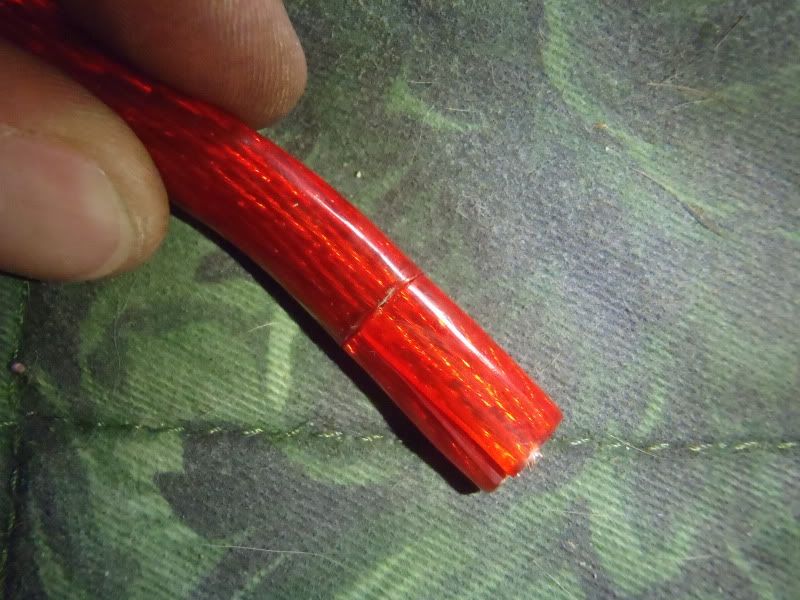
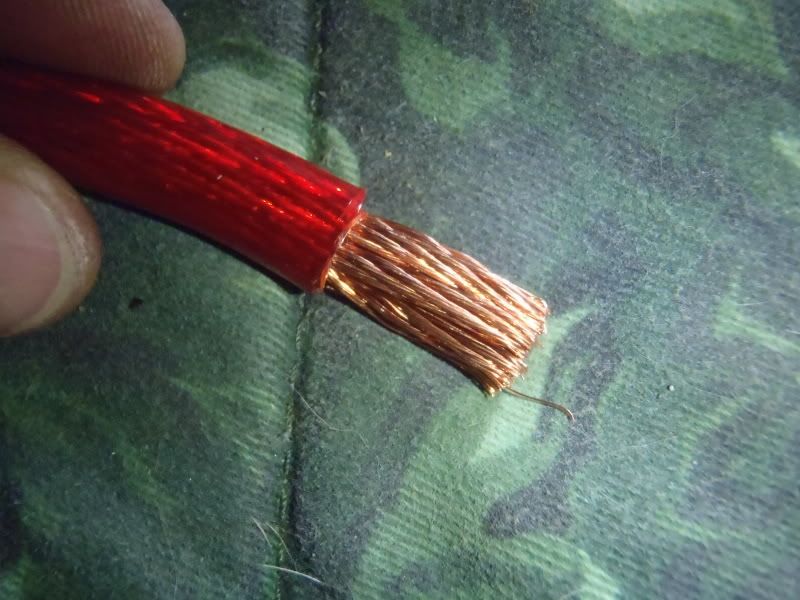
Step 2: Find a C-Clamp, place your ring terminal in the clamp, with the hole for the wire facing up… Cut a couple short pieces (1/2”) of the heavy gauge solder:
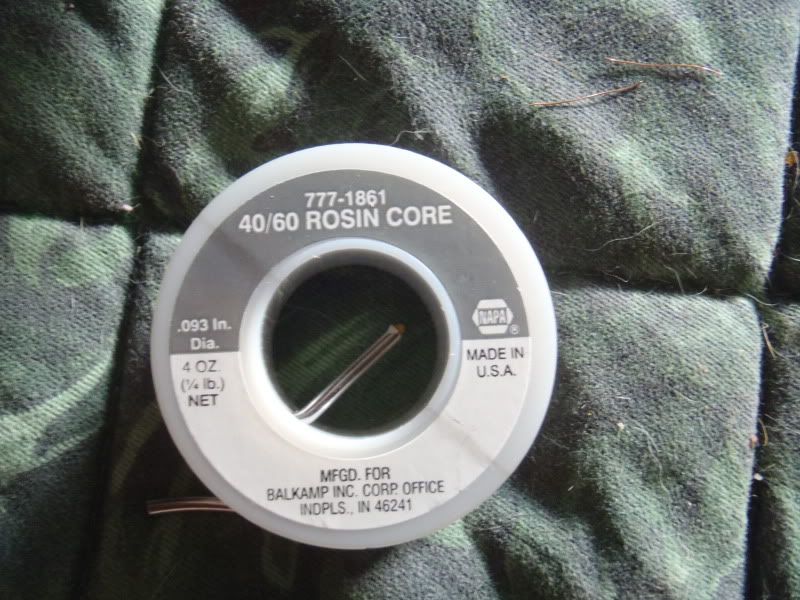
…put the solder in the terminal, and heat with a propane torch until the solder melts.
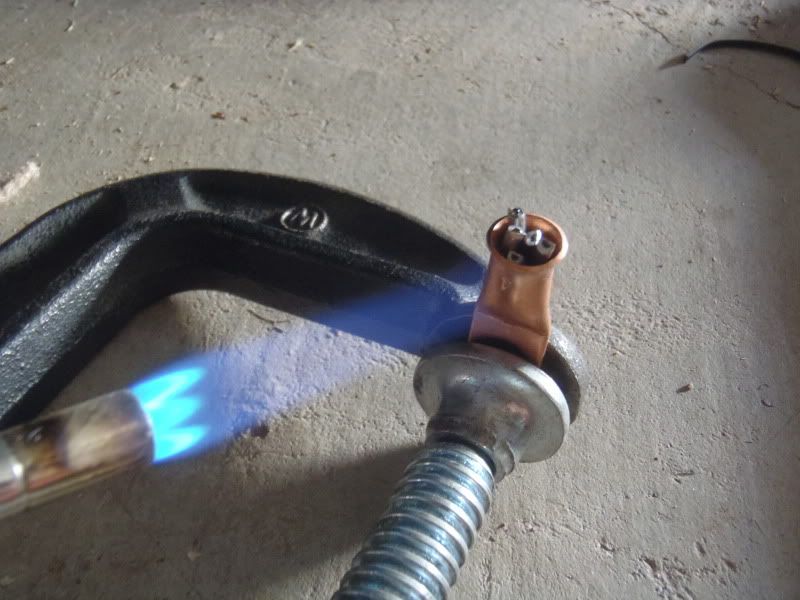
Once the solder is melted, push the stripped end of the wire into the terminal….
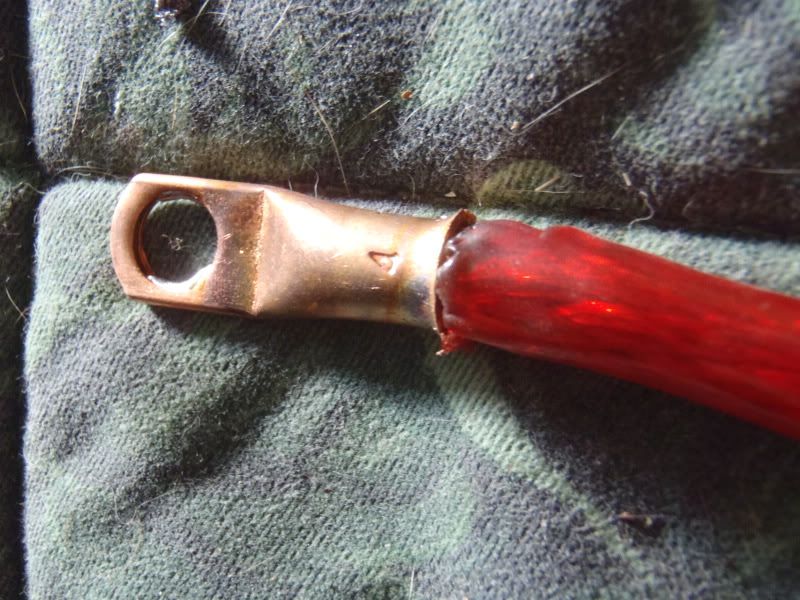
Crimp it… Vice grips worked great for me… And put some heat shrink tubing over the joint where the wire’s shielding meets the terminal.
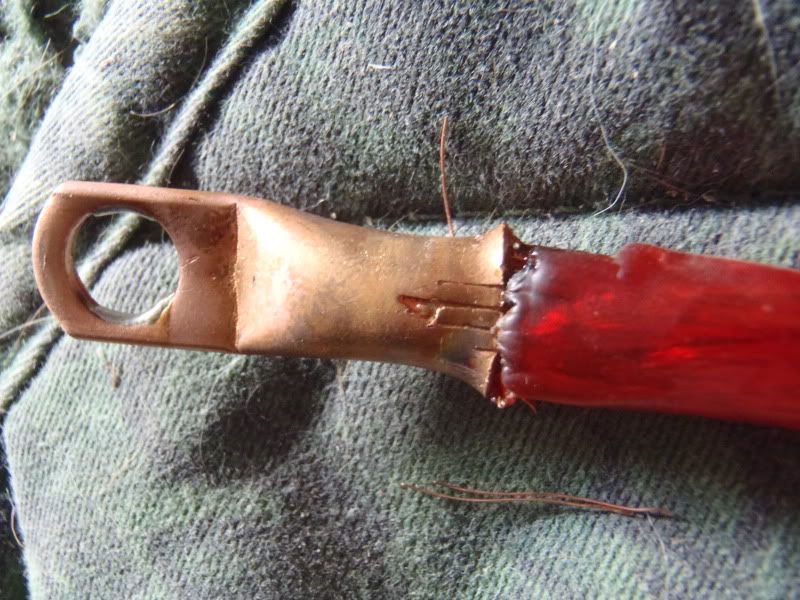
All built….
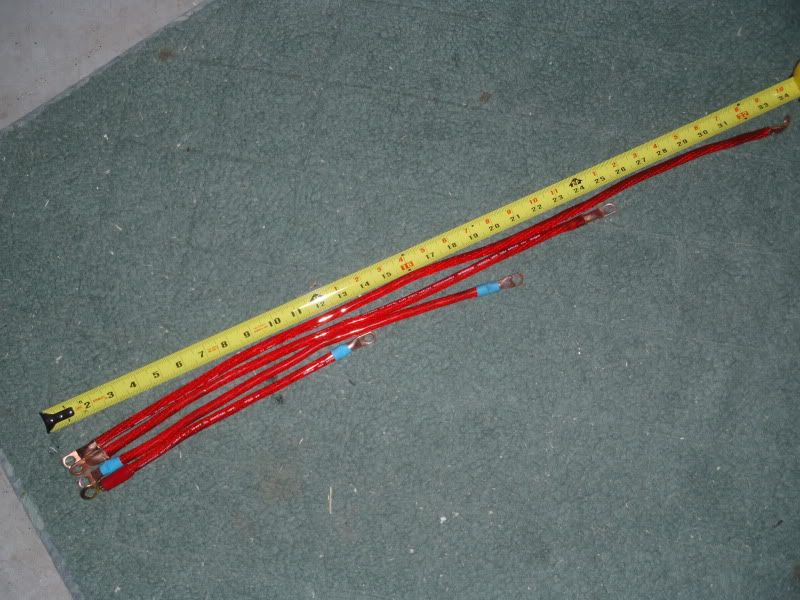
To be continued tomorrow. Hopefully I’ll be able to get it finished up.
In the process of getting my winch all wired up and testing it, I found that my battery was getting weak. Once I decided on the Die Hard I started looking into other improvements to the electrical system. The only other modification that I found that yielded big results, aside from upgrading the alternator, is to upgrade the “Big 3”.
I’m not going to type up an explanation… it’s been done a thousand times. The best explanation of the theory and process is at the link below, courtesy of the The12Volt.com:
How to upgrade the Big Three
In order to install the new battery and complete the “Big 3”, and considering the fact that I had to extend the positive connections to install it, I needed the following:
1. 8 feet of 4 gauge cable… I had some decent quality amp wiring in the garage already.
2. Some heavy gauge flux core Solder.
3. 1/2” Heat Shrink Tubing
4. Some Zip Ties… 8” size is good.
5. Some new battery terminals. The jury is still out on this one, but I got some new marine terminals. I’ll post more on what I end up doing with the terminals when this is all done.
6. Two 4 Gauge Battery Cables (19 inch length). I’ll probably only need one, but these are for extending the positive side of things.
7. Some 1/4-20 3/4” bolts and lock nuts…
8. 120 Amp Circuit Breaker (Littelfuse and Bussman both make a good offering for around $30)
9. Felt Terminal Protectors
10. Electrical Tape.
11. 8 Copper ring terminals, 4 AWG size, 3/8” hole.
All of this additional stuff cost about $75.00.
The Goods:
I didn’t get too far tonight, but I got the wires built for the “Big 3” upgrade:
Step 1: Strip the shielding…
Step 2: Find a C-Clamp, place your ring terminal in the clamp, with the hole for the wire facing up… Cut a couple short pieces (1/2”) of the heavy gauge solder:
…put the solder in the terminal, and heat with a propane torch until the solder melts.
Once the solder is melted, push the stripped end of the wire into the terminal….
Crimp it… Vice grips worked great for me… And put some heat shrink tubing over the joint where the wire’s shielding meets the terminal.
All built….
To be continued tomorrow. Hopefully I’ll be able to get it finished up.
Similar threads

- Replies
- 2
- Views
- 3K

- Replies
- 0
- Views
- 293
- Replies
- 8
- Views
- 6K

- Replies
- 0
- Views
- 3K
- Replies
- 4
- Views
- 8K


