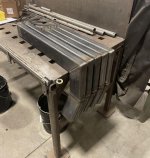
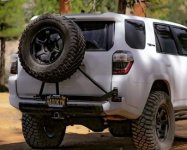
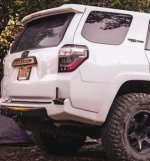
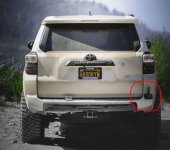
I made my own hitch mount spare tire carrier.

i get that there's a center option. my concern is the distance from the ladder to the back of the tire when installed. for example, the ultraswing (rigd) has a 7" offset from back of the tire carrier to the hatch. i know the gobi ladder is ~ 3" from the hatch to the ladder.

so my conceren is the distance from the ladder to the back of the tire carrier. from ultraswing it's 4". i'm hoping this one (center option) has an offset of less then 3". i think 1" is good :typing:

this will determine if i choose center of offset carrier.

Hi!,
Did you happen to see the pictures I posted of the carrier on my rig? There is very little distance between the back of the wheel and the hatch. (about 1.5")

If you have a gobi (or probably any other brand) ladder installed, the ONLY option will be offset.
 
There is very little distance between the back of the wheel and the hatch. (about 1.5")


If you have a gobi (or probably any other brand) ladder installed, the ONLY option will be offset.

This is why I selected offset. I'll be adding a ladder in the future and, based upon the pics, could tell that the price for such a tight tuck was the need for an offset carrier to make it work.

If I weren't going to do a ladder, I'd have gone with centered. But alas, I have a wife with a case of the short, so a ladder will be needed down the road.
 
This is why I selected offset. I'll be adding a ladder in the future and, based upon the pics, could tell that the price for such a tight tuck was the need for an offset carrier to make it work.

If I weren't going to do a ladder, I'd have gone with centered. But alas, I have a wife with a case of the short, so a ladder will be needed down the road.


And quite frankly, the whole reason I made the carrier to begin with. All the options had such a nauseating gap between the hatch and the tire, I wanted everything tight and tidy. I understand why DOM and Rigd keep the tire so far from the hatch, because they want to make a universal product at a low (in theory) cost. But people buying one of mine would be doing so for a specific reason.
 
Absolutely doable. Easier and better if you're willing to cut up your bumper for access. If you're trying to go around the bumper, you're not going to gain much, as you will still wind up having just as much steel and not a significant improvement in the way it attaches.

i want to cut a hole on the right side for the spindle to stick through and have the rest behind the bumper cover

there is foam between the top of the cross member and bumper cover, that space could be used for any support needed and there is also space between the cover and cross member particularly in the corners.
 
Yes if you are willing to cut a hole in the bumper cover it becomes a lot easier. The biggest problem that jumps out initially (which isn't insurmountable), is that you'd probably need another penetration for the latch. Latching it at the pivot would not be sufficient. There are other options but it would need to be thought through.
 
Hi!,
Did you happen to see the pictures I posted of the carrier on my rig? There is very little distance between the back of the wheel and the hatch. (about 1.5")

If you have a gobi (or probably any other brand) ladder installed, the ONLY option will be offset.


Ohh so if I have a ladder, I won’t be able to use the center carrier. Only the offset carrier will be available as the distance from the hatch for both options is the same.
 
Last edited:
Absolutely doable. Easier and better if you're willing to cut up your bumper for access. If you're trying to go around the bumper, you're not going to gain much, as you will still wind up having just as much steel and not a significant improvement in the way it attaches.

Like the "slim line" front bumpers. Cut out the plastic valence. Could probably use the stock hitch bolt locations and sandwich it in with longer bolts.
 
Yes if you are willing to cut a hole in the bumper cover it becomes a lot easier. The biggest problem that jumps out initially (which isn't insurmountable), is that you'd probably need another penetration for the latch. Latching it at the pivot would not be sufficient. There are other options but it would need to be thought through.

yeah its been done. i've seen the pictures on IG i think. or on here somewhere.
 
Ohh so if I have a ladder, I won’t be able to use the center carrier. Only the offset carrier will be available as the distance from the hatch for both options is the same.

Yes, Both offset and center carriers clearance between it and the rear hatch are the same.
These carriers are tightly tucked close to the hatch.
So from the photos it appears the center carrier would interfere with the ladders.
Offset will be your choice. Tightly tucked and clearance of ladder location.
 
So, here is an update on the upper horizontal arm pieces.
2 Centers and 3 Offset Arms.
 

Attachments

  • 6B360B40-46C6-4252-8499-A6353425FFAA.jpg
    6B360B40-46C6-4252-8499-A6353425FFAA.jpg
    127.1 KB · Views: 822
Great work sir! I would certainly be interested not in you building one of these for me but sharing the design and cad files for me to fab myself. Certainly for a reasonable fee of course! Something that others might be interested also. Thanks in advance!!!
 
[MENTION=594423]CajunMikeR[/MENTION]

Just got a progress report from ctnewman.
He should start assembling the carriers this week!

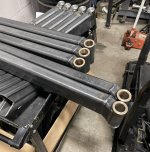
Here is a the run bored and bushed!!!!
 

Attachments

  • 0A158F2A-50CE-4EFA-BC52-F95ABB34805C.jpg
    0A158F2A-50CE-4EFA-BC52-F95ABB34805C.jpg
    128.4 KB · Views: 766
Last edited:
i want to cut a hole on the right side for the spindle to stick through and have the rest behind the bumper cover

there is foam between the top of the cross member and bumper cover, that space could be used for any support needed and there is also space between the cover and cross member particularly in the corners.

Hadokyn on IG has this: Login • Instagram
 

Attachments

  • Hadokyn bumper carrier.JPG
    Hadokyn bumper carrier.JPG
    33.7 KB · Views: 734
  • Hadokyn bumper carrier mount only 2.JPG
    Hadokyn bumper carrier mount only 2.JPG
    25.8 KB · Views: 742
  • Hadokyn bumper carrier mount only.JPG
    Hadokyn bumper carrier mount only.JPG
    31.4 KB · Views: 746
I saw an update on the carrier, but I’m not going to get ahead of [MENTION=602811]ctnewman[/MENTION] and give it away....


You are going to have to wait for any photos!!!!!

(I like what I am seeing. This is a hard working man, just to let all of the people know that think it may be overpriced compared to the mass production usual suspects)
 
Hi everyone,
Things are still going smoothly on my end. I have welded all the latch plates onto the upper arms. Tonight I am going to weld the wheel mounts on. Some things to note:

A) original design for these 5 units was a single "open" position at 120 degrees swung open. I've decided to add a second, even further" open position. The positions are held by a spring loaded plunger, operation will be as follows.

1) release center clamp holding hitch closed
2) briefly lift the secondary lock pin at the hinge and swing open the tire
3) at 120 degrees the latch pin will drop into a slot and the tire wont flop around
4a) to close, lift the pin and swing the tire closed, when the arm is fully closed the safety latch will drop into place and you can close the primary latch.
4b) if you want to open it further, lift the safety latch again and swing the tire almost 180 degrees out of the way. You wouldn't do this all the time, but for special cases it might be useful. There is also a hard stop right after the "extra wide open" position that cannot be passed so the carrier cannot hit your vehicle.

There are no loose pins to try to get into holes that aren't lined up. If you decide you don't want to have the secondary latch system at all? Well you can just unbolt it and will still have the hard stop!

B) Some notes about the primary latch.

1) all stainless construction
2) true one handed operation. There is no need to line up a hook with a reciever or anything like that, think of it as more like closing a house door and turning a deadbolt.
3) the primary latch has a locking handle itself. The handle must be squeezed (albeit lightly) to be operated. This ensures you don't accidentally bump it open with your leg.

C) some other construction notes:

1) All seams are fully welded. This is less to do with strength and more to do with corrosion resistance. Ever see stitch welds leaking rust? That's because the powdercoat can't get into those small cracks.
2) Wrinkle black powdercoat is applied over a baked on zinc primer to add rust resistance
3) Several wire management tabs will be welded onto the back of upper and lower arms. This allows you to manage your wiring for your license plate lights and your back up camera cables.
4) The camera mount is designed to use your stock camera. I would recommend just getting a used camera off ebay, but you can absolutely remove your stock camera. There is a lot of information out there about how to relocate the camera.
5) wheel mounts are pressed in OEM wheel studs. No fumbling with loose hardware. All six studs will be available, (i think having all the lug nuts on looks best) but you could get away with running only 3 for faster tire changes.

I'm excited to show you guys my "anti-rattle system but I'm going to wait until I get them built to show you how it works. In my opinion it's one of the better designs on the market.

I'll have more information and hopefully some pictures this weekend!
 

Members online

Forum statistics

Threads
278,315
Messages
3,554,130
Members
248,016
Latest member
Advally Service

Trending content

Back
Top