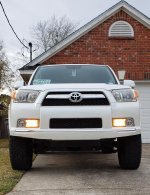
Installed 1" body lift

Can you do a partial body lift in the front like that? Would you use 2 or 4 of the 8 spacers that come with the BL kit?

Sorry, I meant that I may do a 1/2" body lift when I put long travel up front to allow for more fender clearance. It came out wrong. I would not recommend only body lifting one end...
 
does the new tires stick out from the fenders? That was the size I originally wanted but I got the 285 KM2's like your old set up, because of Recon.

No because the backspace and offset of these wheels keep them inside
 

Attachments

  • IMG_5485.jpg
    IMG_5485.jpg
    137.2 KB · Views: 2,405
Did you cut your fan shroud or just took out the spacer where the screws go to hold it in place?

I have the same BL from Pat and I like it, only issue on a limited or early 5th gen is that the bottom part or front bumper cover wont line up correctly with the holes and the top of the back bumper isnt as sturdy so i had to add padding to make it solid

Didn't have to do anything to the fan shroud and double checked that the fan spun freely before starting the truck. I've driven 100+ miles since install and all is good.

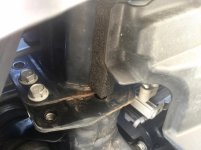
For the front bumper, I did have to move it up in order for the bumper cover and fenders to seam tight because they wouldn't without. It had a slight 1/8" gap so I decided to move the bumper up. There are 8 studs it mounts to, which 6 are in a vertical column. That row of studs allow it to perfectly go up one inch. So now I have 4 of the 8 bolts holding the bumper but it's still plenty solid. Welding it is an option if you feel differently. Ive attached a pic.
 

Attachments

  • IMG_5461.jpg
    IMG_5461.jpg
    125.3 KB · Views: 2,400
Last edited:
I see what you mean. So far, so good with no fan/shroud rubbing.

When i installed mine i didnt do anything to the fan shroud, i left it alone but then i could hear a noise coming from the engine when i break hard cuz the engine would dip down. i checked the fan and i noticed that there was some wear so i took the spacer out in the shroud and it fixed the noise. Double check your fan blade if you start hearing a noise when you break hard.
 
When i installed mine i didnt do anything to the fan shroud, i left it alone but then i could hear a noise coming from the engine when i break hard cuz the engine would dip down. i checked the fan and i noticed that there was some wear so i took the spacer out in the shroud and it fixed the noise. Double check your fan blade if you start hearing a noise when you break hard.

Thanks for sharing. I haven't noticed that yet but also haven't had to brake hard yet either. Where is their a spacer in the shroud?
 
Thanks for sharing. I haven't noticed that yet but also haven't had to brake hard yet either. Where is their a spacer in the shroud?


take out the screws holding the shroud, you will notice a copper barrel spacer where you took the screw out. Push that out and put the screw back in to secure the shroud in place. this will give you close to a 1/2" clearance

18033354_10154542217274632_4971454324702519488_n.jpg
 
take out the screws holding the shroud, you will notice a copper barrel spacer where you took the screw out. Push that out and put the screw back in to secure the shroud in place. this will give you close to a 1/2" clearance

18033354_10154542217274632_4971454324702519488_n.jpg

Thanks b! I'll definitely keep this in mind now if I hear any fan/shroud rub
 
I'm expecting a video about it on your youtube soon! Your videos are absolutely top notch and I am super curious about these blocks. I knew it was possible but I hadnt seen a definite "kit" yet. I find it quite hard to believe that the only thing that cause interference or is affected by spreading the body and frame apart by an inch is the steering shaft.

Thanks b! I'm taking the 4R to the trails tomorrow so I'll have some footage with the BL and 305s to add to the next YouTube episode. The steering shaft has one bolt you loosen before the BL spacers install so the yoke can slide up then just retighten once done.
 
BTW,
check out the build that TheWrath did, he installed a 2" from Pats also back in 2015 but he took it off..
2" Bodylift
I spoke with him and he said he was able to get so set right, other the the steering. He did tell me that there is a steering column extension out of Australia but it is very hard to get.

Sent from my SAMSUNG-SM-G890A using Tapatalk
 
Body Lift

Doing Fat Pat's 1in body lift. 2016 trail. What is the procedure to get at the rear body mount bolts? What do I need to remove?
Thanks!!
 
Buyer Beware with Fat Pats... I returned mine and bought the ToyTec kit... Such a HUGE difference in quality.

<iframe width="560" height="315" src="https://www.youtube.com/embed/bjXzZERBh1s" frameborder="0" allow="accelerometer; autoplay; encrypted-media; gyroscope; picture-in-picture" allowfullscreen></iframe>
 
Last edited:
Buyer Beware with Fat Pats... I returned mine and bought the ToyTec kit... Such a HUGE difference in quality.

<iframe width="560" height="315" src="https://www.youtube.com/embed/bjXzZERBh1s" frameborder="0" allow="accelerometer; autoplay; encrypted-media; gyroscope; picture-in-picture" allowfullscreen></iframe>

Those look like hockey pucks someone got drunk and drilled out.
 
Buyer Beware with Fat Pats... I returned mine and bought the ToyTec kit... Such a HUGE difference in quality.

<iframe width="560" height="315" src="https://www.youtube.com/embed/bjXzZERBh1s" frameborder="0" allow="accelerometer; autoplay; encrypted-media; gyroscope; picture-in-picture" allowfullscreen></iframe>

Sadly Toytec hadn't made their BL kits at the time or I would have gone that route. I had one of the lift spacers slightly drilled off center but nothing as bad as the ones in that video. So far zero problems with the Fat Pats so all good.
 
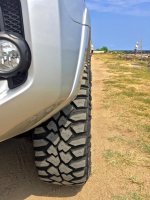
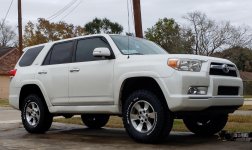
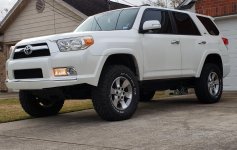
Wanted a bit more lift without sacrificing ride quality and my CVs as well as additional clearance for my new 305/65R17 MT Deegan 38 tires. Installed Fat Pats 1" body lift Fat Pats Body Lifts - Home which took about 4-5 hours to do. Stoked on how it turned out!

Here are my install notes:

1. The bolts were slightly larger in diameter (3/4" head) than the OEM (18mm head) so we had to drill out all the body holes and washers to make them work. Wasn't a problem at the shop I did this at because they had 18" drill bits but you definitely need to get exact bolts for other 5th gen guys wanting this kit. The length wasn't a problem just the diameter.

2. No need to move nor trim radiator shroud. Didn't affect the fan movement at all.

3. Windshield water reservoir bottle just needs the three bolts taken out and hung/slid out of the way to access the mount. No need to disconnect all the hoses & wiring. I zip-tied it to my UCA.

4. Aluminum front bumper can be moved up exactly one inch via its 8-bolt mounting holes and you have to in order to seam the plastic bumper cover back up tight. If not , you'll have a slight 1/8" gap between bumper and fender. By moving it up you can only use 4 of the 8 original mounting holes. Still plenty strong enough mount though. Weld it if you think differently.

5. No problem with rear bumper (and/or bumper cover) but you'll obviously have a space now between the cover and the frame support so I'll be buying a sheet of 1" foam from a craft store and glue to pre-existing bumper styrofoam support. In order to do this though, the bumper will have to be removed to access.

6. You'll definitely need a magnetic retrieval tool that has a strong pull in order to lift the OEM body mount bolts out, particularly for the front and rear set.

7. All the interior door panels are just snapped in/out but the rear is a bit trickier because you don't want to have to remove the entire panel. We just popped about a 3rd of it back enough for a hand and tool to get in there

8. Be prepared to have plenty patience, especially with carefully removing the OEM inner fender fasteners ;)


That looks great!

I don't how it took me so long to learn about body lifts... Last year I pulled the trigger on Bilstein 5100's all the way around with the adjustable in the front set to 2.5" and added a 2" spacer in the rear.

But after seeing this, my itch is getting worse for bigger tires. Currently sitting on BFG KO2 A/T 275/70/17's and what sucks is just got them early this year. If anyone wants any tires PM me they might be coming off, lol.

I'm past the, I don't want to do anything to the truck unless I can go back to it later if I choose stage lol. Chopping the front bumper and wheel wells helped me with that.

I feel like I'm mentally ready to do body mount chops and any other adjustments to get some 305's or even 315's (if possible) to fit.

Ok, enough about me. Question for the thread, I've been having a hard time finding forums about body lifts for the 5th gens. Plenty on the 3rd gens. Does anyone know if there is a 2" or even a 3" body lift kit for the 5th gens?

The pictures attached show a before and after of cutting the front bumper (Still need to go back and round the corner a bit in front of the wheel) and adding Shrockworks rocker trim.
 

Attachments

  • 20181128_161310.jpg
    20181128_161310.jpg
    139.3 KB · Views: 1,232
  • 20191121_074506.jpg
    20191121_074506.jpg
    137.8 KB · Views: 1,223
  • 20191121_074445.jpg
    20191121_074445.jpg
    137.6 KB · Views: 1,221
Are you planning to re-gear? And do you actually need the larger tires or just want them for looks?

Because they're gonna drive like crap without a re-gear.
 
Even after re-gearing make sure you have enough Motor to push it. Those are heavy rims and tires.


Sent from my iPhone using Tapatalk
 

Members online

Forum statistics

Threads
278,312
Messages
3,554,089
Members
248,016
Latest member
Advally Service

Trending content

Back
Top