taxzz
New member
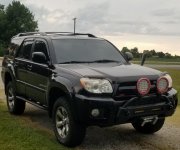
This past weekend I received and installed the Blitz Bumper from [MENTION=320865]Victory 4x4[/MENTION][/MENTION] on my 2004 Limited V8 (see the full build/maintenance sheet in signature below).
I also installed a Smittybilt 9500lb winch (Amazon URL).
The product and service from Victory were great, no complaints from them. The shipping was a bit of an issue and the shipper ended up losing the whole box, but I wouldn't put that on Victory.
The exact product I bought is located here.
4Runner Front Winch Bumper | Blitz w/Tube | 4th Gen (03-09) - Victory 4x4
You can also find the install instructions PDF for a 5th gen/4th gen here.
Here are some photos with general steps if you plan to tackle this yourself. I did this without removing the entire bumper cover, with as little adjustment as possible.
Here is the before shot;

This is a post cut and bumper removal photo, but you can see what's been removed from the bumper/grill.

I used an angle grinder w/ cutoff wheel, which I don't recommend. A sawzall is going to be easier for most people. I had to cut all of the bottom valance and the bottom 'grill'. I tried to remove the grill without cutting it, but that wasn't going to happen.
I did a bit of cleaning up, but the bumper is going to cover all the edges here, so don't fret too much.
I then removed the front bumper by removing the 4 bolts behind the foam here.

There are 4 nuts on each side which will let you remove the bumper extensions. On the bottom of each of those is two clips holding in a splash guard. I did NOT need to remove the bolts, they were fine so I just pushed the new bumper over them.

I then positioned the bumper to slide on. Have a second pair of hands if you have a winch on this SOB, it's heavy. I did this alone and it added a lot of effort.


Here are some after shots. I used the roller fairlead that came with the Smittybilt winch for a few days, but decided I'd rather have the warn cast iron.


I'll be getting a light bar later, but it would have been an easier install to have it on hand before installing the bumper.
I believe this is my first main how to post on the current rig, so let me know if you have any questions.
Here's a sneak peak of the 1st gen overland trailer build my wife and I are working on. She started a thread over here and will update it soon with the RTT situation and interior build out.

I also installed a Smittybilt 9500lb winch (Amazon URL).
The product and service from Victory were great, no complaints from them. The shipping was a bit of an issue and the shipper ended up losing the whole box, but I wouldn't put that on Victory.
The exact product I bought is located here.
4Runner Front Winch Bumper | Blitz w/Tube | 4th Gen (03-09) - Victory 4x4
You can also find the install instructions PDF for a 5th gen/4th gen here.
Here are some photos with general steps if you plan to tackle this yourself. I did this without removing the entire bumper cover, with as little adjustment as possible.
Here is the before shot;
This is a post cut and bumper removal photo, but you can see what's been removed from the bumper/grill.
I used an angle grinder w/ cutoff wheel, which I don't recommend. A sawzall is going to be easier for most people. I had to cut all of the bottom valance and the bottom 'grill'. I tried to remove the grill without cutting it, but that wasn't going to happen.
I did a bit of cleaning up, but the bumper is going to cover all the edges here, so don't fret too much.
I then removed the front bumper by removing the 4 bolts behind the foam here.
There are 4 nuts on each side which will let you remove the bumper extensions. On the bottom of each of those is two clips holding in a splash guard. I did NOT need to remove the bolts, they were fine so I just pushed the new bumper over them.
I then positioned the bumper to slide on. Have a second pair of hands if you have a winch on this SOB, it's heavy. I did this alone and it added a lot of effort.
Here are some after shots. I used the roller fairlead that came with the Smittybilt winch for a few days, but decided I'd rather have the warn cast iron.
I'll be getting a light bar later, but it would have been an easier install to have it on hand before installing the bumper.
I believe this is my first main how to post on the current rig, so let me know if you have any questions.
Here's a sneak peak of the 1st gen overland trailer build my wife and I are working on. She started a thread over here and will update it soon with the RTT situation and interior build out.
Last edited: