Jack Points

umidkusername

New member
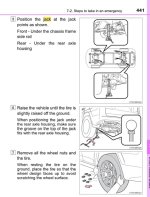
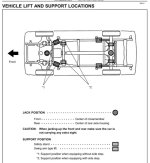
Does anyone have an image of the underside of a 5gen 4Runner that circles or points out the points where you can put a jack under it to lift it up to change a tire or lift up to put on jack stands?

Or does anyone want to make one to be the coolest person on this forum?


Sent from my iPhone using Tapatalk
 
Register to hide this ad
I open the door and use that... that way i can jack the vehicle up while sitting on the seat:hiding::moon:

Then if something goes wrong all you gotta do is replace the door!!

3b5.jpg
 
Alright, lots of super helpful comments already here, but let's see if I can shed some additional light on the front jack point. I know I've searched forums high and low and haven't found very good pics or detailed location information about the single jack point in the front of the vehicle (to lift both front wheels at the same time). Unfortunately I wasn't able to find an actual picture, but I did find this diagram from the Factory Service Manual.

Xvqtu8Y.png


Frame: obviously you can jack anywhere along here, but towards the front or rear wheel is the typical spot to lift from. This'll be where you can place jack stands as well.

Rear differential: this is an easy place to lift both wheels of the rear up at once. On either side of the rear differential you can place jack stands if needed. Usually my go-to when not doing axle work.

Front crossmember: this is shown in the FSM diagram as the forward centered circle. I pulled the below images from a YouTube oil change video. In pic 1 you can see the Fumoto valve circled in red which would normally just be an oil drain bolt. The orange circle shows the cross member with an indentation that would be the jack point. In pic 2 you can see that normally the oil drain bolt location is covered (red circle) - DO NOT JACK FROM HERE, it'll obviously crush.

cF20HGU.png

OuftWX2.png


So I've been jacking from that front crossmember location since I've had the vehicle. I have noticed that if my jack is perfectly centered on the crossmember that the front end does not lift evenly. Usually not a big deal I'll just jack higher. Alternatively I'll position the jack slightly to one side an inch or so and that's enough to offset whatever imbalance exists.

If anyone has any additional information or detail I'd love to hear it!
 
Last edited:

Attachments

  • 25AC197A-6593-4128-BD19-27F69E5A698C.jpeg
    25AC197A-6593-4128-BD19-27F69E5A698C.jpeg
    133.1 KB · Views: 52,070
  • 308D23D4-58D1-45BA-8EBB-BBEFF9A7CD23.jpeg
    308D23D4-58D1-45BA-8EBB-BBEFF9A7CD23.jpeg
    98.6 KB · Views: 35,489
  • 4BF45641-F8E7-4CDA-99AC-0043C1F28495.jpeg
    4BF45641-F8E7-4CDA-99AC-0043C1F28495.jpeg
    91 KB · Views: 35,646
  • E83A8842-0334-4239-9E0B-B4A96C02AA4C.jpeg
    E83A8842-0334-4239-9E0B-B4A96C02AA4C.jpeg
    73.8 KB · Views: 35,390
Last edited:
Y’all the best. With this knowledge I can get under mine and spray paint the points. I want to make this as simple as possible for me. Medium size orange dots to make it a no brainer. I don’t even want to question it or second guess when I need to change the tires. Just put jack under the orange dot. I find the stock jack sufficient. From the threads I’ve seen it’s good for changing a tire but not like maintenance work, which is fine.

My wife ripped two tires in her Jeep and it was Christmas Eve and raining and you want to talk about a mess? Anyone tried jacking up a Jeep Compass Elevation model? It’s a damn nightmare. The rain made it worse.


Sent from my iPhone using Tapatalk
 
I've looked this up a few times myself. The jack point images in my 2018 owners manual are overly simplified, to the point of being unclear enough to want to search here.

Anyway, this thread captures all of the most useful posts and even some more detailed images of the front cross member jacking location.

Thank you [MENTION=26691]Bossman[/MENTION], [MENTION=200736]ElectroBoy[/MENTION], [MENTION=595035]grizzlypath[/MENTION]

How can we sticky this thread?
 
From the thread Bossman linked.
Rear:
https://www.toyota-4runner.org/3363099-post67.html

Front:
https://www.toyota-4runner.org/3364202-post75.html

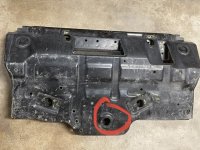
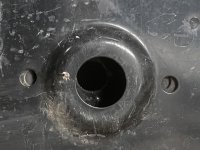
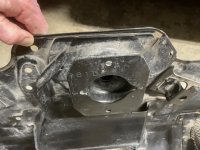
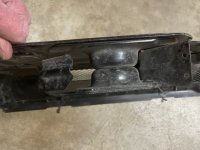
To lift BOTH front wheels. There’s a reinforced circular area on the stock front skid that sits against the crossmember. The jack goes there. I happen to have my skids off so here’s some pics:

(To lift BOTH rear wheels center the jack on the rear diff pumpkin).
This makes sense to me but is a different spot from both Grizzlypath's (the post before you) and the owner's manual's which is further to the back from oil drain cover and is an indent so what gives?
 
This makes sense to me but is a different spot from both Grizzlypath's (the post before you) and the owner's manual's which is further to the back from oil drain cover and is an indent so what gives?

It's just a different model skid plate. You are over thinking it. Just look at it, and see where the reinforced area that makes contact with the crossmember is. Put a floor jack there to lift the entire front of vehicle.

My OEM skids looked like electroboys, the other guy has a TRD skid plate, which maybe that is why it looks lightly different. Either way it's the same principal.
 
Y’all the best. With this knowledge I can get under mine and spray paint the points. I want to make this as simple as possible for me. Medium size orange dots to make it a no brainer. I don’t even want to question it or second guess when I need to change the tires. Just put jack under the orange dot. I find the stock jack sufficient. From the threads I’ve seen it’s good for changing a tire but not like maintenance work, which is fine.

My wife ripped two tires in her Jeep and it was Christmas Eve and raining and you want to talk about a mess? Anyone tried jacking up a Jeep Compass Elevation model? It’s a damn nightmare. The rain made it worse.


Sent from my iPhone using Tapatalk

DO NOT use the emergency bottle jack to lift the entire front or rear end of the vehicle. If you are using the bottle jack (which you shouldn't) to do work, just lift it off the frame, litterally anywhere, one wheel at a time.

You should really be using a floor jack and jack stands.
 
Over the years there have been various diagrams in the owners manual about jacking and lifting points.

In my 2018 manual Emergency section, the diagram shows where to jack to change a flat tire. One at a time, on the front frame and rear axle. See below.

There are other diagrams I’ve seen online that show where a mechanic would position the arms of a swingarm lift (frame and/or cross member). Or where to position a jack on a central point to lift either the front of back ends, then place jack stands (front frame and rear axle). See 2nd diagram below.
 

Attachments

  • AE2DCDB2-5B31-4B2B-A5A7-D7BA78BC7A4A.jpeg
    AE2DCDB2-5B31-4B2B-A5A7-D7BA78BC7A4A.jpeg
    98.4 KB · Views: 36,433
  • 6C1A5710-AD75-46AE-8698-D26F15052713.jpeg
    6C1A5710-AD75-46AE-8698-D26F15052713.jpeg
    82.1 KB · Views: 40,602

Awesome! I've seen that reinforced spot before, but wasn't sure if it was a legitimate jacking location or just skid weak spot reinforcement.

The spot I typically lift from is further back and I believe engages directly with the front crossmember. I'm going to have to get under there and investigate further...

cF20HGU.png
 
It's just a different model skid plate. You are over thinking it. Just look at it, and see where the reinforced area that makes contact with the crossmember is. Put a floor jack there to lift the entire front of vehicle.

My OEM skids looked like electroboys, the other guy has a TRD skid plate, which maybe that is why it looks lightly different. Either way it's the same principal.
The photos in Grizzlypath's post #15 shown the two different positions with stock skid. i have more confidence putting floor jack under the protruding circle nearer to the front than the rectangular recess further to the back. Have you put the jack to the latter with no problem?
I'd also like to see what Grizzlypath has to say. Thanks guys.
 
The photos in Grizzlypath's post #15 shown the two different positions with stock skid. i have more confidence putting floor jack under the protruding circle nearer to the front than the rectangular recess further to the back. Have you put the jack to the latter with no problem?
I'd also like to see what Grizzlypath has to say. Thanks guys.

Okay, looking at post #15, the circle near the front (circled in red) is your oil pan (this one has a Fumoto drain valve threaded in instead of a normal oil drain bolt). Obviously, don't jack the vehicle up from here. haha

376011d1611703977-jack-points-25ac197a-6593-4128-bd19-27f69e5a698c-jpeg


This photo above, with the circle is where you should be putting a floor jack.
 
Okay, looking at post #15, the circle near the front (circled in red) is your oil pan (this one has a Fumoto drain valve threaded in instead of a normal oil drain bolt). Obviously, don't jack the vehicle up from here. haha

376011d1611703977-jack-points-25ac197a-6593-4128-bd19-27f69e5a698c-jpeg


This photo above, with the circle is where you should be putting a floor jack.
Per 2018 Toyota manual we are to jack where the orange circle is which is a recess behind the drain pan in post #15. Apparently quite a few have used this as jack point with no problem but I'm hesitant as I haven't got around to remove that part of the skid and see what is above it. The circle is what I would use but could not if I were to change oil filter or any other work above the front skid.
I so missed my 15 year old Jeep which I could jack anywhere along the axles and the frame and sometimes worked on stuff without jacking it up.
 
The orange circle in GrizzlyPath's post #7 is in the wrong spot. It does NOT match the diagram in the owners manual (also shown in post #7). Do not lift from here.

In the diagram, the lift point is clearly forward of the double-tear-drop cover for the oil drain plug. GrizzlyPath's orange circle is clearly rearward of that same cover.

The red circle from ElectroBoy's post is the correct spot.
 

Members online

Forum statistics

Threads
278,305
Messages
3,554,042
Members
248,016
Latest member
Advally Service

Trending content

Back
Top