
You are using an out of date browser. It may not display this or other websites correctly.
You should upgrade or use an alternative browser.
You should upgrade or use an alternative browser.
jacking points
- Thread starter cd121082
- Start date
Register to hide this ad

KidVermicious
New member
What do you mean "nothing"? The jack didn't work, or it didn't go high enough to lift the wheels?
Assuming the jack works, use a block of wood between the jack and the lift point, or lift directly at the control arm so the suspension doesn't droop.
Assuming the jack works, use a block of wood between the jack and the lift point, or lift directly at the control arm so the suspension doesn't droop.

jbstrd
New member
So i was trying to lift the front of the 4Runner to test fit some wheels and looked at the book and used the points suggested there with my 2.5 Ton floor jack and nothing. Where would you guys suggest i use the jack from? thanks
this is the jack i was using.
Sears.com
If you want to lift both at the same time, there is a circle in the center of the rear portion of the stock front skid plate. There is a reinforced piece that is there for this very reason. I believe it butts up against the crossmember. Lift on that section, place two Jack stands (one on either side) along the frame rails just behind the front wheels, then lower the vehicle onto the Jack stands.
If you only need to do one wheel at a time, I use the bottom of the front lower control arm.

manofsteele2003
New member
Well according to the website that is a low profile jack that has a limit of 14". While there are points you could lift (rear axle, control arms) and be able to get it off the ground but most other places (most of the frame) probably won't cut it. I would suggest getting another jack as most lift about 17"-19" lift especially if you are considering getting a lift. But I guess it's not necessary just easier.

BobsTrail
Senior Member
If you want to lift both at the same time, there is a circle in the center of the rear portion of the stock front skid plate. There is a reinforced piece that is there for this very reason. I believe it butts up against the crossmember.
I learned something new again from this forum. I took off the skid plate and noticed the circular area before rotating the tires.
:doh:
Last edited:

BlackWorksInc
New member
Well according to the website that is a low profile jack that has a limit of 14". While there are points you could lift (rear axle, control arms) and be able to get it off the ground but most other places (most of the frame) probably won't cut it. I would suggest getting another jack as most lift about 17"-19" lift especially if you are considering getting a lift. But I guess it's not necessary just easier.
That's weird, the 4th Gen bottle jack is identical to the 5th Gen's and I measured mine in at about 19" fully extended (that's what she said, heyo!)
http://www.toyota-4runner.org/5th-g...too-short-my-4r-trail-2015-a.html#post1810747
I learned something new again from this forum. I took off the skid plate and noticed the circular area before rotating the tires.
:doh:
You know... I always noticed that reinforced part but never gave it much though and now it makes sense. lol :hatsoff:


dsfra
Member
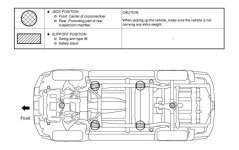
VEHICLE LIFT AND SUPPORT LOCATIONS
1. NOTICE ABOUT VEHICLE CONDITION WHEN RAISING VEHICLE
(a) The vehicle must be unloaded before jacking up or raising the vehicle. Never jack up or raise a heavily loaded vehicle.
(b) When removing any heavy components like the engine or transaxle, the vehicle center of gravity will shift. To stabilize the vehicle, place a balance weight in a location that will prevent the vehicle from rolling or shifting, or place a transmission jack under the appropriate jack position at the opposite end of the vehicle.
2. NOTICE FOR USING 4 POST LIFT
(a) Follow the safety procedures outlined in the lift's instruction manual.
(b) Do not damage the tires or wheels while driving onto the lift.
(c) Use wheel chocks to secure the vehicle.
3. NOTICE FOR USING JACK AND SAFETY STANDS
(a) Work on a level surface. Use wheel chocks at all times.
(b) Use safety stands with rubber attachments as shown in the illustration.
(c) Set the jack and safety stands exactly under the specified locations on the vehicle.
(d) Do not work on or leave the vehicle supported only by a jack. Be sure to support the vehicle with safety stands.
(e) When jacking up the vehicle, first release the parking brake and move the shift lever to N.
(f) When jacking up the entire vehicle:
(1) When jacking up the front wheels first, make sure wheel chocks are behind the rear wheels.
(2) When jacking up the rear wheels first, make sure wheel chocks are in front of the front wheels.
(g) When jacking up only the front or rear wheels of the vehicle:
(1) Before jacking up the front wheels, place wheel chocks on both sides of the rear wheels.
(2) Before jacking up the rear wheels, place wheel chocks on both sides of the front wheels.
(h) When lowering a vehicle that only has its front or rear wheels jacked up.
(1) Before lowering the front wheels, make sure wheel chocks are in front of the rear wheels.
(2) Before lowering the rear wheels, make sure wheel chocks are behind the front wheels.
1. NOTICE ABOUT VEHICLE CONDITION WHEN RAISING VEHICLE
(a) The vehicle must be unloaded before jacking up or raising the vehicle. Never jack up or raise a heavily loaded vehicle.
(b) When removing any heavy components like the engine or transaxle, the vehicle center of gravity will shift. To stabilize the vehicle, place a balance weight in a location that will prevent the vehicle from rolling or shifting, or place a transmission jack under the appropriate jack position at the opposite end of the vehicle.
2. NOTICE FOR USING 4 POST LIFT
(a) Follow the safety procedures outlined in the lift's instruction manual.
(b) Do not damage the tires or wheels while driving onto the lift.
(c) Use wheel chocks to secure the vehicle.
3. NOTICE FOR USING JACK AND SAFETY STANDS
(a) Work on a level surface. Use wheel chocks at all times.
(b) Use safety stands with rubber attachments as shown in the illustration.
(c) Set the jack and safety stands exactly under the specified locations on the vehicle.
(d) Do not work on or leave the vehicle supported only by a jack. Be sure to support the vehicle with safety stands.
(e) When jacking up the vehicle, first release the parking brake and move the shift lever to N.
(f) When jacking up the entire vehicle:
(1) When jacking up the front wheels first, make sure wheel chocks are behind the rear wheels.
(2) When jacking up the rear wheels first, make sure wheel chocks are in front of the front wheels.
(g) When jacking up only the front or rear wheels of the vehicle:
(1) Before jacking up the front wheels, place wheel chocks on both sides of the rear wheels.
(2) Before jacking up the rear wheels, place wheel chocks on both sides of the front wheels.
(h) When lowering a vehicle that only has its front or rear wheels jacked up.
(1) Before lowering the front wheels, make sure wheel chocks are in front of the rear wheels.
(2) Before lowering the rear wheels, make sure wheel chocks are behind the front wheels.
Attachments
Last edited:
manofsteele2003
New member
That's weird, the 4th Gen bottle jack is identical to the 5th Gen's and I measured mine in at about 19" fully extended (that's what she said, heyo!)
http://www.toyota-4runner.org/5th-g...too-short-my-4r-trail-2015-a.html#post1810747
You know... I always noticed that reinforced part but never gave it much though and now it makes sense. lol :hatsoff:
He wasn't using the factory bottle jack, he was using the Sears one in the link he attached to his post.
Thanks everyone for the information. I usually dont use the one provided cause well most of the time they are junk. I am going to try and jack it at the cross member in the front and see how it goes lol.He wasn't using the factory bottle jack, he was using the Sears one in the link he attached to his post.

darrylj
New member
I would suggest getting another jack as most lift about 17"-19" lift especially if you are considering getting a lift. But I guess it's not necessary just easier.
When I got my 4runner I had to order a taller jack as my existing hydraulic jacks were for a low car and were too short. On the other hand, on the car they kept punching rusty holes through the unibody "jack points", so welcome body-on-frame!
I've got one of these on the way, a combo jack stand / jack and we'll see how it works out. The jack raises it, the jack stand holds it.
Amazon.com: Powerbuilt 640912 All-In-One 3-Ton Bottle Jack with Jack Stand: Industrial & Scientific

kboxvegas
New member
When I got my 4runner I had to order a taller jack as my existing hydraulic jacks were for a low car and were too short. On the other hand, on the car they kept punching rusty holes through the unibody "jack points", so welcome body-on-frame!
I've got one of these on the way, a combo jack stand / jack and we'll see how it works out. The jack raises it, the jack stand holds it.
Amazon.com: Powerbuilt 640912 All-In-One 3-Ton Bottle Jack with Jack Stand: Industrial & Scientific
Interesting product, had a laugh at 1:04 in the video of the product page though. Shows a guy about to lift the truck by the cheap nerf bars. Wish they would have shown the result of that.:crazy:

Chsbrgr
New member
Here's a link to a quality bottle jack system for those of us who drive "soccer mom stock" 4Runners and don't have many ways to use a high lift.
Safe Jack Bottle Jack Recovery Kit With Bottle Jack
Safe Jack Bottle Jack Recovery Kit With Bottle Jack
Chart source?
Thanks for the chart. I cannot find this anywhere in the owner's manual and my 2016 did not come with a maintenance supplement mentioned in so many posts in this forum. Would you mind sharing where you found this info...? I'm hoping to find much of the maintenance info that didn't seem to come with my ride. Thx.
VEHICLE LIFT AND SUPPORT LOCATIONS
1. NOTICE ABOUT VEHICLE CONDITION WHEN RAISING VEHICLE
(a) The vehicle must be unloaded before jacking up or raising the vehicle. Never jack up or raise a heavily loaded vehicle.
(b) When removing any heavy components like the engine or transaxle, the vehicle center of gravity will shift. To stabilize the vehicle, place a balance weight in a location that will prevent the vehicle from rolling or shifting, or place a transmission jack under the appropriate jack position at the opposite end of the vehicle.
2. NOTICE FOR USING 4 POST LIFT
(a) Follow the safety procedures outlined in the lift's instruction manual.
(b) Do not damage the tires or wheels while driving onto the lift.
(c) Use wheel chocks to secure the vehicle.
3. NOTICE FOR USING JACK AND SAFETY STANDS
(a) Work on a level surface. Use wheel chocks at all times.
(b) Use safety stands with rubber attachments as shown in the illustration.
(c) Set the jack and safety stands exactly under the specified locations on the vehicle.
(d) Do not work on or leave the vehicle supported only by a jack. Be sure to support the vehicle with safety stands.
(e) When jacking up the vehicle, first release the parking brake and move the shift lever to N.
(f) When jacking up the entire vehicle:
(1) When jacking up the front wheels first, make sure wheel chocks are behind the rear wheels.
(2) When jacking up the rear wheels first, make sure wheel chocks are in front of the front wheels.
(g) When jacking up only the front or rear wheels of the vehicle:
(1) Before jacking up the front wheels, place wheel chocks on both sides of the rear wheels.
(2) Before jacking up the rear wheels, place wheel chocks on both sides of the front wheels.
(h) When lowering a vehicle that only has its front or rear wheels jacked up.
(1) Before lowering the front wheels, make sure wheel chocks are in front of the rear wheels.
(2) Before lowering the rear wheels, make sure wheel chocks are behind the front wheels.
Thanks for the chart. I cannot find this anywhere in the owner's manual and my 2016 did not come with a maintenance supplement mentioned in so many posts in this forum. Would you mind sharing where you found this info...? I'm hoping to find much of the maintenance info that didn't seem to come with my ride. Thx.
4Running22
New member
What's a good jacking points for rotating your tires? Let's say if I start at the driver's side can I just jack it up in the center of the driver's side frame and place two jack stands and both sides? Will it damage the vehicle if I jack it in the center of the frame?

SlvrRnnR
New member
What's a good jacking points for rotating your tires? Let's say if I start at the driver's side can I just jack it up in the center of the driver's side frame and place two jack stands and both sides? Will it damage the vehicle if I jack it in the center of the frame?
+1 would like clarification on this also. Have scoured the web and only have found one or two videos of Taco owners jacking from the center of the frame and placing 2 jack stands on one side. (to do the front to back tire rotation)
The only other info for the 4r I found was someone mentioned jack from the front center Toyota suggested point, place one jack stand (ie on the pass side) and lower jack.
Then jack from rear pumpkin (Toyota recommended) and place one jack same side under the diff axle (Toyota suggested)
Wondering if there's too much twisting doing this as your jacking the rear up with only one side of the front on a stand. I guess I could just get 4 jack stands and lift it all up evenly. Thought having one side on ground feels safer though.
Last edited:
4Running22
New member
The only other info for the 4r I found was someone mentioned jack from the front center Toyota suggested point, place one jack stand (ie on the pass side) and lower jack.
Then jack from rear pumpkin (Toyota recommended) and place one jack same side under the diff axle (Toyota suggested)
Wondering if there's too much twisting doing this as your jacking the rear up with only one side of the front on a stand. I guess I could just get 4 jack stands and lift it all up evenly. Thought having one side on ground feels safer though.
That was my other option. I was afraid too if that would cause too much twisting.
Or I can start from the rear by jacking up the rear pumpkin and place a jack stand under the diff axle (ex. passenger side). Then jack it up at the frame at the front passenger side and place a jack stand there. Would that cause twisting as well?

83Mule
New member
If I do a front to back swap, I just put the jack in the middle of the frame and lift the whole side.....swap tires and move to the other side. If I cross, I lift the front side and put a stand and use the jack on the rear axle and swap, then do the other two. I have two jacks and can just lift the whole thing at once If I want to cheat! A Harbor Freight $59 lightweight makes a great second jack and makes everything easier. I ground one of the 4 ''tabs'' on the lift point to fit in the hole in the bottom of the lower arm and it locks in and lifts one front wheel securely and can;t fall off.
4Running22
New member
If I do a front to back swap, I just put the jack in the middle of the frame and lift the whole side.....swap tires and move to the other side. If I cross, I lift the front side and put a stand and use the jack on the rear axle and swap, then do the other two. I have two jacks and can just lift the whole thing at once If I want to cheat! A Harbor Freight $59 lightweight makes a great second jack and makes everything easier. I ground one of the 4 ''tabs'' on the lift point to fit in the hole in the bottom of the lower arm and it locks in and lifts one front wheel securely and can;t fall off.
I thought about doing that as well, lifting from the center of the frame to do a front to back swap. I'm assuming that wouldn't damage the frame.
Similar threads
- Replies
- 26
- Views
- 6K

- Replies
- 0
- Views
- 11K
- Replies
- 5
- Views
- 2K


