Jerod's Supercharged T[u]RD Build

gamefreakgc

Elite Member
After years of resisting... I'm finally making a build thread. But this is not quite like most on here, rather it's a performance build and other odds and ends I've done. The "Turd" nickname came after I added the TRD logo on the side, my wife calls it a "turd" so the name stuck. I like having a vehicle that's extremely capable on-road as much as it is off-road. That's where we will begin.

My "other baby" was born on September of 1997, meaning it's a '98. I purchased it in September of 2014 when TuRD was 17 with 190,000 miles, give or take a few for a purchase price of $7,000. A bit steep for some, but it had one thing that I desperately wanted, a dealer installed TRD supercharger! I completed a JDM Engine swap in January 2019 at 221,773 miles. The replacement engine had roughly 79,500 KM on it according to the company. I completed a transmission swap in Sept 2022 at 244,300 miles with a used unit with 137,900 miles. Here's how it looked when I bought it:

gamefreakgc-albums-interior-body+mods-picture48404-gedc2688.jpg

And here is how it stands as of February 2021 (the real party is under the hood!):

sYt52K5.jpg

Virtual dyno run completed on 2/2021, 326 WHP and 347 WTQ!
gamefreakgc-albums-engine-performance-mods-picture59862-3in-intake-vs-old-intake.jpg

Exhaust clip after 3" exhaust install:
<iframe width="800" height="500" src="https://www.youtube.com/embed/stAnEI-mQMs" frameborder="0" allow="accelerometer; autoplay; encrypted-media; gyroscope; picture-in-picture" allowfullscreen></iframe>


Dyno run on May 7, 2018. You can hear it hit the speed governor... only made 229 RWHP and 256 TQ because of it:

<iframe width="560" height="315" src="https://www.youtube.com/embed/0hIotwCwv_o?rel=0" frameborder="0" allow="autoplay; encrypted-media" allowfullscreen></iframe>


YouTube

List of links to projects I've done:

Engine Swap @ 221,773 miles
Cylinder head damage due to shim spacers

Performance
5.29 final drive ratio regears with stock 265/70R16 tires - 30% shorter gears
Torque Converter 'Unlock' Switch
Supercharger Porting
3" Custom Intake with aFe filter
3" Custom Borla Exhaust
Magnecor KV85 Competition Spark Plug Wires
Maxbore.com Throttle Body
aFe Power 5R Oiled filter virtual dyno test
AEM F/IC 6 Installation - More on this below!
Pulleyboys 2.0" Pulley and Results after tuning (took it off)
1320 Performance 2.1" Pulley and Stage 2 Methanol Injection - Went with 2.1" pulley over the 2.0"
Colt Camshafts and LCE Lightweight Crankshaft Pulley - Camshafts were removed after engine damage
Eaton Detroit TrueTrac Installed
Re-Gapped Spark Plugs to 0.035"
Doug Thorley Headers, Install & Review
Electric Fan Conversion
CS144 Alternator upgrade (necessary with e-fan)
TransGo Transmission Shift Kit & Review
Tru-Cool 4490 External Transmission Cooler
Wideband Sensor - UEGO
Deckplate Mod
Airaid Intake
Big 3 Wiring Upgrade

Dyno Runs
First dyno run on Mustang AWD Dyno at 4400 ft elevation

Interior
Complete Sound Overhaul: Sound Deadening, Infinity Speakers, 10" Sub
LED Map & Dome Lights


Exterior
LED Light Bar & Headlight Upgrade
TRD Badges and Decals
Wax, rubbing compound & black trim restoration
PIAA Super Bass Horns
'02 TYC Headlight Comparison vs '98 Stock
Hood Struts and under hood LED lighting

Product Reviews
Royal Purple Ice coolant system optimizer
Royal Purple Max Atomizer injector cleaner
Royal Purple MAX ATF
Meguiar's Ultimate Compound and waxes
CRC's Guarenteed to Pass catalytic converter cleaner

And for anyone looking to install and tune the AEM F/IC 6:

Tuning Notes for AEM F/IC 6
Closed loop tuning & O2 sensor skewing notes
Closed Loop O2 Table and Fuel Map Table
AEMLog Files
 
Last edited:
Register to hide this ad
I'm not going to bore you all with nitty gritty details on oil changes, preventative maintenance, etc. I will list the projects I've done and if there was any major repairs I'll have a bit more info on how I did it.

Upon receiving the vehicle I did the following maintenance:

  • Oil change x2 (oil was sludgey)
  • Transmission fluid drain and fill
  • Coolant change
  • New shocks/strus, KYB Gas-a-Just, with new OEM height springs
  • New bushings all around
  • LBJ's replaced
  • New fuel filter
  • Regular maintenance items (spark plugs, gaskets, etc)
  • New Supercharger nose cone assembly
  • New Tundra brakes with all OEM parts

The vehicle had been neglected but not too far that I couldn't bring it back. Now that we have the boring stuff out of the way, let's get to the good stuff!

gamefreakgc-albums-mods++upgrades-picture30592-catch-can-redirects-oil-residue-into-can-where-settles-out-intake.jpg


One of the first things I added was a cheap-o catch can. I noticed after replacing my PCV valve and hose that there was a lot of oil in there, or so I thought. I checked it after my first oil change, it was sort of a latte color. Figured there was some oil in there, so emptied it and put it back in. Second oil change, an even lighter latte color (I also switched to synthetic oil). Then I realized, all it was doing was trapping water vapor plus a tiny bit of oil. Turns out catch cans are not "smog legal" in California anyway since they modify the PCV hose, which is not allowed. The smog tech said they mostly just catch water vapor anyway, which I also noticed. Oh well, was only $20. It's gone now.

gamefreakgc-albums-engine-performance+mods-picture48421-a.jpg


After reading Gadget's site I decided to try out the deckplate mod. Funny thing is... my expert butt dyno can tell when the deckplate is in or out. I'll notice a little loss in throttle response and wonder what happened, and then realize I put the plate back in on a dusty road. It is simple enough, if you don't have the special saw bit then just line up the deckplate on the box facing outwards and use a sharpie to trace around the inner circle of the deckplate. Then cut slightly beyond the marker and it's a perfect sized hole. Here's the dyno proof from Gadget's website:

1st gear 2nd 3rd
Run 9 Stock Box No Front 173.3 HP 205.5 HP 210.8 HP
Run 8 Stock Box No Elbow 170.7 HP 205.1 HP 210.8 HP
Run 7 Stock Box 168.8 HP 199.5 HP 201.8 HP

He got 9 HP at WOT for just putting a hole in the airbox. That's about as easy as free HP can get. Needless to say it was a no-brainer for us boosted folk. Another fun fact: modifying the stock airbox, even after the filter, is also not "smog legal" in California. I now have 2 boxes, one for passing smog and another for the other 729 days between smog tests.

+9 HP

Running Total
+9 HP


AIR-510-934.jpg


https://www.airaid.com/search/product.aspx?prod=510-934

Next came the Airaid intake. Now, before you say 'why didn't you just remove the boxes yourself', that's also not "smog legal" in California (noticing a trend here?). So, rather than failing smog again due to the visual check, this part has a CARB EO# which means they will approve it every time. It also gave me a platform to add a methanol nozzle to, which will come later.

gamefreakgc-albums-engine-performance+mods-picture48420-a.jpg


However I will note it does not fit on 96-98 air boxes very well, it had to be rotated slightly. Once I swapped in a 99-02 air box/MAF it fit perfectly. Just a side note for those out there.

Est. +4 HP

Running Total:
+13 HP
 
Last edited:
gamefreakgc-albums-interior-body+mods-picture48425-img-1843-1280x960.jpg


I wanted to add a stereo and some more lighting (lets admit it, our headlights suck) but my battery was not up to the task. I got an Optima red-top AGM battery from a member here and love it. It has much more capacity than my old one and allows me to run the stereo or lights with the engine off and will start up strong every time.

On top of that, I also did the "Big Three" wiring using the instructions by BigFishAllDay: http://www.toyota-4runner.org/3rd-g...wiring-ugrade-3rd-gen-toyota-4runner-how.html to make sure I'm flowing as much voltage as possibly to my engine and other components.

gamefreakgc-albums-interior-body+mods-picture48427-img-1845-1280x960.jpg


https://www.amazon.com/gp/product/B00EQ0LGE4/ref=oh_aui_detailpage_o06_s00?ie=UTF8&psc=1
https://www.amazon.com/gp/product/B00O72R7Z8/ref=oh_aui_detailpage_o07_s00?ie=UTF8&psc=1

Once the power was set up, I added a simple LED light bar under the steel bumper by cutting into the plastic valance with a hack saw. Pretty simple once you make the measurements. For us 96-98 people, just drill a couple of holes under the metal tabs (which line up perfect for me), thread a bolt through and you're golden! Love the light output it gives! The wiring was simple and I attached the relay to the side of the fender in an un-used bolt hole. The new battery terminals make hooking up accessories a complete breeze!

gamefreakgc-albums-interior-body+mods-picture48426-img-1844-1280x960.jpg


gamefreakgc-albums-interior-body+mods-picture48428-img-1848-1280x960.jpg


The switch I ordered did not fit correctly so I had to get creative to get it to fit. Worked out in the end though, after using a knock out plate and cutting a hole in the plate with a dremmel.

81YkwkQ-8%2BL._SX522_.jpg


https://www.amazon.com/gp/product/B00BQWQLPO/ref=oh_aui_detailpage_o06_s00?ie=UTF8&psc=1

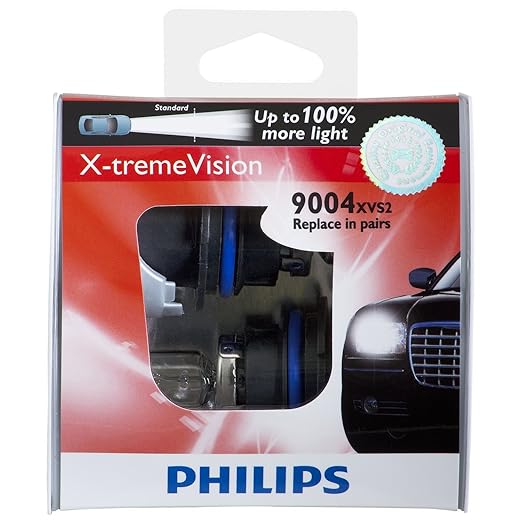
Last but not least, I added some higher wattage head lights. This actually helped a bit, I noticed a difference in brightness. Highly recommend these or something similar, as more LED headlights are coming onto the market.
 
Last edited:
More light in the cabin was also needed, at least for me and my family. Nothing worse than dropping something in the footwells and turning on the map light only to find out the map lights suck.

gamefreakgc-albums-interior-body+mods-picture48432-img-1862-1280x960.jpg


I replaced them with 5630 SMD LED's. Bonus fact, 5630's are brighter per LED than 5050's and have a great light output. I bought some simple 24 5630 LED's with 31mm festoon adapters for the map light and cargo light, attached them with doublesided tape. For the map lights, I used 31 mm festoon style LED's with 6 5050's (5630's are too big), then added a jumper wire from the ground side of the housing to the driver's map light. I just threaded it through under the headliner using a coat hanger and had it pop out where the rear view mirror attaches to the roof. With the jumper wire in place, when you open a door the driver's map light turns on. If you press the driver's side map light button, the dome light comes on as well as the map light. If you press the passenger's side map light button, only the map light turns on. Perfect.
 
Last edited:
It's AUDIO TIME!!!

Taken from the thread I started here:

http://www.toyota-4runner.org/3rd-gen-t4rs/203866-thinking-about-upgrading-your-sound-system-do.html

Here's my complete sound overhaul - on a modest budget. I just finished installing sound deadening on the front doors and new Infinity component speakers up front powered by a modest amp. I knew the stock speakers were pretty awful since I've swapped speakers in other cars before but this is the first time I've gone a more serious route. Here's what I've done:

Installed Alpine head unit for BT & USB - $99
Alpine CDE-143BT CD receiver at Crutchfield.com

Installed Alpine power pack, 45RMS x 4 (a bit higher since the Infinitys run at 3 ohms, not 4) - $100. Best part? NO EXTRA WIRING NEEDED!
Alpine KTP-445A Power Pack Compact upgrade amplifier for your Alpine receiver ? 45 watts RMS x 4 at Crutchfield.com

Installed 6 1/4 in. Infinity Reference X Components - $105
Reference 6500cx - Infinity US

Sound deadening on front doors as well as on the center console and transmission tunnel - $395 total spent in materials for the entire vehicle from RAAMaudio - Automotive sound deadening products Also, they have a GREAT how-to article for newbies like me, not every surface needs to be plastered with the stuff for great results. I ordered an additional amount, now up to $395. Wanted more foam and mat materials to do the entire cargo area since it's so noisy compared to the front end now.

6 1/4 in. Coax Infinity Reference X speakers on rear doors (current ones are completely blown out) - $70
Infinity Reference X REF-6502ix 6-3/4" 2-way car speakers — also fit 6-1/2" openings at Crutchfield.com

Sound deadening in the rear cargo area, it's noisy.

Powered Blaupunkt 10" subwoofer - $216
Blaupunkt Blue Magic XLb 250 A Single 10" subwoofer enclosure with 250-watt amp at Crutchfield.com

Wiring kit from Crutchfield, 10 gauge - $40 Don't get this one: http://www.crutchfield.com/p_142PA8BX/EFX-PA8BX-Wiring-Kit.html?tp=2919, the RCA's failed in a week. I'm so bummed. Get the Kicker or higher quality ones that have RCA's made with copper for more strength.

After doing the front end of the vehicle, it is a HUGE improvement in sound, at least to me. I still get a lot of road noise from the rear of the vehicle but the speakers sound awesome. I tested it along the way to hear improvements to see what was most effective:

  1. Adding the amp brought it to life. These Infinitys really shine with an amp, but I knew that already. Clear highs and good bass, almost feels like I have a small sub tucked away somewhere!
  2. The sound deadening quieted down the cabin and increased bass response but more importantly, took away all the rattles I had in the door panels.
  3. Just swapping the speakers did very little to improve sound, even though Infinitys are good quality. Would have been a waste of the speakers if I stopped there.

Now that I'm really going at it, an amp and sound deadening or some sort of insulating foam is a must. Those showed way more improvement than just swapping speakers.

Also, no more distortion at low frequencies that was hurting my ears :( Did I mention I did not have to do any wiring for the amp? That was the best part, it's literally plug and play. Only tricky part was where to mount it, I ended up putting it right below the head unit but far enough away that heat would not be an issue. I'm all for easy routes, and besides a new head unit plus a new amp for $200 is a complete steal. Crutchfield sells open packages for cheap, and Amazon and Ebay will have steals if you watch long enough.

I've put in about $900 to do the whole 4Runner, but it could be done for less if you're not so picky about sound. There are some decent Alpine or Pioneer speakers out there for much cheaper, I just love the sound of the Infinity Reference X line. Decent bass but the mids and highs just sound sooo good to me. Highly recommend going to Fry's or a car audio store to listen to speakers before you buy, they really do sound different when compared. If you guys want some photos I can take some of the next parts of the installs, such as my plan on how to fit 6 1/4 in the 5 1/4 openings on the rear doors and such. I was really cramped for time over the past week so I didn't have any time for photos of what I did up front but could take off the door panel if you really, really want me to. I've put in about 10 hours total so far with the install, it's slow going especially when I have to solder new wiring but not hard at all.

UPDATE: Just finished the deadening and wow, what a difference. The rear cargo really is the problem spot in our vehicles. There's still engine noise but there's nothing coming from the back of the 4Runner anymore. All the sounds are still there but reduced, if that makes sense. Also pretty much all high-frequency sounds are gone. I can hear my wife talk to me much, much better than before.

If you wanted to go one step further, do the front floor, that's the next spot that would need it. I'm not going to though, I'm happy with what I've got.

Anyway, hope this helps someone looking to plan their next sound upgrade on their 4Runner! Here's the photos for reference (I adjusted my crossover settings so had the door panel off this evening):

Tweeter:

gamefreakgc-albums-interior-body+mods-picture35039-tweeter.jpg


That's right, I glued it, just like how the stock ones were. The ones I have are in a solid casing, there's no magnet to move like the woofers. The component set had three different mounts but there's not enough space to fit it behind the grill (the stock tweeter is very thin, probably why it sounds bad!). Gorilla Glue and a clamp and we're done! All you audiophiles are probably cringing right now :)

Here's a few more photos for kicks:

Crossover location inside the door above the support bar (not deflecting any sound waves and not blocking the window operation):

gamefreakgc-albums-interior-body+mods-picture35041-crossover-location-inside-door.jpg


New speaker on the old mount I did use the supplied mount provided in the kit for a more secure fit:

gamefreakgc-albums-interior-body+mods-picture35040-gedc3062-768x1024.jpg


Finished product. Not pretty on the outside but it sounds awesome and nobody sees it anyway!

gamefreakgc-albums-interior-body+mods-picture35038-gedc3059-1024x768.jpg


Also put foam on the inside of the door panel, took away a lot of rattles. I used twice as much foam as I did sound deadening:

gamefreakgc-albums-interior-body+mods-picture35037-gedc3057-800x600.jpg


More photos, updated 9/8

Routed the power wire for the amp through the firewall plug (poked a hole with a screwdriver)

gamefreakgc-albums-interior-body+mods-picture35479-power-wiring-through-hole-firewall.jpg


And then ran it under the trim to the back. Also ran my RCA's on the OTHER side to remove any risk of sound contamination.

gamefreakgc-albums-interior-body+mods-picture35477-hiding-wires.jpg


Installed the volume control knob in the pocket under the head unit using Velcro. Great location and easy to remove if I ever need to. If you haven't bought a large supply of Velcro yet... it makes life so much easier.

gamefreakgc-albums-interior-body+mods-picture35478-installing-volume-knob.jpg


Stripped the interior (which is a whole lot easier than it looks, took all of an hour) and added sound deadening. I ran out though so waiting on some more to come in.

gamefreakgc-albums-interior-body+mods-picture35480-all-torn-up.jpg


Took out the plastic pocket and glued some carpet in there instead. Now my storage is 3x what it used to be! No more rattles either. Shout out to [MENTION=65101]BrianSD_42[/MENTION] for his photos that gave me the inspiration.

gamefreakgc-albums-interior-body+mods-picture35481-storage-compartment-expansion.jpg


Bonus pic of the other side in progress.

gamefreakgc-albums-interior-body+mods-picture35482-sound-deadening.jpg


All I have left to do is finish the floor of the cargo area and I'm DONE!

Post #2:

Ok, had some time last week to do the rear doors as well as some of the interior panels, I took a few photos that I hope will help some people. I will also show how I mounted 6 1/4 in speakers in the rear doors. It was a pain, but doable.

gamefreakgc-albums-interior-body+mods-picture35280-flattening-old-speaker-mount.jpg


First, how I mounted the speakers in the rear doors. I took the existing plastic mount, trimmed it flat and traced it on 0.22" MDF board that I picked up at Home Depot. This thickness was perfect, not too thick but still rigid.

gamefreakgc-albums-interior-body+mods-picture35281-new-speaker-mount.jpg


Then I cut out the opening by tracing the mounting bracket supplied by Infinity. I have to say, that bracket was super helpful since it had hole alignments that fit perfectly for a Toyota. I did have to trim off some very long screw mount holes, but nothing terrible. I ended up putting screws straight through the bracket, MDF and into the door panel in the stock holes, except for one. If this is not an option for you, you'll have to cut out a second "ring" for a mounting bracket and then either glue it to the MDF board or sink the mounting screws so they don't stick up, and then put in more screws to hold the speaker to the ring.

Wiring was simple, no crossover to deal with.

gamefreakgc-albums-interior-body+mods-picture35282-trimming-door-panel.jpg


The harder part was trimming the door panel. This does cut into the inside of the pocket, but there's extra space in there so you don't notice it. Even with taking 2" off the side there's no chance of anything falling inside the door. If you take off the panel you'll see what I mean.

gamefreakgc-albums-interior-body+mods-picture35279-center-pillar.jpg


Also stuffed the center pillar behind the door with foam and coated over some of the holes in the metal. No more echoes. BE CAREFUL WITH THE CLIPS! These metal ones tend to bend and break, one snapped off and was lost in the pillar. No need to detach anything above the removable panel, that's where I went wrong.

My Infinity's sound AWESOME now that they are tuned a bit to my liking. They actually have really good mid-bass now that the doors are done and essentially act as custom enclosures. With the 10" sub it sounds fantastic. Went with this one since it's easy to wire, just run power, ground and RCA's. Amp and sub come pre-loaded in the enclosure. No remote wire needed!
 
Last edited:
Next in line was the pre-methanol injection parts. I need a way to see my Air to Fuel Ratio or AFR, so a wideband sensor was in order.

gamefreakgc-albums-engine-performance+mods-picture48422-a.jpg


https://www.amazon.com/gp/product/B00N3VGPYS/ref=oh_aui_detailpage_o04_s00?ie=UTF8&psc=1
https://www.amazon.com/gp/product/B00R8NIXME/ref=oh_aui_detailpage_o05_s00?ie=UTF8&psc=1

I ordered and installed an AEM UEGO wideband and placed it in the shifter trim bezel. It's quick, accuarate, and has a data out wire that I hope to use in the future for tuning. Great product. That little light you see next to it is a simple LED I put on the power wire of the methanol injection system so I know when the pump is on and running.

Also, being in the wonderful state of CA I am yet to see if I can pass smog with a wideband sensor, so I bought a bung plug in case I need to remove the sensor to pass smog. We will see.
 
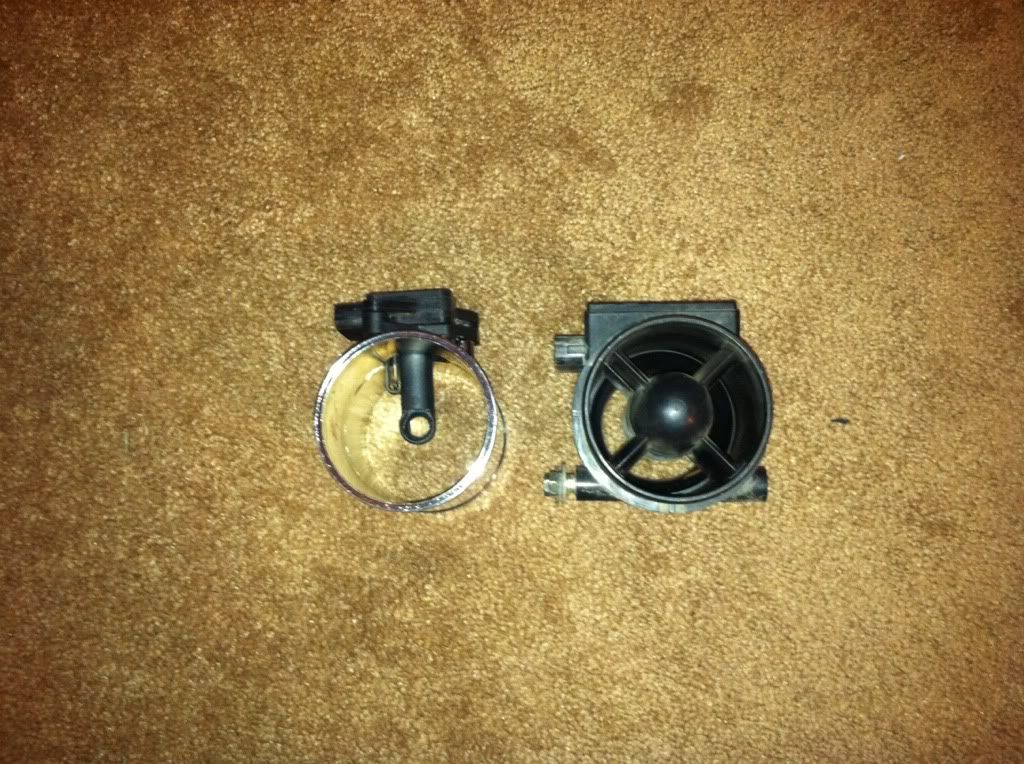
I want to free up as much airflow as possible, and heard of this mythical "MAF swap" from the turbine design to the smaller MAF in newer 99-02 4Runners. Here's what I am talking about:

a6329712.jpg~original


Smaller restriction = more air flow. Turns out, all you have to do is move the black wire from the end, over 4 spots like this:

210671d1467854764-maf-conversion-wiring-02-maf-98-2015-07-21-23.23.36.jpg


Thanks to [MENTION=106741]bambi_runner6[/MENTION] for the photo! Hoping this photo lives on to help others and to encourage people to learn Elvish.

So all that is needed is a small screwdriver. First, pop out the white lower section of the MAF plug. Pry under it and it'll come out. Next, you'll see little black tabs under each wire connector. Pull on the wire a bit on the backside while prying the little tab down. It should pop down and stay in place. Do this to all five wires and pull them out the back of the connector.

Next, move the black wire from the end to the second to last position as shown in the photo. No other wires move around. Then reinsert the wires until each one "clicks" in place. Re-insert the white lower portion and you are done!

What's interesting is that my Long-Term Fuel Trims went from roughly +9% (from the deckplate and Airaid tube) to +19.5%. I'm flowing roughly 10% more air in than before, not bad! The computer adjusts just fine to the newer MAF's as well. Now that I've got more airflow, it's time to crank up the boost!

P.S. You will also need to swap the airbox with the 99-02, since the MAF sits in the airbox, while the turbine style actually is part of the intake.
 
Last edited:
Great start to your thread...looking forward to your future posts

I'm sort of doing this backwards... since I'm posting up the pics & stuff I've done but posted elsewhere on the forum! But better to have it all in one place, plus it's going to get good once I start adding the real go-fast parts!
 
Nice thread!

I've sound deadened the front doors and the rear cargo floor, but that's it. I had plans and bought the stuff to do the entire truck minus the roof, but never got around to it. You might have just inspired me to finally do it this weekend. I think the weather is supposed to be pretty nice this weekend. I also might remove my box on the passenger side and put some carpet in there for the increased storage area.

What kind of carpet did you use? Just some sort of cheaper carpet from Lowes/Home Depot?

That seems like a good spot to keep softer things like straps, blanket, ropes, etc. I wouldn't want to keep shackles or anything heavy back there because I'd be afraid of denting the body panels.
 
Nice thread!

I've sound deadened the front doors and the rear cargo floor, but that's it. I had plans and bought the stuff to do the entire truck minus the roof, but never got around to it. You might have just inspired me to finally do it this weekend. I think the weather is supposed to be pretty nice this weekend. I also might remove my box on the passenger side and put some carpet in there for the increased storage area.

What kind of carpet did you use? Just some sort of cheaper carpet from Lowes/Home Depot?

That seems like a good spot to keep softer things like straps, blanket, ropes, etc. I wouldn't want to keep shackles or anything heavy back there because I'd be afraid of denting the body panels.

I never did the foot wells (didn't want to remove front seats and the budget was a bit high for more material), but the rear doors make a difference too. For passengers, the rear doors +2 layers on the rear cargo area make a huge difference. A professional installer said that the 4Runners have some of the noisiest cargo areas out there and said he always puts a layer of mat, then foam, then mat, then foam again. It worked well for me.

It's just cheapo carpet from Home Depot. The 3M spray on adhesive made it go on very easy too, and no smearing glue around. It pretty much tripled my storage compartment, in there I have:

Wheel spacers (for spare to clear Tundra calipers)
First aid kit
Glow Stick
2 paper atlases (one nationwide and one just California)
Full length of rope
Jumper cables (12 ft)
Ratchet straps
Bungee cords

So yeah, it's worth doing for sure.
 
I'm sort of doing this backwards... since I'm posting up the pics & stuff I've done but posted elsewhere on the forum! But better to have it all in one place, plus it's going to get good once I start adding the real go-fast parts!

I am doing something similar with my thread...been lurking here for a long time, and now its time to share a bit
 
Last edited:
Here comes the fun part. I knew I wanted to run a smaller pulley but needed more fuel to run it safely at sea level.

00000001%20trd%20pulley-500x500.jpg


I purchased a 2.1" pulley from a local performance shop, 1320 Performance, also found online here: http://1320performancestore.com/image/cache/data/00000001 trd pulley-500x500.jpg

Installation is simple but in order to run it safely you need more fuel. The stock system tops at 7 PSI, this runs at about 11 PSI so you need a lot more fuel. I wanted to try out methanol injection, so I bought a Stage 2 kit from Snow Performance.

212-2T.jpg


I don't want to get in too much detail on the installation, since it's up to you how you want to install it. PM me if you want more details. I put the nozzle in the bottom of the AirAid tube as directed, I put the pump on the driver's side fender wall just below the battery tray, and used the stock washer fluid reservoir for the fluid, which holds about 0.75 gallons (3 quarts). The methanol injection does not "add power" just allows for more boost to be run safely. I'm currently running a #3 injector, which is a bit much for this engine, but is about right for AFR's. I really just need bigger injectors and reduce this to a much smaller nozzle that turn on sooner. I currently have it set to turn on at 5 PSI and max at about 11 PSI, so far from perfect.

+4 PSI = ~30 HP

Running Total:

+43 HP
(and yes, I will get this thing on a dyno soon!)
 
Last edited:
My 4Runner's running pretty good now, but with the extra power I'm realizing the limitation of the stock transmission. the gears are always searching and the 1st->2nd gear shift is VERY sloppy and slow.

e346e_340-hd2.jpg


https://www.summitracing.com/parts/trg-340-hd2

[MENTION=121903]Black798[/MENTION] did an AWESOME write up on how to install a TransGo Shift Kit here, I take no credit for doing this on my own: http://www.toyota-4runner.org/3rd-gen-t4rs/223578-transgo-340-hd2-install-reveiw.html. The install was difficult because when I took out the valve body and opened it up, it slipped out of my hands due to all the oil on it and dropped all the bearings out. I tried to put it together as best I could but the tranmission ran TERRIBLE. Luckily, Black798 helped me out and I stole an extra bearing from a spare transmission in the backyard since I had lost one and all was well.

Also, get a solid gasket for the transmission pan while you are at it: https://www.summitracing.com/parts/fel-tos18685

Normal driving around town and in traffic, etc there's little change which is a good thing. Shifts are quiet and smooth, no noticeable difference for the average driver. The 2-3 shift is a bit quicker but it feels the same. ECT on makes it hold the RPM's a bit higher than usual, close to 3k RPM but nothing crazy since it did that before.

At about 1/2 or more throttle is when you notice the change. The shift is very quick and there's a little "jolt" snapping into the next gear. Acceleration is a bit of a jump but once again nothing crazy. The difference here is that with the ECT Power off (or for those that don't have it) the transmission shifts at higher RPM's and doesn't bog down at low RPM's. Those without a supercharger won't know quite what I'm talking about here but that's ok. Basically it acts as if you had ECT power on, without it on. And with it on, it revs about 3k RPM before shifting, allowing you to use more of the power band.

WOT runs - This is where it is noticed the most. I used the "truck" settings not the "hot rod" because I didn't want it to shift funny at normal driving speeds for my wife. She drives pretty conservative anyway. At wide-open-throttle, this kit shifts VERY fast. My 1-2 shift no longer jumps around searching for a gear like it did before with not ECT Power on. I basically always kept ECT on, since without it the gears would not downshift and it would bog down at sub-3k RPM's and not respond well. Now it act like it should. Once again, not sure if those without a supercharger will know what I mean by this but those that do will understand. This also helps eliminate the "low RPM ping" that many complain about since it won't stay at low RPM's with any substantial boost. With ECT Power on at WOT - I have yet to try this more. The few times I did it responded nicely and rev'd very high and used all of the power band, which it USUALLY did before but once again, the stock transmission acts funny sometimes and once in a while it would upshift then immediately downshift again, which basically robbed power and make for a very jerky ride. It has yet to do this and shifts fast (read: it jerks because it shifts so fast!). I don't have any times to share comparisons though and a video does not do the kit any justice since it is felt by the driver, not observed.

My conclusion - This kit does not magically "unlock tons of HP" or something like that. What it does is shorten shift times and gets rid of lazy shifts especially going from 2-3 but also 1-2, and helps hold a gear higher under more normal/aggressive driving. Of course, if you are on a track quicker shifts equals faster times but that's not what I was after.

Contrary to what you'll read online about Gadget's thoughts on a valve body upgrade being necessary (some of you will recognize his site here: Transmission Modifications) the stock transmission works fine. As long as you have an external cooler on it or change the fluid regularly there's no issues. Performance wise it acts funny, especially once you go beyond just a stock supercharger since it'll search for gears sometimes but nothing that threatens the integrity of the transmission. Those with ECT Power will notice it cleans it up a bit, but not entirely. This kit makes it work in sync with the extra power nicely. However, being that we have only a 4 speed transmission and in WOT situations you're only using 3 gears, this only is affecting two shifts. That's why it's not a huge game-changer. If we had a 5-speed or 6-speed, this would be a whole different story!

This is not for the average DIY'er, which I consider myself to be. Without the help here on the forums I would not have been able to successfully complete the job and I almost took on more than I could handle. Do this upgrade at your own risk and have a contingency plan if your transmission doesn't work right after the install.
 
Last edited:
My exterior needed a fresh new looks, so I figured some new wheels and paint was in order. I had a set of Tacoma TRD wheels in my backyard I took off another 4Runner but the paint was in bad shape. Great excuse to try painting my own wheels!

hwp102_052213.jpg

I decided on Graphite Duplicolor Wheel Paint, found here at Oreilly's for cheap: https://www.oreillyauto.com/detail/...al-coating-18076/wheel-coating/hwp102/4268146. Also picked up some self-etching primer and clear coat. I love the look of the dark silver color contrasted against the Desert Dune paint:

gamefreakgc-albums-interior-body+mods-picture48469-wheels-duplicolor-graphite.jpg


I also cleaned up the existing paint job since my paint was scratched, faded and looking very dull. This was a 3-step process for me, since I have light colored paint. I also had some deeper scratches on the doors I knew that wax alone would not take care of.

g1016_smthsrfcclyktcopy.jpg

First step was to use a clay bar and cleaning liquid to get all the sap, grime, tar, and other hardened stuff off my paint. This took a while but made the surface silky smooth when done.

g17216.jpg

Next step was Ultimate compound using a wool bonnet one a rotary tool from Harbor Freight. I kept the speeds low and make sure I got all areas evenly. This took out all the scratches and smoothed it out very nicely. This must be done with care otherwise you can burn your paint.

Taping is a must before you start applying wax or compound.

a1216p.jpg

Since I have light paint and not dark, I didn't need a polish so went straight to wax. This one's nice since if I ever decide to wax again, this cleans & waxes the paint in one go. Less is more here too, it doesn't take much wax. The more you put on the harder it is to take off too. The finished product on the paint was fantastic, I could see my reflection in the doors and hood! BTW, this bonnet that fits over the buffing pads was awesome to polishing up the wax at the end: Shurhold 3153 Microfiber Bonnet

But now my black trim looked dirty and unsightly...

06112.jpg

This scrubbed in with a small brush was a lot of work in the valance and running boards but took out all the white grossness that had built up over the years. I finished it off with a black silicone liquid sealer and it looks brand new! Here's the finished product (with decal):

gamefreakgc-albums-interior-body+mods-picture48468-img-1888-1280x960.jpg


gamefreakgc-albums-interior-body+mods-picture48467-img-1887-1280x960.jpg
 
Headers!

So, now is where my build takes a turn for the better in performance, but turn for the worse for my bank account.

I realized that I wasn't going to do anything halfway and my current setup with the pulley, methanol injection just wasn't cutting it anymore. I want to get serious with my 4Runner. What's next you might ask? Headers.

I've not seen a good resource for the Doug Thorley Shortie Headers for our 4Runners, so writing this for future reference for all members & 4Runner enthusiasts.

Below you'll find the Short Review (if you don't want to read it all) and the Full Review.

Short Review:

The headers give a nice grunt across the entire powerband. It’s not going to blow your socks off, but a subtle increase in power. You'll notice an increase for passing, accelerating, or flooring it. The installation for 96-98 Autos is a complete nightmare. I am unsure about 99-00, but for 01-02 years it would fit better, or better yet, a manual transmission. Tacomas have an easier time as well than 4Runners.

Ratings:

Install – 2 out of 10, barely fits. Lots of fabrication needed for 96-98.

Power – 7 out of 10, nice increase with a supercharger. Not huge, but just the next step in building out a 4Runner with a supercharger. It's like the difference between having your A/C on, then turning it off to free up HP.

Noise – 5 out of 10, noisier under heavy throttle but the sound isn’t my favorite.

Overall – 5 out of 10. There’s a reason why this was one of the last performance mods I’m going to do on my 4Runner. It’s expensive, difficult, but once it is on, you never have to worry about it again.

Full Review:

I purchased the Doug Thorley Headers, Part #: THY-507-C from Auto Acessories Garage: https://www.autoaccessoriesgarage.com/Exhaust/Doug-Thorley-Header?set-vehicle=1. With a coupon code, I paid $665.00, which is the cheapest price I could find anywhere. Since I live in the red-tape filled state of California, having it 50-state smog legal is imperative, which it is. You might be asking, why even bother with headers? My answer:

gamefreakgc-albums-engine-performance+mods-picture47559-best-sr-ct.jpg


My vehicle is also supercharged but with a 10 PSI pulley and methanol injection, so the gains might even be higher for me since I’m cramming even more air into the engine, and it needs to get out quickly.

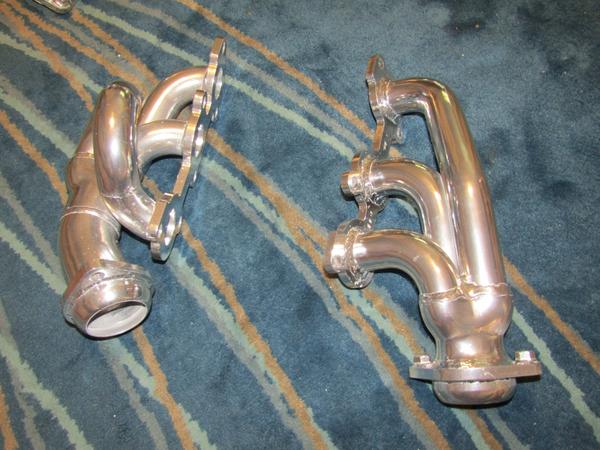
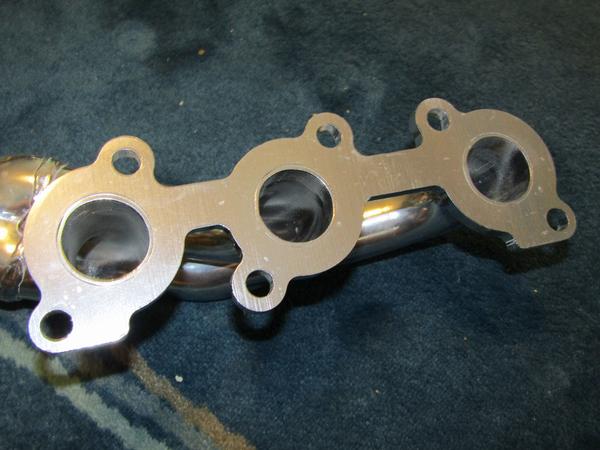
Upon arrival, here’s what the parts looked like:

gamefreakgc-albums-engine-performance+mods-picture47545-img-1568-1280x960.jpg


gamefreakgc-albums-engine-performance+mods-picture47546-img-1569-1280x960.jpg


gamefreakgc-albums-engine-performance+mods-picture47547-img-1570-1280x960.jpg


gamefreakgc-albums-engine-performance+mods-picture47548-img-1571-1280x960.jpg


gamefreakgc-albums-engine-performance+mods-picture47549-img-1572-1280x960.jpg


I was missing the relocation bracket and the weld-on flange, so I had to contact Auto Accessories Garage about getting the missing parts. I must say, they were extremely polite and very fast to contact Doug Thorley Headers to get what I needed. Sothern hospitality at its best! So if you do order headers, make sure all the parts are included before diving in. I liked their customer service so much, I bought some other items from them as well.

After calling around looking for a shop that would be willing to do the the installation, I was recommended to All Automotive here in my town of Citrus Heights. If anyone in the Sacramento area ever needs a quality mechanic that does top notch work, Gardner is the best I have ever seen. Treated my 4Runner like I would treat it and went above and beyond what was expected to not only install it, but make it look good in the process: Home | All Automotive Service. Seriously though, I will never go to another shop for custom work or fabrication again.

Install – 2 out of 10

The installation was a complete nightmare. I knew it was going to be bad, but once he showed me all that was needed to be done I can’t believe he didn’t just chuck the headers out of the shop and tell me to find someone else to do it. It took him 10 hours, but he only charged me for 7. That put the cost of installation at $742 (before ya’ll freak out, this was about what I was expecting).

The transmission dipstick tube had nowhere to go. He ended up bending it and creating a new bracket to hold it in place:

gamefreakgc-albums-engine-performance+mods-picture47550-img-1636-1280x960.jpg


The transmission kickdown table had nowhere to go and had to be bent (it is protected from heat at least though):

gamefreakgc-albums-engine-performance+mods-picture47551-img-1638-1280x960.jpg


The exhaust flange did not weld on the piping since the downpipe is 2.25” piping (why Toyota, why?), compared to the headers which is 2.5” so he had to weld a section of 2.5” on (note in this photo, you can see the flange welded to 2.5" pipe, then welded to the 2.25" pipe):

gamefreakgc-albums-engine-performance+mods-picture47552-img-1641-1280x960.jpg


Various hoses and wires did not fit right so he had to re-route some.

I have no welding capacity, so I knew this was out of my league from the start. Add on a wideband sensor bung and some gaskets, my total cost was…

$1432.49. Yes, you read that right.

Like I said at the beginning, this is one of the last performance mods I will ever do to my 4Runner. For half the cost of a supercharger I added 16 HP and 11 lbs of torque, maybe a little bit more. If you have a stock engine and are thinking about adding headers, I hope this points you to a blower instead.

Power – 7 out of 10

It did exactly what I thought it would do. Nothing more, nothing less.

My best comparison is like if you are doing some pulls and had the A/C on, then turned it off. That's about the power increase you'll get with these headers.

For those of us who are supercharged, I read in advance it would do a curious thing of reducing boost. Turns out, that is true. There’s less backpressure in the exhaust now so the air evacuates the combustion chamber faster, allowing for more air in and less pressure built up in the supercharger. I need less fuel to run the same 2.1” pulley now, which I’m expecting to also translate into MPG savings. I topped out at 10.7 PSI the last time I had a boost meter hooked up before the headers and it tops out now at 10.0 PSI exactly. So less boost pressure because more air is flowing.

For those of you with superchargers fighting ping or lean conditions, this might be a solution or alternative to fuel mods, and it’s smog legal. For a reference point, with the setup at WOT I was running at about 12.8ish AFR's. After putting on headers, the AFR's decreased to 10.7. I needed less fuel for the same amount of boost.

One other thing I've noticed is a reduction in exhaust temperatures, as well as engine temperatures. I'm no engineer so I don't know the full effects of this benefit, but I know that superchargers put off a lot of heat because of the compressed air and excess heat is not good for any engine. Less heat may = more timing, and my initial runs have confirmed the ECU is running more timing advance than before.

Noise – 5 out of 10

Some people like big, gurgling V-8’s rolling down the road. I am not one of those people. I don’t do any mods for the sake of noise or appearance (except for the TRD decals), purely for function or performance. At little throttle you won’t even hear the headers. At moderate throttle you’ll get a gurgling noise. At full throttle or WOT it blares a bit more, not obnoxiously but once again, I'm not a huge noise person. Some people might like it more than I do. It does sound more like a V-8 than a V-6 now though. At WOT, the supercharger is much louder than the headers, but that's partly because of the smaller pulley I have on there.

Overall – 5 out of 10

In a rating scale of 1 to 10, 1 to 5 is the lower half of the scale. I put it as a 5 because it gave the power I was looking for, but the installation totally kills any “fun factor” of modifying your engine. At the end of the day though, I’m glad I had the funds to have it done and am satisfied with the results.

Hoping this will help future 4Runner owners decide if headers are right for them and what might be required to make it all work.

MPG ratings to come once I can get myself to stop stomping on the throttle at every stop! Feel free to ask any questions and I'll try my best to answer.

UPDATE: Noticed a slight gain of 0.5-1.0 MPG's after install. Not drastic, but helps a little bit.

HP Increase:

+16 HP

Running Total:

+59 HP
 
Last edited:
If you've made it this far, congratulations! You are now at the present day, so posts won't be so fast and furious now.

Next steps from here are a higher flow fuel pump, bigger injectors, AEM F/IC 6 to tune the injectors and URD harness to wire it all in.

gamefreakgc-albums-engine-performance+mods-picture48423-stock-evo-9-fuel-pump-roughly-200-lph.jpg


Oh look what came in the mail today... it's a 200ish lph DENSO fuel pump from a Mitsubishi Lance EVO IX, Part#195130-3570. Bought it used for $20!

gamefreakgc-albums-engine-performance+mods-picture48424-stock-evo-9-fuel-pump-roughly-200-lph.jpg


This will replace the stock fuel pump and is completely plug & play, or so I hope. Also is quiet, unlike Walbro fuel pumps. This gives me more than enough fuel to drive larger injectors.
 

Members online

Forum statistics

Threads
278,309
Messages
3,554,070
Members
248,016
Latest member
Advally Service

Trending content

Back
Top