
brillo_76
Elite Member
20.57 miles per gallon isn't a 20 gallon fill up...How the hell did you have a 20 gallon fill up?

Sent from my SM-A536V using Tapatalk

20.57 miles per gallon isn't a 20 gallon fill up...How the hell did you have a 20 gallon fill up?

How the hell did you have a 20 gallon fill up?
20.57 miles per gallon isn't a 20 gallon fill up...
Sent from my SM-A536V using Tapatalk
I've thought about this and it doesn't really make sense. What gear were you testing in? I usually do 2nd and or 3rd to check fueling. If you were trying 1st, then yeah I'd say the enrichment just couldn't keep up with the RPM.

I road tuned mine in 3rd :beer: Yep speed limiter is a thing up there lol.
My 2nd gear is a bit leaner than 3rd. 12.2 in 2nd is 11.8-11.9 in 3rd. I think it just has to do with RPM resolution and the speed the RPMs climb, at least for my URD 7th setup and water meth injection. YMMV. If you mainly hit enrichment in 2nd, that's where I'd focus the tuning. Your gears are probably move through the RPMs much more quickly.
I've been having a valve tick for over a month, which has turned into a outright stumble and I started losing gas mileage and power. Once I started losing power I knew what it was: my valves were out of adjustment despite doing a valve adjustment when I put the Colt camshafts in. Here's my theory as in why:
- The Colt Cams camshafts have the same lift on the exhaust side, but almost 40% more lift on the intake side.
- Because the cams have more lift, the stock valve springs with 200k+ miles on them compressed just a tiny bit due to extra stress on the springs.
- 6 of the 9 valves that are out of spec are intake valves and all had gaps that were too big. Normally, intake valves rarely go out of spec and it's the exhaust valves that have issues. I believe this is due to the extra lift.
- I may have to do this again until the springs completely settle into their new positions with the extra lift.
I don't have it running yet, but that now brings me to 21 shims I've had to replace since installing the cams. Yikes. You should see my shim pile I have in the tool box.
So you got this "262" cam that sea2sky was selling and it was able to idle and run without specific tuning? You mentioned the intake side is 40% larger than stock so it's 7.85 + 7.85*.40 = basically 11mm of lift on the intake side and the stock valve springs accommodated that much lift? The exhaust side was the stock lift but with 262 duration?
So, I had some time to run a few times down the road and get some power readings with the two filters. Here's the chart and I'll discuss the data below:
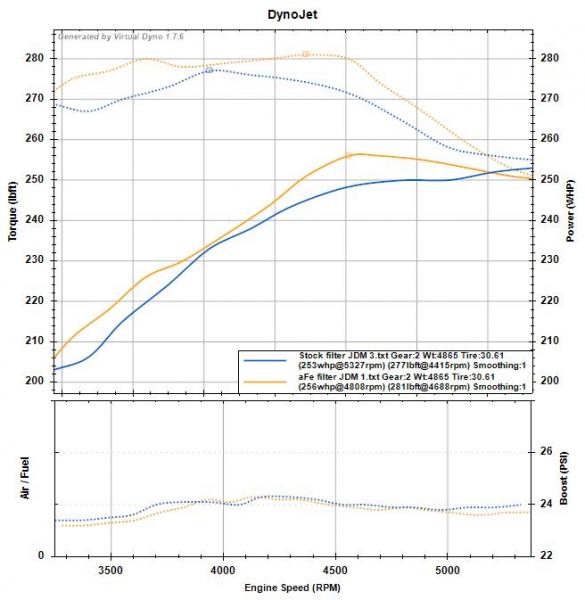
Orange line is the aFe 5R Power oiled filter, blue is my stock paper filter. Pretty conclusive by the chart this thing flows better for my engine. Now, before you ditch your paper filter on your N/A 4Runner know that my engine is heavily modified and has a higher cfm flow than stock.
That being said, I'm very pleased with how it performs. Peak gain might only be +3 HP and +4 lbs tq but max gain is +9 HP and +9 lbs tq at 4500 RPM! Now this is just preliminary data based off my AEC FIC 6 logs (using Virtual Dyno) but it's shown to be pretty darn accurate. I'm going to give this filter a straight +6 HP, the power is there. Confirms also that my intake it still too restrictive.
A few other things I learned today is that heat soak happens on the third run. You'll notice the top end REALLY drops off once you go back 5000 RPM's. That's what happened on the dyno last year too, heat is a real limiting factor on this engine. I might do another run soon when the engine is cooler for some better comparisons. I took at total of 6 runs, that was too many without allowing it to cool down.
Also, I learned that the AEM FIC reads the AFR +0.3 higher. I will need to re-tune my engine soon to correct that.
HP Gain:
+6 HP
Running Total:
+109 HP
So at this point you are 256whp/281wtq. Did you have the colt cams 262 in it? ( I imagine so because power is being made past 4500 rpm ).
You ended up with 326WHP 347TQ, what was responsible for this gain?
And the colt cams estimate of 22HP that was likely on a N/A 5vzfe setup, or was it boosted indeed? 262 cam is a pretty big step up from a small 228 cam. In other platforms with displacements around 3.0-3.5l with heads of similar design to the 5vz fe that would be around 35hp gain.
After 3 solid days of wrenching, the Colt Cams 262* grind and the LCE Lightweight Crankshaft Pulley are in! I was pressed for time so no photos... but not like it would have helped much. If you are reading this to figure out how to put them in, refer to the FSM for detailed instructions. You'll have to take off the upper intake/plenum, timing belt, radiator, and the crankshaft pulley just to swap out cams. It's a very involved job with a lot of checking, double-check, and triple checking as well as a dreaded valve adjustment.
The power is really there at 4000+ RPM's from the cams, and the lightweight pulley helps a lot with passing and quick accelerations around town. It accelerates quicker, and hauls all the way to redline very easy! I noticed a lot more power at 4500+ RPM. The supercharger helps a bit to alleviate the power drop off up there but never seemed to enjoy redlining much. now it pulls even in the 5000's with plenty of power and torque like never before! That's the whole point of performance camshafts anyway, they add power at higher RPM's.
LCE Lightweight Crankshaft Pulley - This claims 2.7 acceleration horsepower per pound removed, and is 7.5 lbs lighter. So that's 20.25 hp gain of "acceleration HP" which is a made up term, by the way. In the real world, you notice this when stomping on the gas to pass on the highway, or going from a dead stop. Less rotating mass = more power to the wheels. It adds nothing as far as engine performance but rather frees up the engine to rotate the wheels, not the pulley. However it will still show up as a performance gain on a intertia-based dyno because of science and physics stuff. Since I had to take the crankshaft pulley off anyway for the timing belt, it was a no-brainer. Easy bolt-on performance.
Colt Cams 262 degree 5VZ-FE Camshafts - These are dyno tested to gain 22 HP, and I can guess where! My engine pulls much harder at 4500-5500 RPM's and loves to redline. I need to get this on a dyno soon to see if there's extra power to bump up the redline to 6,000 RPM's but not sure. There's not really much as far as gains in the 2k to 4k range, so if you are looking for some extra torque down low these are not what you want. These cams gain power by slightly changing the intake and exhaust timing, I'm talking maybe a couple of degrees difference. Side by side the stock cams are almost identical until you look hard. It idles a little rougher than stock but combined with extra lift on the intake side over stock, provides some nice power in the upper RPM's.
This was a VERY involved job. As a few people on here also have bought them so hopefully I can provide a few tips to help in the process.
First off, you will need a digital caliper to measure the valve shim thicknesses. This is not optional. Second, a valve adjustment job is a must and you will need to custom order shims from Toyota since the exhaust valves WILL be out of spec. The shim spacers provided from Colt Cams are not quite thick enough to provide the right valve clearances (printed on the sticker under your hood). I needed to buy 9 of the 12 exhaust shims, 3 of them I was able to swap around to bring them into spec. Only 3 intake valves were out of spec initially and swapping shims around fixed all 3. Shims cost $15 each, so I was out $135 just for those.
When you fit the shim spacers supplied by Colt Cams in and you go to check the clearances, rotate the cams one complete revolution before measuring the gaps. I noticed that the oil in between the spacers and buckets would actually cause the reading to be off until it was pressed by the camshaft lobe at least once. Almost pulled my hair out thinking I had ordered the wrong size shims. Also, you will not get the clearances perfect. Since Toyota only makes them in 0.05mm increments (i.e. 3.00mm, 3.05, 3.10, etc.) it's hard to always get the perfect size. When it doubt, for exhaust valves go a little too big instead of too small. Exhaust valves will widen over time so having the gaps a little smaller initially will get you more life out of your exhaust valves.
Give yourself plenty of time to do this job. I had to remove the stock cams, remove all shims, install all shim spacers, measure all shim thicknesses, put in the new cams, check clearances and write it all down, then remove all cams, then order new shims, then install new shims, install camshafts, measure all clearances, remove exhaust camshafts, swap a few shims around, install camshafts again. That process took me about 8 hours. This is NOT an easy job nor something to be done by first time DIY mechanics.
I realize that this is the only real review of 5VZ-FE camshafts on the internet. These are the same camshafts that were offered by Sea2Sky tuning, Geoff at Colt Cams made this grind for that shop. The shop closed but Geoff still has the grind and told me he's been selling quite a few lately. Please feel free to PM me for any questions on installation or anything else related to these camshafts.
And yes, I am getting this thing ready for another dyno run!
Do u have any videos of how it sounds, I mainly js wanted to get cams to have loud idle chop
After 3 solid days of wrenching, the Colt Cams 262* grind and the LCE Lightweight Crankshaft Pulley are in! I was pressed for time so no photos... but not like it would have helped much. If you are reading this to figure out how to put them in, refer to the FSM for detailed instructions. You'll have to take off the upper intake/plenum, timing belt, radiator, and the crankshaft pulley just to swap out cams. It's a very involved job with a lot of checking, double-check, and triple checking as well as a dreaded valve adjustment.
The power is really there at 4000+ RPM's from the cams, and the lightweight pulley helps a lot with passing and quick accelerations around town. It accelerates quicker, and hauls all the way to redline very easy! I noticed a lot more power at 4500+ RPM. The supercharger helps a bit to alleviate the power drop off up there but never seemed to enjoy redlining much. now it pulls even in the 5000's with plenty of power and torque like never before! That's the whole point of performance camshafts anyway, they add power at higher RPM's.
LCE Lightweight Crankshaft Pulley - This claims 2.7 acceleration horsepower per pound removed, and is 7.5 lbs lighter. So that's 20.25 hp gain of "acceleration HP" which is a made up term, by the way. In the real world, you notice this when stomping on the gas to pass on the highway, or going from a dead stop. Less rotating mass = more power to the wheels. It adds nothing as far as engine performance but rather frees up the engine to rotate the wheels, not the pulley. However it will still show up as a performance gain on a intertia-based dyno because of science and physics stuff. Since I had to take the crankshaft pulley off anyway for the timing belt, it was a no-brainer. Easy bolt-on performance.
Colt Cams 262 degree 5VZ-FE Camshafts - These are dyno tested to gain 22 HP, and I can guess where! My engine pulls much harder at 4500-5500 RPM's and loves to redline. I need to get this on a dyno soon to see if there's extra power to bump up the redline to 6,000 RPM's but not sure. There's not really much as far as gains in the 2k to 4k range, so if you are looking for some extra torque down low these are not what you want. These cams gain power by slightly changing the intake and exhaust timing, I'm talking maybe a couple of degrees difference. Side by side the stock cams are almost identical until you look hard. It idles a little rougher than stock but combined with extra lift on the intake side over stock, provides some nice power in the upper RPM's.
This was a VERY involved job. As a few people on here also have bought them so hopefully I can provide a few tips to help in the process.
First off, you will need a digital caliper to measure the valve shim thicknesses. This is not optional. Second, a valve adjustment job is a must and you will need to custom order shims from Toyota since the exhaust valves WILL be out of spec. The shim spacers provided from Colt Cams are not quite thick enough to provide the right valve clearances (printed on the sticker under your hood). I needed to buy 9 of the 12 exhaust shims, 3 of them I was able to swap around to bring them into spec. Only 3 intake valves were out of spec initially and swapping shims around fixed all 3. Shims cost $15 each, so I was out $135 just for those.
When you fit the shim spacers supplied by Colt Cams in and you go to check the clearances, rotate the cams one complete revolution before measuring the gaps. I noticed that the oil in between the spacers and buckets would actually cause the reading to be off until it was pressed by the camshaft lobe at least once. Almost pulled my hair out thinking I had ordered the wrong size shims. Also, you will not get the clearances perfect. Since Toyota only makes them in 0.05mm increments (i.e. 3.00mm, 3.05, 3.10, etc.) it's hard to always get the perfect size. When it doubt, for exhaust valves go a little too big instead of too small. Exhaust valves will widen over time so having the gaps a little smaller initially will get you more life out of your exhaust valves.
Give yourself plenty of time to do this job. I had to remove the stock cams, remove all shims, install all shim spacers, measure all shim thicknesses, put in the new cams, check clearances and write it all down, then remove all cams, then order new shims, then install new shims, install camshafts, measure all clearances, remove exhaust camshafts, swap a few shims around, install camshafts again. That process took me about 8 hours. This is NOT an easy job nor something to be done by first time DIY mechanics.
I realize that this is the only real review of 5VZ-FE camshafts on the internet. These are the same camshafts that were offered by Sea2Sky tuning, Geoff at Colt Cams made this grind for that shop. The shop closed but Geoff still has the grind and told me he's been selling quite a few lately. Please feel free to PM me for any questions on installation or anything else related to these camshafts.
And yes, I am getting this thing ready for another dyno run!


After 27 years of grime, grease, an engine swap and bug splatter, my engine bay is clean again. 5 hours to do it though... probably never again ha! But it turned out nice. I used the 'Chris Fix' detailing method, worked well.


