JWaldz '99 Adventure Build - Dual Locked | Geared | Mid-Travel | 35s | Armored

Sorry... what I meant to say, is that I'm lazy. What were the PN's / cost to do it? I've had the same issue for a long while.

lol.. The part number is 90385-11003. It's also labeled on most diagrams as part 33501G. Was around $5 for all 4... Talk about expensive lol
 
12/24/16 - Tundra Brake Upgrade 2.0

Since the new rear axle will have all performance brake components, I wanted to update the front brakes to match. I've had the TBU for a while now and have nothing but great things to say about it. I've always wondered though, if I could squeeze any more performance out of the upgrade without going with an actual Big Brake Kit, which are $$$$.

I decided to pull the trigger on Power Stops performance rotors and pads kit along with their calipers. The calipers, to my understanding, are remanufactured in the US and they only use OEM to rebuild. They are outfitted with new bleeders, pins, and hardware along with premium boots and seals. They use a high-temp silicone lubricant on the caliper pins to lengthen the life span of them. Then, they're 100% pressure tested and finally powder coated.

Caliper Kit: S2712 (13WL/231mm)
Rotor & Pad Kit: K2324

While I was replacing the brakes I went ahead and put on some extended brake lines I had purchased through a guy on Tacoma World Forums, here.

The process was simple as I didn't have to do any grinding to the dust shield since it had already been done before. Bolt off old, bolt on new. Love the new look and hope to see a little more performance out of this setup!


20161223_142201_zpsw9basaiy.jpg~original
 
I love your runner man. That is almost exactly how I want mine setup. Going to read through your build to get some ideas for mine. Thanks!
:clap2:
 
Took the runner out for a shake down a couple weekends ago to see how the rear works out.. Little adjustment in the links but otherwise, I love how everything turned out!

Fotor_148867013281975_zpsv4zul8pr.jpg~original


Fotor_14886696560186_zpshkpfo6sv.jpg~original


I also did a little bit a electrical clean-up and added the MJT Blue Sea Fuse Block Plate to move it off the factory fuse block.

IMG_20161127_190506_zpshe9meq4r.jpg~original
 
Last edited:
So, I did a thing :D

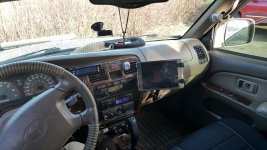
New mount for the new tablet! After debating forever where to put this thing, I decided against bolting it to the actual dash and just drilling through the glove compartment door and bolting it down. Much easier to replace the door than replacing the dash piece if I ever decide to remove it all completely.

I used the Arkon TAB806 mount. It's very solid, and I love the placement. Allows for me to see the rest of my dash as well as be usable for road trips if a passenger wants to watch a movie. Doesn't get in the way of passenger's legs/knees and can take the arm extension part off that leaves just the mount "nub". Can even open the compartment door without anything touching/resting on the seat, even with the tablet in.
 

Attachments

  • FB_IMG_1492017270856.jpg
    FB_IMG_1492017270856.jpg
    77.4 KB · Views: 1,110
Last edited:
She's beautiful!!!

I love what you did with your 99 4R. I am looking at making some upgrades on my 99 4R. You inspired me... Thanks
 
The excitement just doesn't end today! These were waiting for me when I got home :D

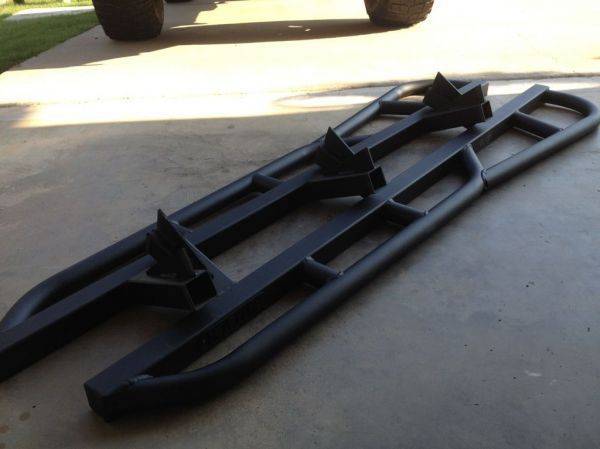
BAMF Sliders w/ Kickout and PC'd w/ Black Coal Textured
lived8wFHu.jpg

i decided to pull the trigger on his thanksgiving sale this year for my new to me black 4runner i will be building... i was on the fence between the kickoff or not...

i liked the hugged look on the regular one but i also love the kickout... its just troublesome to weld them on so tight to the body with the kickoff because of the rear passenger doors and the clearance to open them up...


any close up pics of how close you were able to mount your sliders and still clear the rear doors when they open?
 
[MENTION=102606]infamousRNR[/MENTION]

Both my doors slightly hit the kickout.. But its because I was the guinea pig. I was his first set w/ kickouts for a 3rd gen with limited flares. He's since lowered the angle so it shouldn't be a problem anymore for future production.

I'll snap a few pics soon.
 
[MENTION=102606]infamousRNR[/MENTION]

Both my doors slightly hit the kickout.. But its because I was the guinea pig. I was his first set w/ kickouts for a 3rd gen with limited flares. He's since lowered the angle so it shouldn't be a problem anymore for future production.

I'll snap a few pics soon.

ok thats good to hear. thanks for your response. i wanted to do something a little different than my thundercloud build. i LOVE BAMF's stuff so i knew i wanted to get his sliders again but i wanted to try the kickoff this time.

i just prefer the sliders to hug the body as tight as possible and i know the kickout can be a problem from limited cladding.
 

Members online

Forum statistics

Threads
278,315
Messages
3,554,130
Members
248,016
Latest member
Advally Service

Trending content

Back
Top