kick panel removal?

A286

New member
hello everyone,
I just bought a 2012 4Runner SR5 and a forum search brought me to this treasure trove of information and kindred spirits.
And now I must ask for help as I've created a small problem:

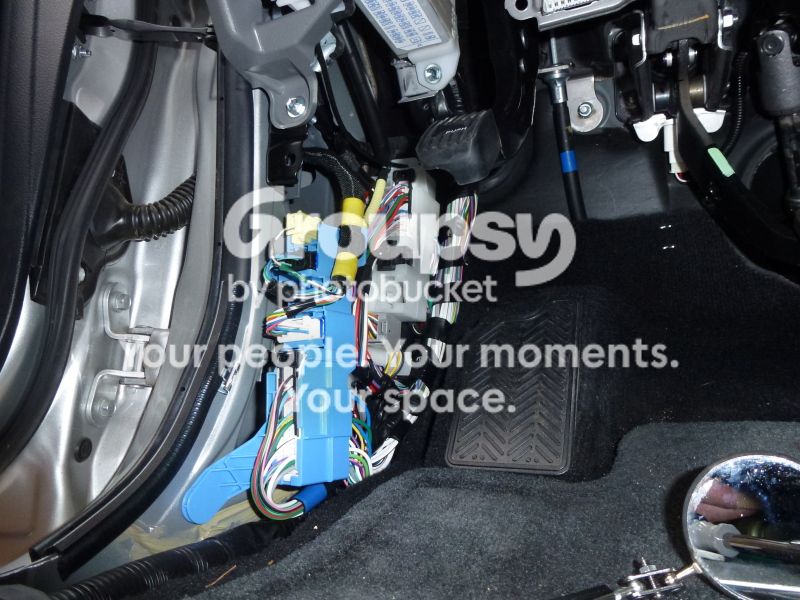
While working with the interior fuse box, I dropped a screw behind the driver's kick panel. No amount of inspection mirror and magnet could retrieve the little bugger (where do they go???). My background in aerospace will not allow my conscience to rest, knowing a piece of FOD is in the vehicle. To retrieve the screw, it looks like the kick panel must be removed. How is this done? There is but one fastener visible on the floor. This fastener is easily removed, but then what? How does the panel come out? Does snap on or someone else make a special tool to facilitate the removal of the panel without damage?

thanks in advance,

Dave

P1010504.jpg~original
 
Last edited:
Register to hide this ad
hello everyone,
I just bought a 2012 4Runner SR5 and a forum search brought me to this treasure trove of information and kindred spirits.
And now I must ask for help as I've created a small problem:

While working with the interior fuse box, I dropped a screw behind the dirver's kick panel. No amount of inspection mirror and magnet could retrieve the little bugger (where do they go???). My background in aerospace will not allow my conscience to rest, knowing a piece of FOD is in the vehicle. To retireve the screw, it looks like the kick panel must be removed. How is this done? There is but one fastener visible on the floor. This fastener is easily removed, but then what? How does the panel come out? Does snap on or someone else make a special tool to facilitate the removal of the panel without damage?

thanks in advance,

Dave

P1010504.jpg~original

Pull up on the door sill plate and remove that first. you can wiggle you fingers under it and just gently but firmly pull it up. Once that is out of the way you can remove the kick panel once you have removed the screw.

In my signature below you will find a link to the 4Runner shop manual. Download it and make it your best friend :)

Okki
 
Dave,

Did you use any type of tool or did the sill plate just "pop" off? I want to run a power wire to some rear ligts and am afraid that I'll break something by just pulling the plate up. Then I have to pull the knee panels to do the switch wiring. It looks like they are just clipped in (at least in the 2010 repair manual that Okki refered me to.

Sgt. Rock
 
Dave,

Did you use any type of tool or did the sill plate just "pop" off? I want to run a power wire to some rear ligts and am afraid that I'll break something by just pulling the plate up. Then I have to pull the knee panels to do the switch wiring. It looks like they are just clipped in (at least in the 2010 repair manual that Okki refered me to.

Sgt. Rock

I've had my sill plates (and most of the interior) off several times. I use a panel remove to save my fingers but it's not needed to protect the sill plates. Just take your time and pull straight up.
 
thanks Okki,

Mission complete. Screw recovered and vehicle re-assemblied. Good as new.

P1010509.jpg~original

WOW! I was not expecting to see that mess of wiring behind that panel. I had planned to run a #8 welding cable through there to power a sub, but I may have to rethink things now as the price is right, but the insulation on the cable may prove too bulky.
 
WOW! I was not expecting to see that mess of wiring behind that panel. I had planned to run a #8 welding cable through there to power a sub, but I may have to rethink things now as the price is right, but the insulation on the cable may prove too bulky.

I've got a 4ga & 10ga cable plus 3 audio coax and a few other wires running through that area on mine. It takes a little patients to do it cleanly but it can be done. The trick is to run your new wires behind the existing stuff.
 
I've got a 4ga & 10ga cable plus 3 audio coax and a few other wires running through that area on mine. It takes a little patients to do it cleanly but it can be done. The trick is to run your new wires behind the existing stuff.

thanks for the tip, maybe I'll pull it off and see what's what
 
I've had my sill plates (and most of the interior) off several times. I use a panel remove to save my fingers but it's not needed to protect the sill plates. Just take your time and pull straight up.

Thanks for the guidance. I think I'll have time tomorrow...unless I get called in to work...that's normal when I make plans!
 
WOW! I was not expecting to see that mess of wiring behind that panel. I had planned to run a #8 welding cable through there to power a sub, but I may have to rethink things now as the price is right, but the insulation on the cable may prove too bulky.

I found it much easier to run fat power wire down the passenger side. I easily fit a 1/0 OFC cable through the large rubber firewall grommet and had plenty of room down the passenger scuff plates (all the way to the cargo area). Ran all RCA cables down the center console and under the carpet for ultimate isolation from the 1/0...

:cool:
 
I found it much easier to run fat power wire down the passenger side. I easily fit a 1/0 OFC cable through the large rubber firewall grommet and had plenty of room down the passenger scuff plates (all the way to the cargo area). Ran all RCA cables down the center console and under the carpet for ultimate isolation from the 1/0...

:cool:
Rca cables are generally coaxial (shielded), and all the power systems are dc, so there would be no alternating magnetic fields to cause interference anyway.
I actually pulled apart all the driver's side panels yesterday. Wasn't as scary as that one photo made it look.
 
Rca cables are generally coaxial (shielded), and all the power systems are dc, so there would be no alternating magnetic fields to cause interference anyway.
I actually pulled apart all the driver's side panels yesterday. Wasn't as scary as that one photo made it look.

True dat - But I'm running 4KW RMS of switching type amps and I'd bet they throw some harmonics in the audible spectrum back into the B+ line. The current is also fluctuating heavily with load (overall volume and transients) - but granted it's still DC (but highly dynamic DC ;) ).

NTM running RCA's down the center console (driveshaft hump) to the cargo area means the shortest low-level run (opposed to running RCA's across the dash and down the scuff plates) :)

I know my DVD Changer's Composite Video feed (rear mounted changer feeds dash mounted HU) goes crazy with visible video interference in time with the bass hits if it's anywhere near the 1/0 main B+ feed (250Amp Fuse - and I'm sure I use very close to the full 250Amps). Probably not a big deal for more sane current draws...

:cool:
 
Last edited:

Members online

Forum statistics

Threads
278,308
Messages
3,554,059
Members
248,016
Latest member
Advally Service

Trending content

Back
Top